Tools
Configure tools that extend your agents' capabilities — from knowledge retrieval and CRM integrations to human handoff and custom API calls.
Overview
Tools are actions and integrations that agents can invoke during conversations. They allow your agent to go beyond simple text responses — retrieving documents, calling external APIs, handing off to human agents, creating CRM leads, and more.
Tools are configured at the workspace level under Settings > Processors > Tools, then assigned to individual agents under the agent's Tools & Artifacts module.
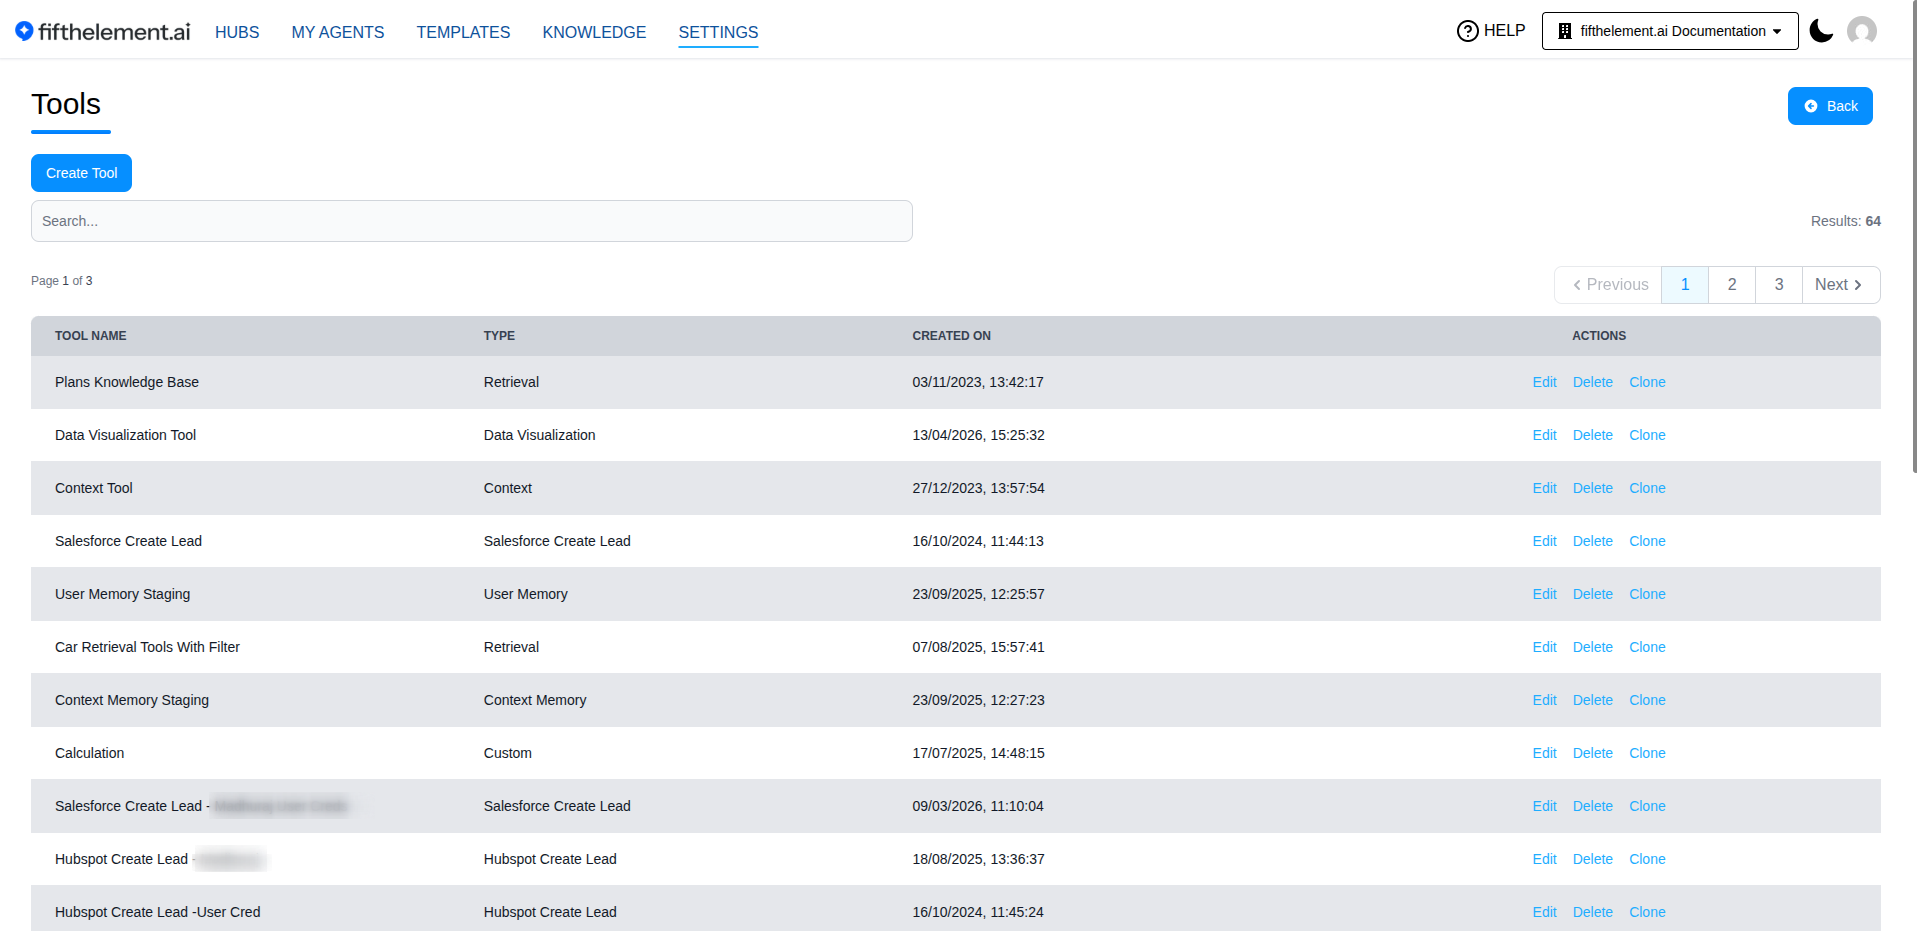
Available Tool Types
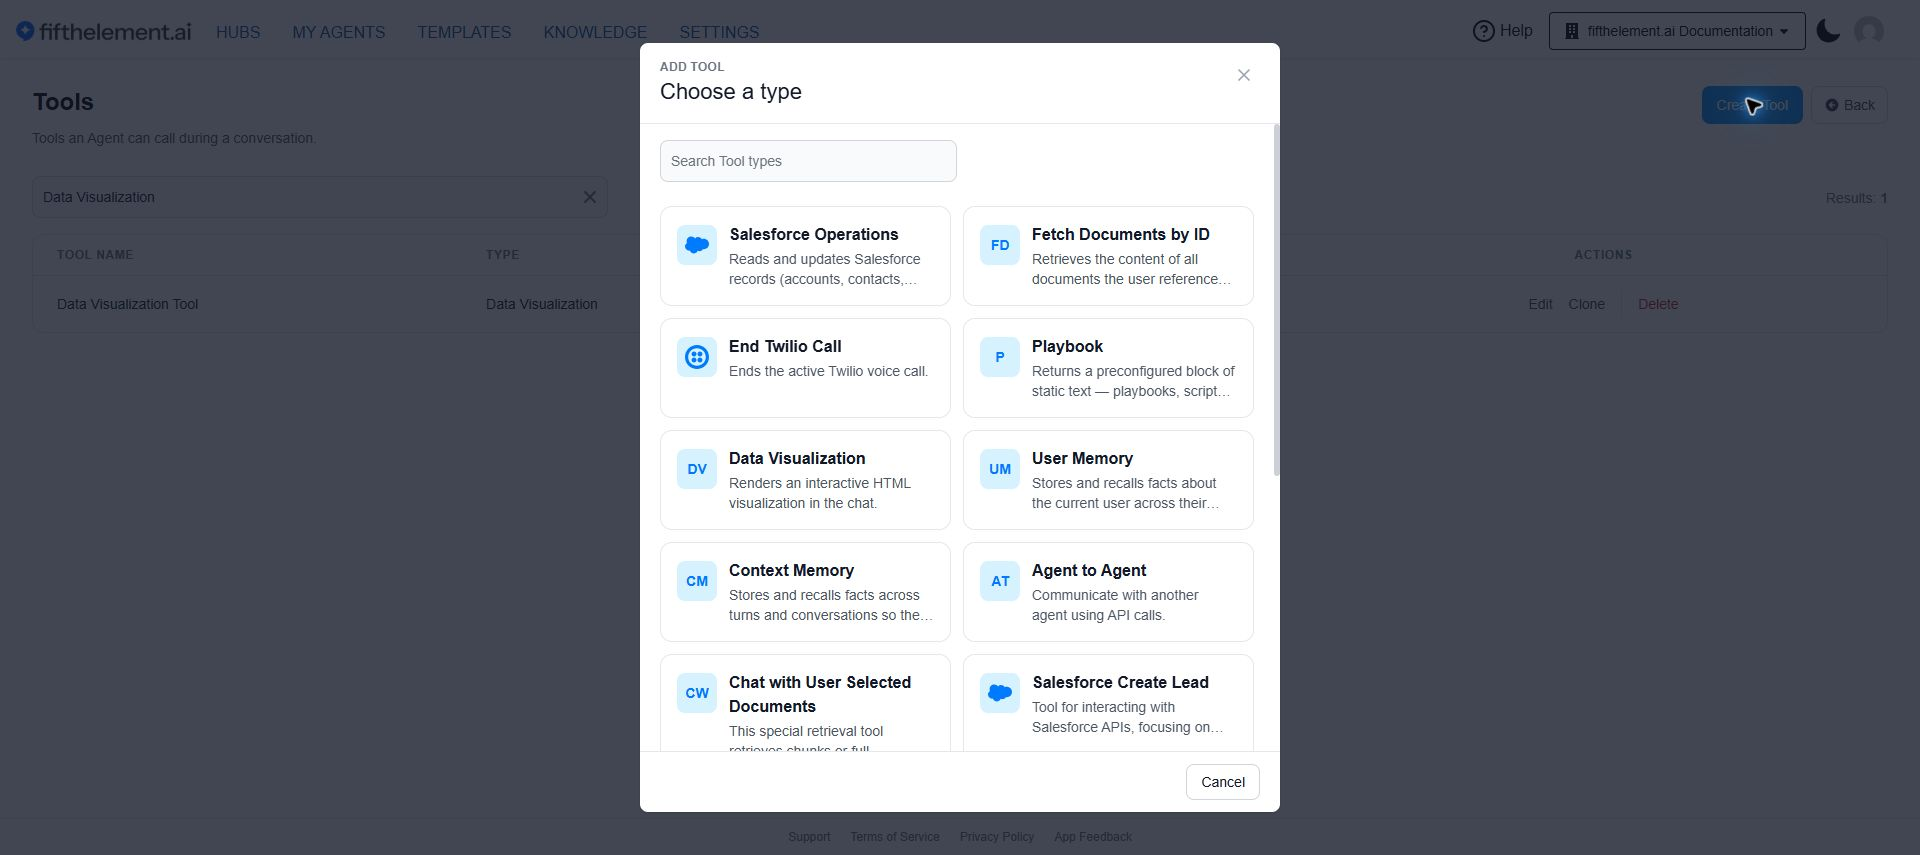
Click Create Tool, search for a type, and select it. Complete the form and review Advanced parameters before saving.
| Tool | Description |
|---|---|
| Context | Provides static or dynamic context to the agent — text, document, or knowledge repository |
| Retrieval | Searches a knowledge repository to find relevant document chunks for the agent's response |
| Playbook | Returns a preconfigured block of text verbatim on demand — playbooks, scripts, policies |
| Chat with User Selected Documents | Lets users select specific documents from search results for focused chat conversations |
| Custom | Execute custom JavaScript logic |
| Webhook | Send data to an external URL via HTTP webhook |
| Multi-Step Custom | Chain multiple API calls in sequence for complex workflows |
| Human Agent | Hand off the conversation to a human agent with queue management and rating |
| Agent to Agent | Transfer conversations between different agents |
| User Memory | Persist user-specific information across conversations |
| Context Memory | Store and retrieve contextual data with smart merging across configurable scopes |
| Data Visualization | Generate visual data representations within chat responses |
| Salesforce Create Lead | Create leads directly in Salesforce from conversation data |
| Hubspot Create Lead | Create leads directly in HubSpot from conversation data |
| Calendly | Integrate Calendly scheduling into agent conversations |
| End Twilio Call | Ends a live Twilio voice call from the agent side |
| Fetch Documents by ID | Looks up documents referenced by ID or title in the chat |
| Salesforce Operations | Reads and updates Salesforce records within configured access limits |
Core Tools
Playbook
When to use
Use Playbook when the agent needs a fixed block of wording returned exactly as authored — a call script, an escalation playbook, a policy, a tone-of-voice guide. It keeps large instruction sets out of the system prompt while remaining fetchable for the turn that actually needs them.
Playbook (previously called Static Text) stores a verbatim block of text that the agent can fetch on demand. No vectors, no chunking — the configured body is returned as-is.
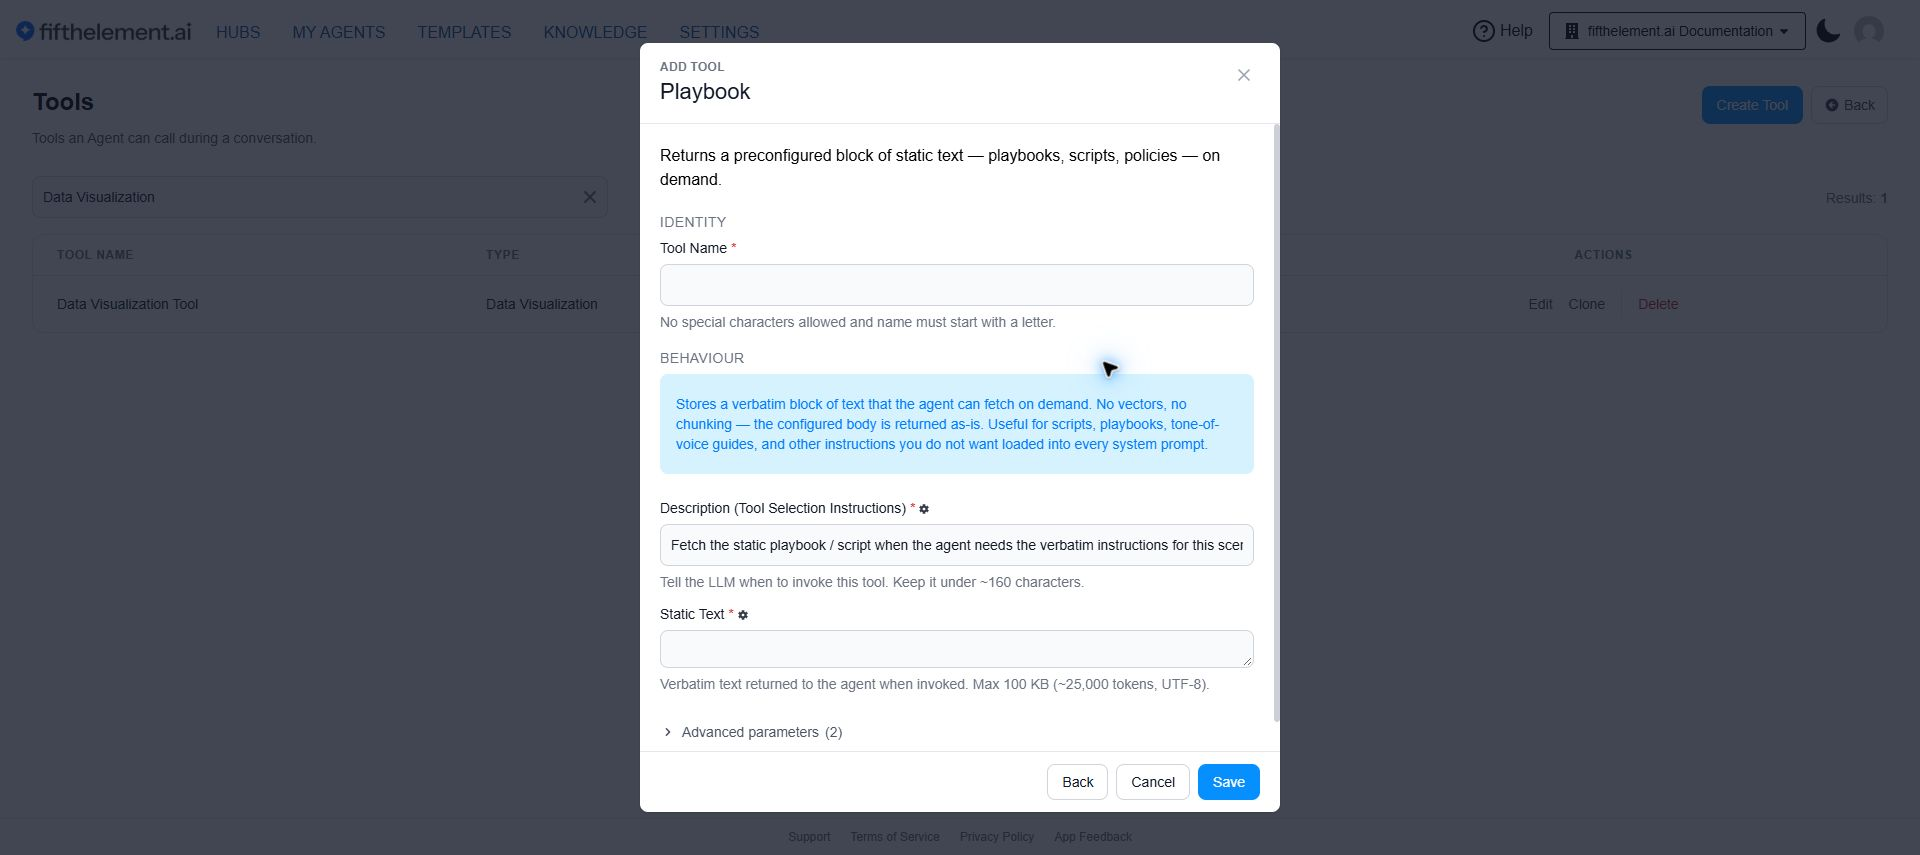
| Field | Required | Description |
|---|---|---|
| Tool Name | Yes | Descriptive name |
| Description (Tool Selection Instructions) | Yes | Tells the LLM when to invoke this tool. Keep it under ~160 characters |
| Static Text | Yes | Verbatim text returned to the agent when invoked. Max 100 KB (~25,000 tokens, UTF-8) |
Why use it over a Knowledge Base:
- Verbatim return — no retrieval, no embedding, no chunking, and nothing lost to a similarity threshold
- Keeps the system prompt lean — large instruction sets stay out of the system prompt
- No repository overhead — nothing to ingest, vectorise or re-index when the text changes. Edit the tool and the next call returns the new body
How to configure:
- Navigate to Settings → Processors → Tools → Create Tool and select Playbook
- Give the tool a Name and a tool-selection Description that tells the LLM when to fetch it
- Paste the static text body and save
- Add the tool to any agent that needs it
End Twilio Call
When to use
Use this on voice agents to stop abandoned or silent call legs from staying open and running up telephony cost.
The platform holds the Twilio Call SID internally and can end a live voice call from the agent side. Attach this built-in tool to a voice agent — when the agent invokes it, the active call is ended.
Inactivity auto-disconnect
A separate platform-level auto-disconnect fires 1–2 minutes after inactivity is detected, independently of the agent invoking this tool. Together the two stop abandoned or silent call legs from staying open on the telephony account.
Context
The Context tool provides the agent with background information to work with. There are two primary types:
Static Context — fixed information that does not change:
| Method | Description |
|---|---|
| Text | Directly input text as context by pasting into the text field |
| Document | Upload a single file (PDF, TXT, DOCX — max 25MB) as context |
| Knowledge Base | Select a pre-existing Knowledge Base; all documents collectively serve as context |
Dynamic Context — obtained from the webpage the agent is operating on (Floating Widget/Sidebar only):
- Enable "Use Dynamic Context from the Webpage for Floating Widget/Sidebar Agent"
- Configure the Get Contents Code — a JavaScript snippet that extracts content from the page
- Default:
return document.body.innerText;(uses all page content)
User Provided Context
When "Allow User Provided Context" is enabled, end users can upload their own documents. If both admin and user context are configured, user-provided context takes precedence.
Retrieval
The Retrieval tool performs vector search against a knowledge repository to find and return the most relevant document chunks for each user query. This is the core tool for RAG (Retrieval-Augmented Generation) workflows.
Chat with User Selected Documents
Enables end users to select specific documents from search results within a Search Type agent and initiate a focused chat conversation using only those documents as context.
Setup requires two agents:
- Search Agent — enable "Enable Chat with Selected Documents" in Behavior settings and designate a Chat Type agent
- Chat Type Agent — must be configured with the "Chat with User Selected Documents" tool, which inherits the parent Search Agent's knowledge repository
End-user flow:
- User searches in Non-AI mode and selects up to 10 documents
- Clicks "Start Chat" to open a new chat session with those documents as context — opens in the same browser tab (browser back button returns to the Search Agent view). Works consistently across Chrome, Firefox, Edge and Safari
- Can toggle between Full Documents and Relevant Chunks modes
- A real-time capacity visualization bar tracks token usage
- System automatically falls back to Retrieval Mode if documents exceed 100% context capacity
Human Agent
Hands off the conversation from the AI to a human agent. Includes queue management, timeout configuration, and end-of-session rating.
Key configuration fields:
| Field | Description |
|---|---|
| Maximum Queue Time | Max duration a transfer request stays in the agent queue before returning to AI |
| Agent Console Notification Idle Timeout | Max time a human agent can be idle after receiving a notification. Set to 0 to disable |
| Mid-Conversation Agent Idle Timeout | Max inactivity time during an active conversation before returning to AI |
| Agent No Response Message | Message shown when the idle timeout is exceeded |
| Human Agent Transfer Message | Custom greeting when an agent takes over. Supports {{human_agent_name}} placeholder |
| Notification Sound | Select from multiple notification sound options |
| Chat Rating | Enable 5-star rating and optional feedback after human-agent sessions |
Agent to Agent
Communicate with another agent using API calls. Useful for specialized workflows where different agents handle different types of tasks. Cyclic loops are automatically prevented.
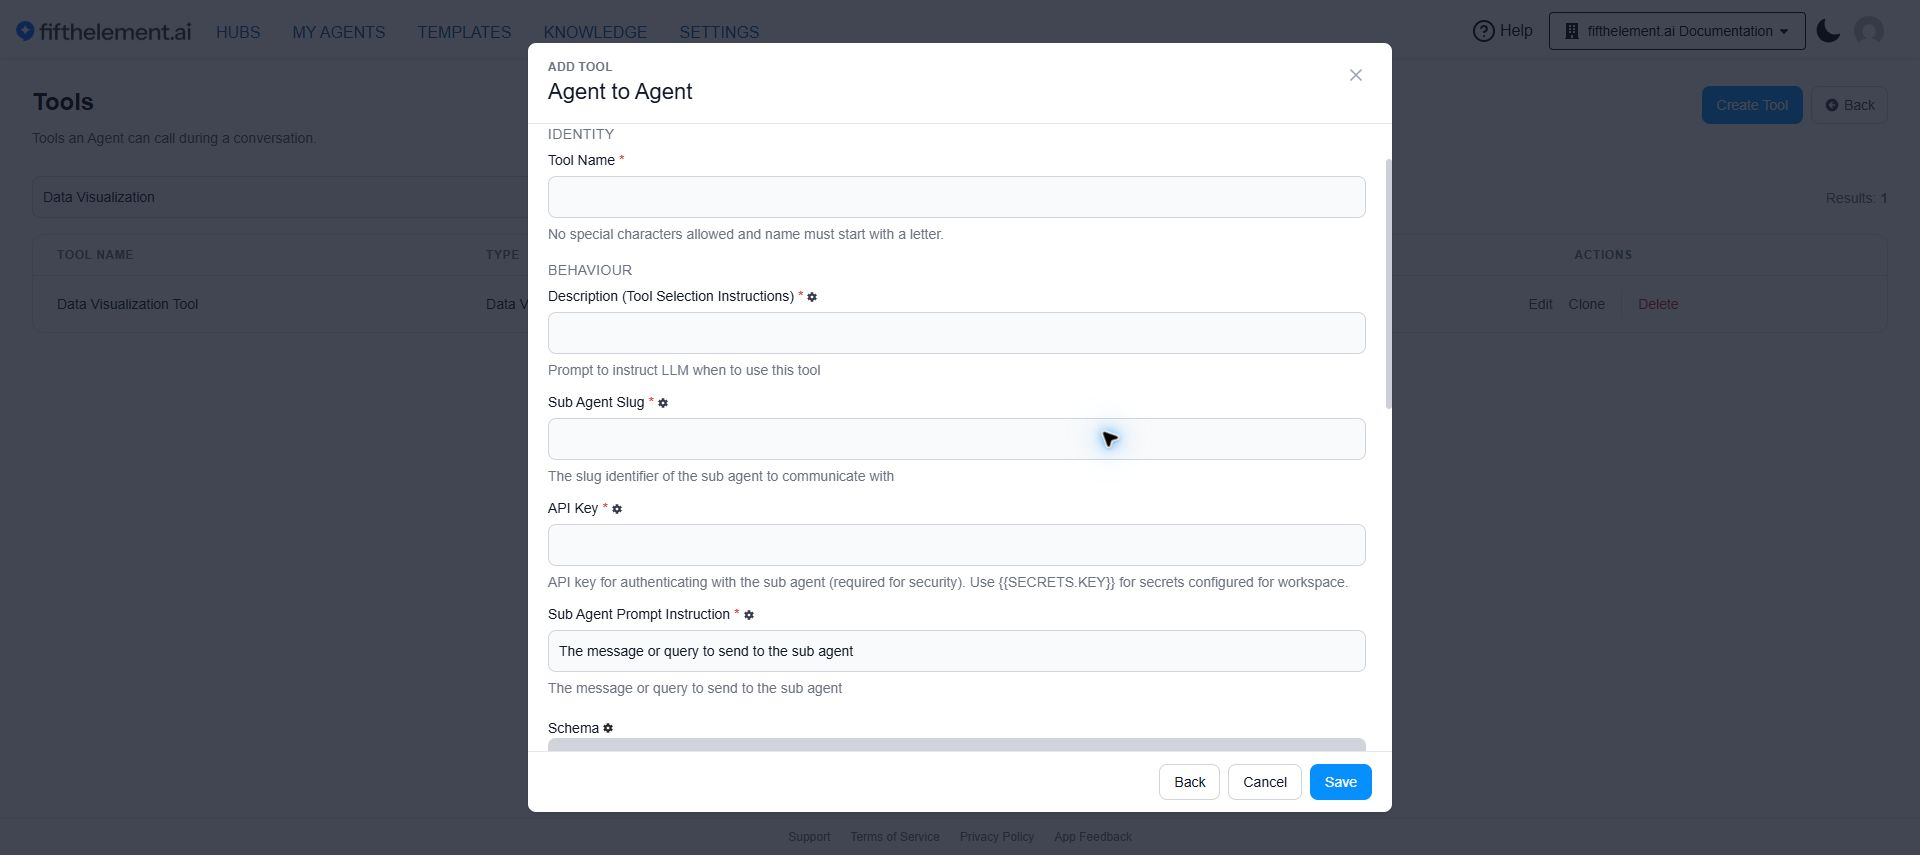
| Field | Required | Description |
|---|---|---|
| Tool Name | Yes | Descriptive name |
| Description (Tool Selection Instructions) | Yes | Prompt instructing the LLM when to use this tool for agent-to-agent communication |
| Sub Agent Slug | Yes | The slug identifier of the sub agent to communicate with |
| API Key | Yes | API key for authenticating with the sub agent. Use {{SECRETS.KEY}} for workspace secrets |
| Sub Agent Prompt Instruction | Yes | The message or query to send to the sub agent |
| Schema | No | Properties are automatically added to user_data and passed to the sub agent |
| Tool Custom Agent Instructions | No | Additional instructions when the tool is used. Use {response} placeholder for the tool's response |
| Timeout (seconds) | Yes | Maximum time to wait for response from sub agent (default: 60 seconds) |
| Max Output Length | Yes | Maximum character length of the response. Use -1 for no truncation (default: -1) |
| Return Direct | No | Return response directly to user without further LLM processing |
| Error Message | No | Custom error message when the tool fails |
User Memory
Persists user-specific information across all conversations for a specific user. The agent can store and recall facts about the user (preferences, past interactions, account details) between sessions.
Tool Configuration Fields
| Field | Required | Description |
|---|---|---|
| Tool Name | Yes | Descriptive name (e.g., User Memory Staging) |
| Description (Tool Selection Instructions) | Yes | Prompt instructing the LLM when to use this tool (e.g., "Use this tool ONLY when a user explicitly types the command '/remember'…") |
| Instructions | No | The user-specific instructions or preferences to remember. Helper note: "User instructions content to append (max 5000 characters total)". Wired as input to the merge step — not raw-appended |
| Merge Instructions | No | Tool-level rules for how the LLM should combine new and existing memory. A Default link inserts a built-in rule set (conflict resolution, deduplication, consolidation). Editable per agent for fine-grained control |
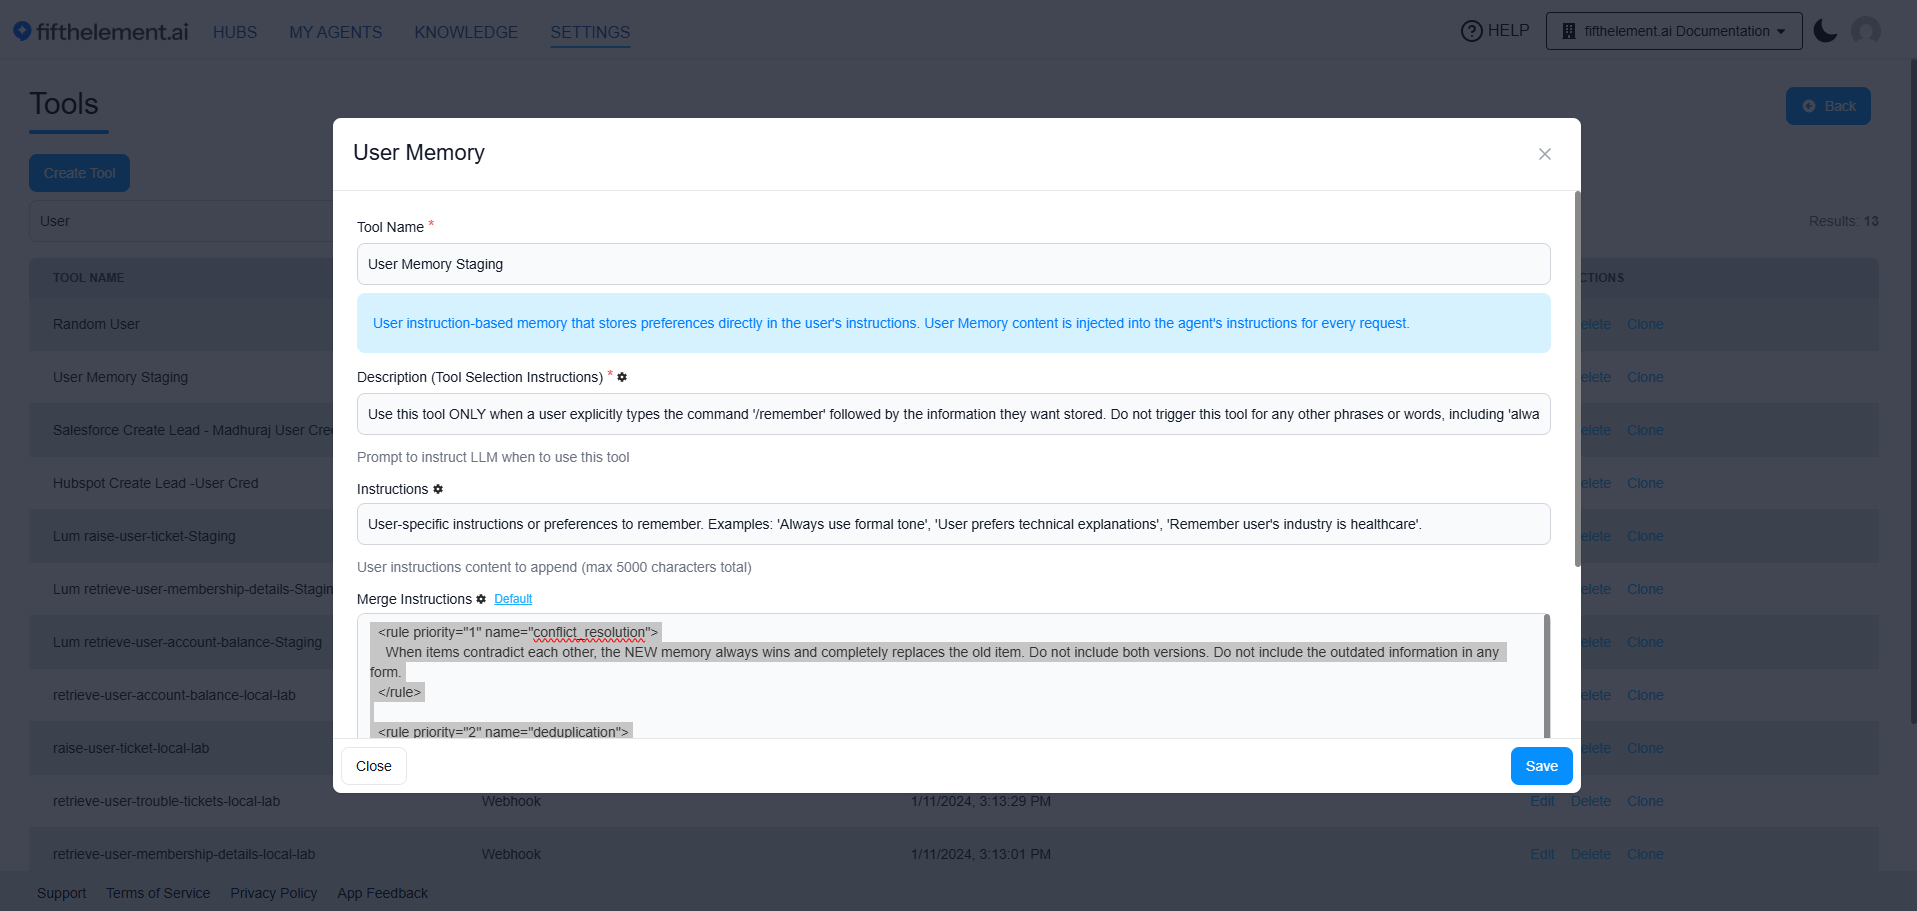
User Memory tool configuration with the Merge Instructions field — rule-based merge logic (conflict_resolution, deduplication, …) is editable at the tool level; click Default to restore the built-in rules
Why this matters
Previously the "User instructions content to append" field appended content directly without applying merge logic, causing memory bloat, duplicates, and occasional merge failures. Merge Instructions provide rules for combining new and existing memory. Test conflicting and repeated preferences with your selected model before relying on the result.
Context Memory
Stores and retrieves contextual data with smart merging logic. Supports multiple persistence scopes:
| Scope | Persistence Level |
|---|---|
| Turn | Current request only |
| Conversation | Throughout the active session |
| User | Across all conversations for a specific user |
| Agent | Shared across all conversations for that agent |
| Workspace | Shared across all agents in the workspace |
Advanced configuration:
| Field | Description |
|---|---|
| Knowledge Base | Select a Memory store for storage |
| Prefix | Unique identifier to isolate data when multiple Memory Tools are active |
| Content | The data to store |
| Merge Instruction | Rules for how new information should be combined with existing memories |
| Merge Model & Controls | Select a model and tune Temperature and Max Tokens for deterministic memory updates |
Integration Tools
Custom
A generic tool that executes a custom JavaScript function to perform any logic — calculations, data transformations, API calls, or custom business rules.
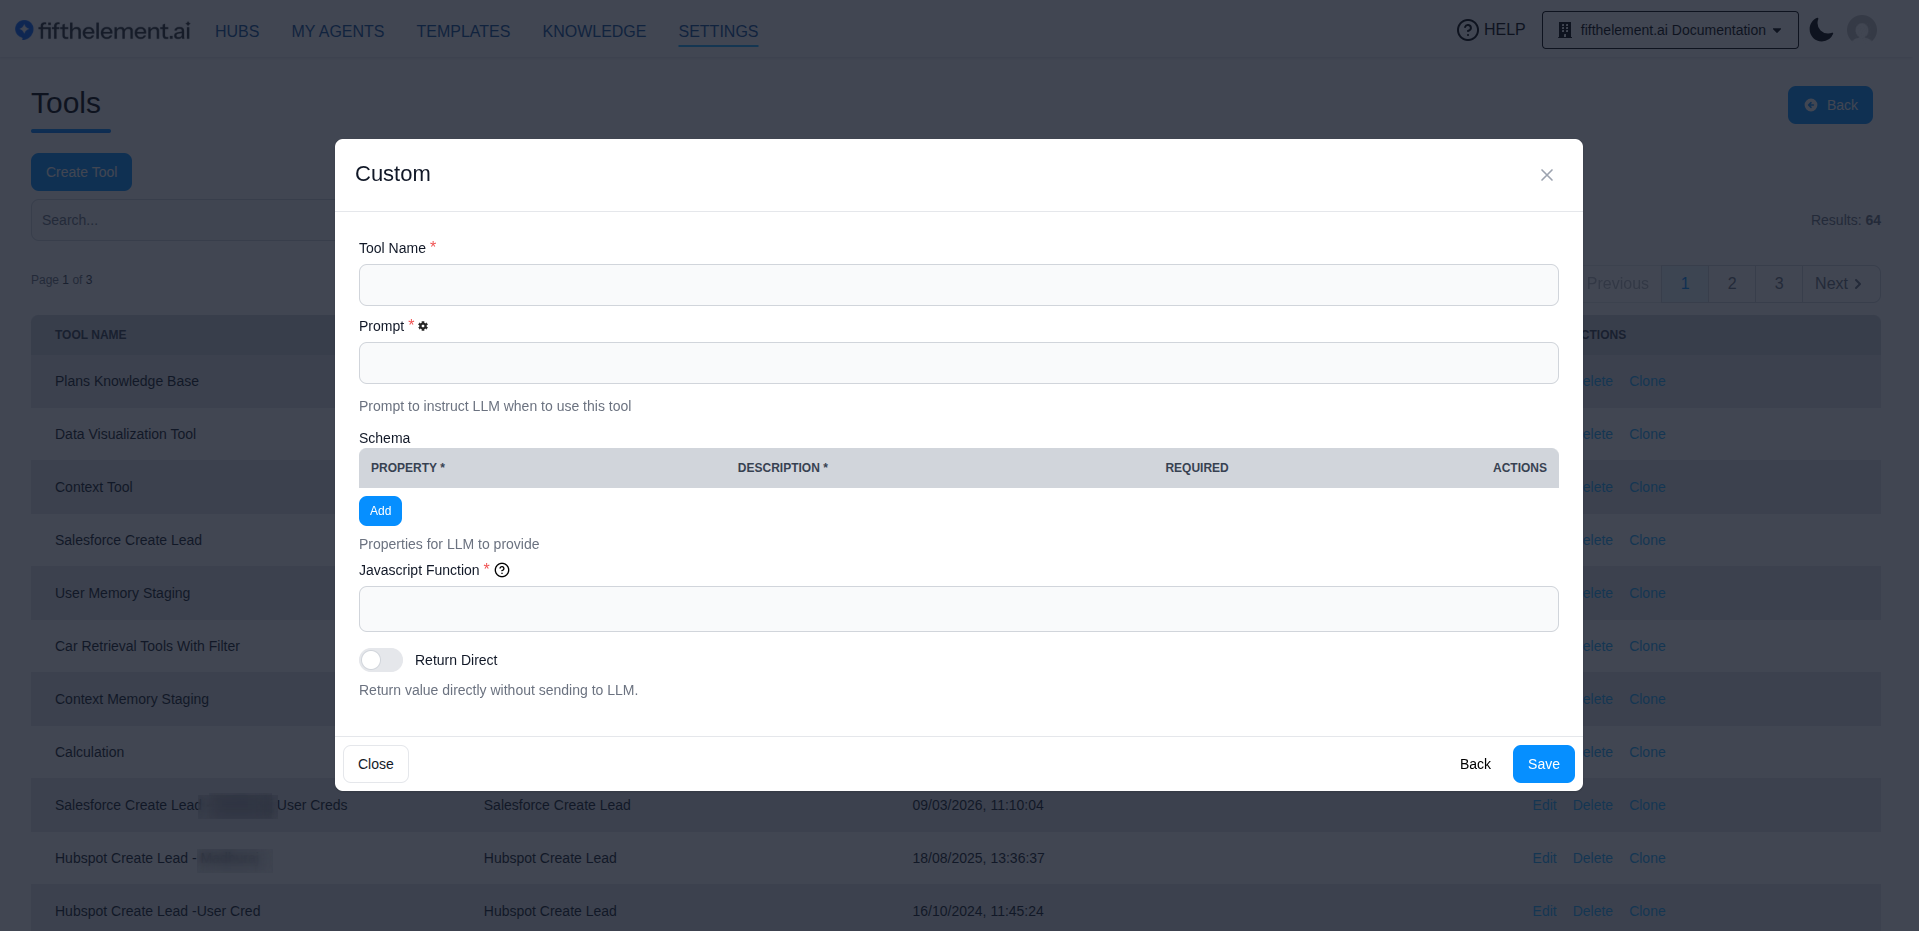
| Field | Required | Description |
|---|---|---|
| Tool Name | Yes | Descriptive name (e.g., "Calculation") |
| Description (Tool Selection Instructions) | Yes | Instruction telling the LLM when to use this tool (e.g., "Use this tool to perform mathematical analysis.") |
| Schema | Yes | Define properties the LLM must provide — each with a name, description, and required toggle |
| Javascript Function | Yes | The JavaScript code that executes the tool logic. Has access to schema.<property> for LLM-provided values |
Example — validating calculation inputs:
Schema properties: operation, left, right. This JavaScript illustrates input validation and arithmetic; adapt the result handling to the Custom tool runtime before use.
function calculate(operation, left, right) {
  if (typeof left !== "number" || typeof right !== "number" ||
      !Number.isFinite(left) || !Number.isFinite(right)) {
    throw new Error("left and right must be finite numbers");
  }
  switch (operation) {
    case "add": return left + right;
    case "subtract": return left - right;
    case "multiply": return left * right;
    case "divide":
      if (right === 0) throw new Error("Cannot divide by zero");
      return left / right;
    default: throw new Error("Unsupported operation");
  }
}
const result = calculate(schema.operation, schema.left, schema.right);
Webhook
An HTTP tool for calling external APIs. The API must respond within 10 seconds.
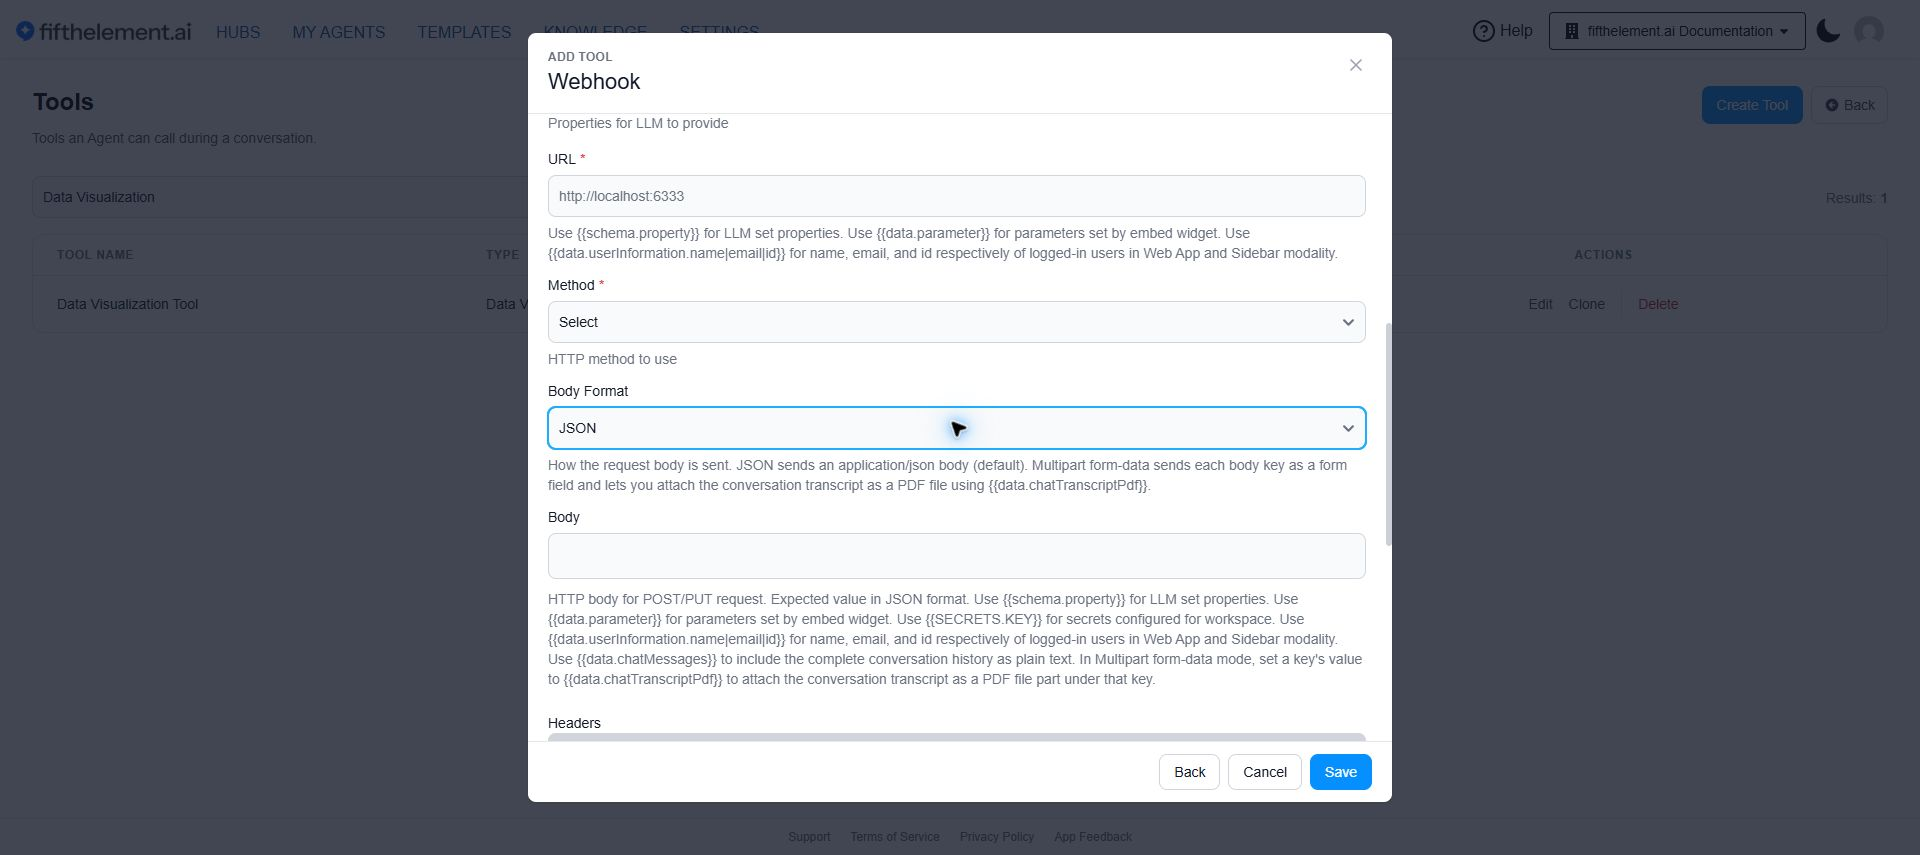
| Field | Required | Description |
|---|---|---|
| Tool Name | Yes | Descriptive name |
| Description (Tool Selection Instructions) | Yes | Prompt instructing the LLM when to use this tool |
| Tool Custom Agent Instructions | No | Additional instructions when the tool is used. Use {response} placeholder for the tool's response |
| Schema | No | Properties for the LLM to provide (used in URL, body, headers via {{schema.property}}) |
| URL | Yes | The API endpoint. Supports placeholders (see below) |
| Method | Yes | HTTP method: GET, POST, PUT, DELETE |
| Body Format | Yes | How the request body is sent — JSON (default) or Multipart form-data. See below |
| Body | No | JSON body for POST/PUT requests. Supports placeholders |
| Headers | No | HTTP headers (e.g., Content-Type: application/json) |
| Response Path | No | JSONPath to extract from response. Leave blank for entire response |
| Max Output Length | No | Maximum characters to return (default: 2000) |
| Error Message | No | Message sent to LLM if the webhook fails |
Available placeholders in URL, Body, and Headers:
| Placeholder | Description |
|---|---|
{{schema.property}} | Values provided by the LLM from the schema |
{{data.parameter}} | Parameters set by the embed widget |
{{data.userInformation.name\|email\|id}} | Logged-in user details (Web App and Sidebar) |
{{SECRETS.KEY}} | Workspace secrets configured under Settings |
{{data.chatMessages}} | The complete conversation history as plain text |
{{data.chatTranscriptPdf}} | The conversation transcript as a PDF file. Multipart form-data only |
Body Format — JSON or Multipart form-data
When to use
Switch to Multipart form-data when the receiving system cannot render markdown. The transcript exposed through {{data.chatMessages}} is produced in markdown, so systems that render only HTML — Odoo CRM, for example — show raw markdown syntax to the reader. Sending a PDF instead delivers a clean, formatted document.
| Option | Behaviour |
|---|---|
| JSON | Sends an application/json body. This is the default, so existing webhook tools are unchanged |
| Multipart form-data | Sends each body key as a form field, and lets you attach the conversation transcript as a PDF file |
In Multipart form-data mode, set a key's value to {{data.chatTranscriptPdf}} to attach the conversation transcript as a PDF file part under that key.
The PDF placeholder can sit alongside the existing ones in the same body — for example the PDF attachment plus the markdown transcript and an LLM-set schema property.
Additional Parameters:
| Field | Description |
|---|---|
| Preprocessing Javascript Function | Runs before the webhook call. Can access data, schema, ld (lodash), llmUtil.call(), and getWorkspaceSecret(). If it returns {returnDirect: true, text: 'message'}, the webhook call is skipped |
| Return Direct | When enabled, returns the webhook response directly to the user without sending it through the LLM |
Multi-Step Custom
A specialized tool that executes a series of steps in order — like a purchase journey or multi-stage workflow. Each step is a separate API call or action that can use outputs from previous steps.
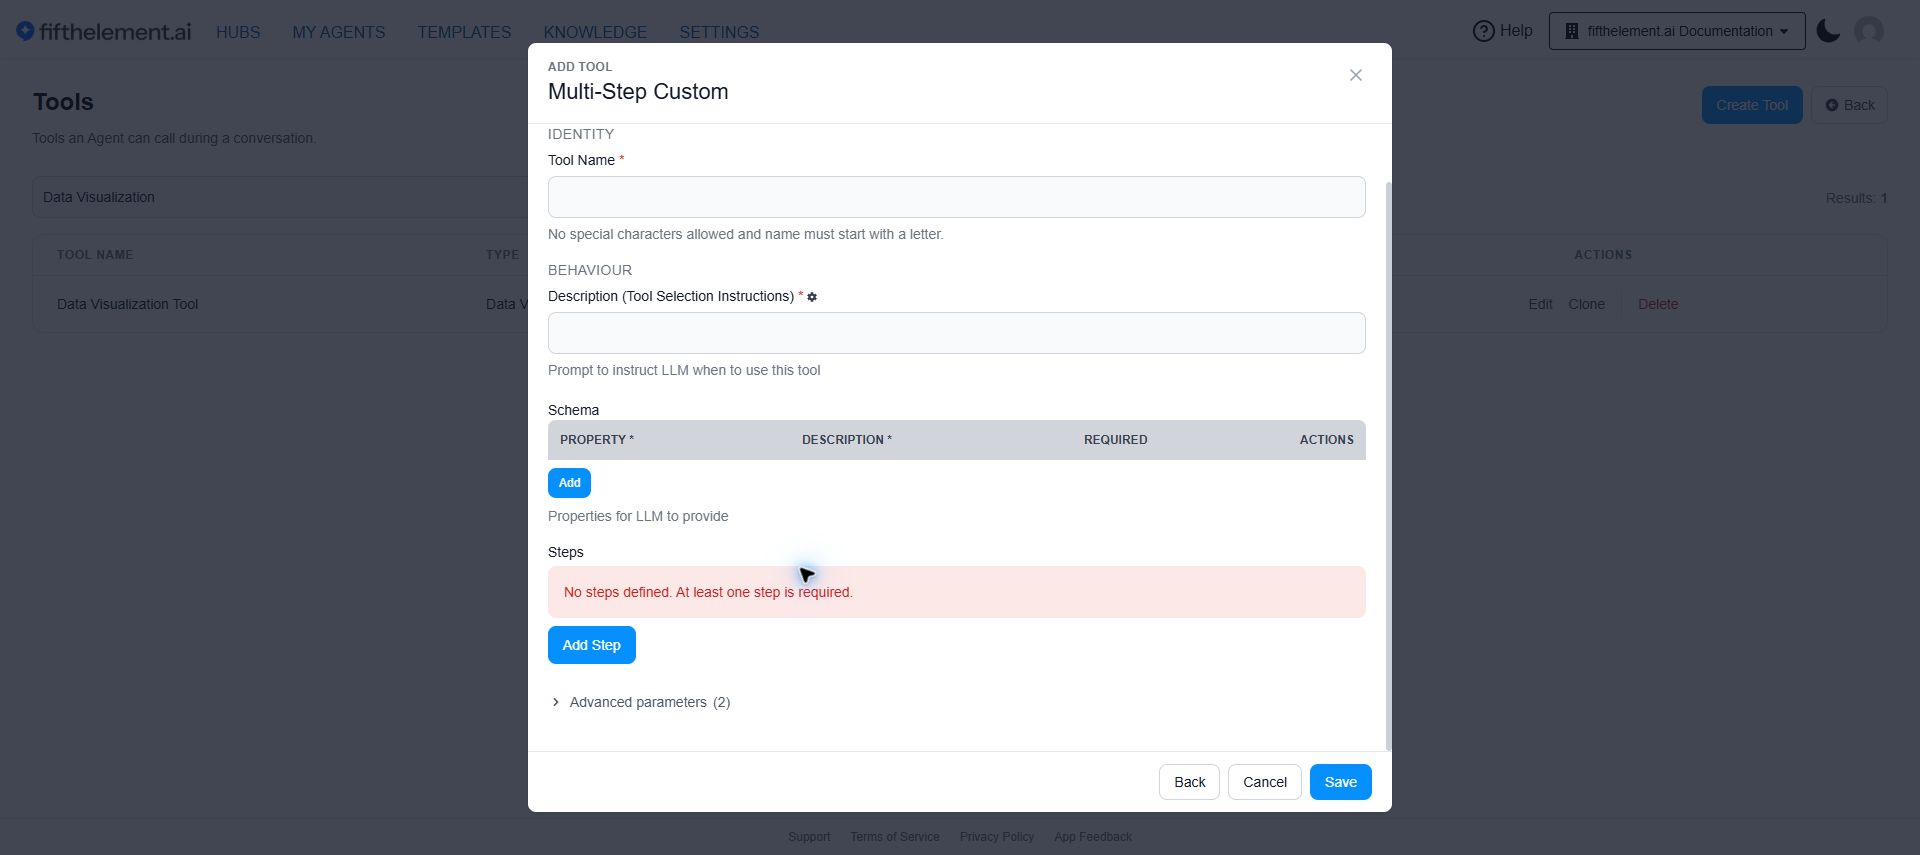
| Field | Required | Description |
|---|---|---|
| Tool Name | Yes | Descriptive name (e.g., "Service-Purchase-Flow") |
| Description (Tool Selection Instructions) | Yes | Instruction telling the LLM when to use this tool |
| Schema | Yes | Properties the LLM must provide for the entire flow |
| Steps | Yes | Ordered list of steps (Step 1, Step 2, ...). Each step can be expanded to configure its own API call |
Click "Add Step" to add more steps to the sequence. Each step executes in order, and outputs from earlier steps can be referenced by later ones.
Salesforce Operations
Use Salesforce Operations for record lookup and updates beyond lead creation. Configure Account Connection Mode, then choose Auto for AI-planned operations or Script for an admin-authored JavaScript function.
In Auto mode, Access Level defaults to Read only. Confirm Before Writes is enabled by default; the form describes a preview and confirmation before create, update or delete. Objects the Tool Can Use starts with Account, Contact, Lead, Opportunity, Task and Event. Removing all object restrictions allows all objects, so keep an explicit list when you need a limited scope.
Fetch Documents by ID
This tool retrieves documents referenced by ID or title in the conversation. Configure Document Selection Model, Query Schema Prompt, optional response instructions and Context Token Limit (the form documents a 2048-token default). Use User Input as Query to Query the Knowledge Base controls use of the user's query.
Salesforce Create Lead
Tool for interacting with Salesforce APIs, focusing on lead management. Creates leads directly in Salesforce from conversation data.
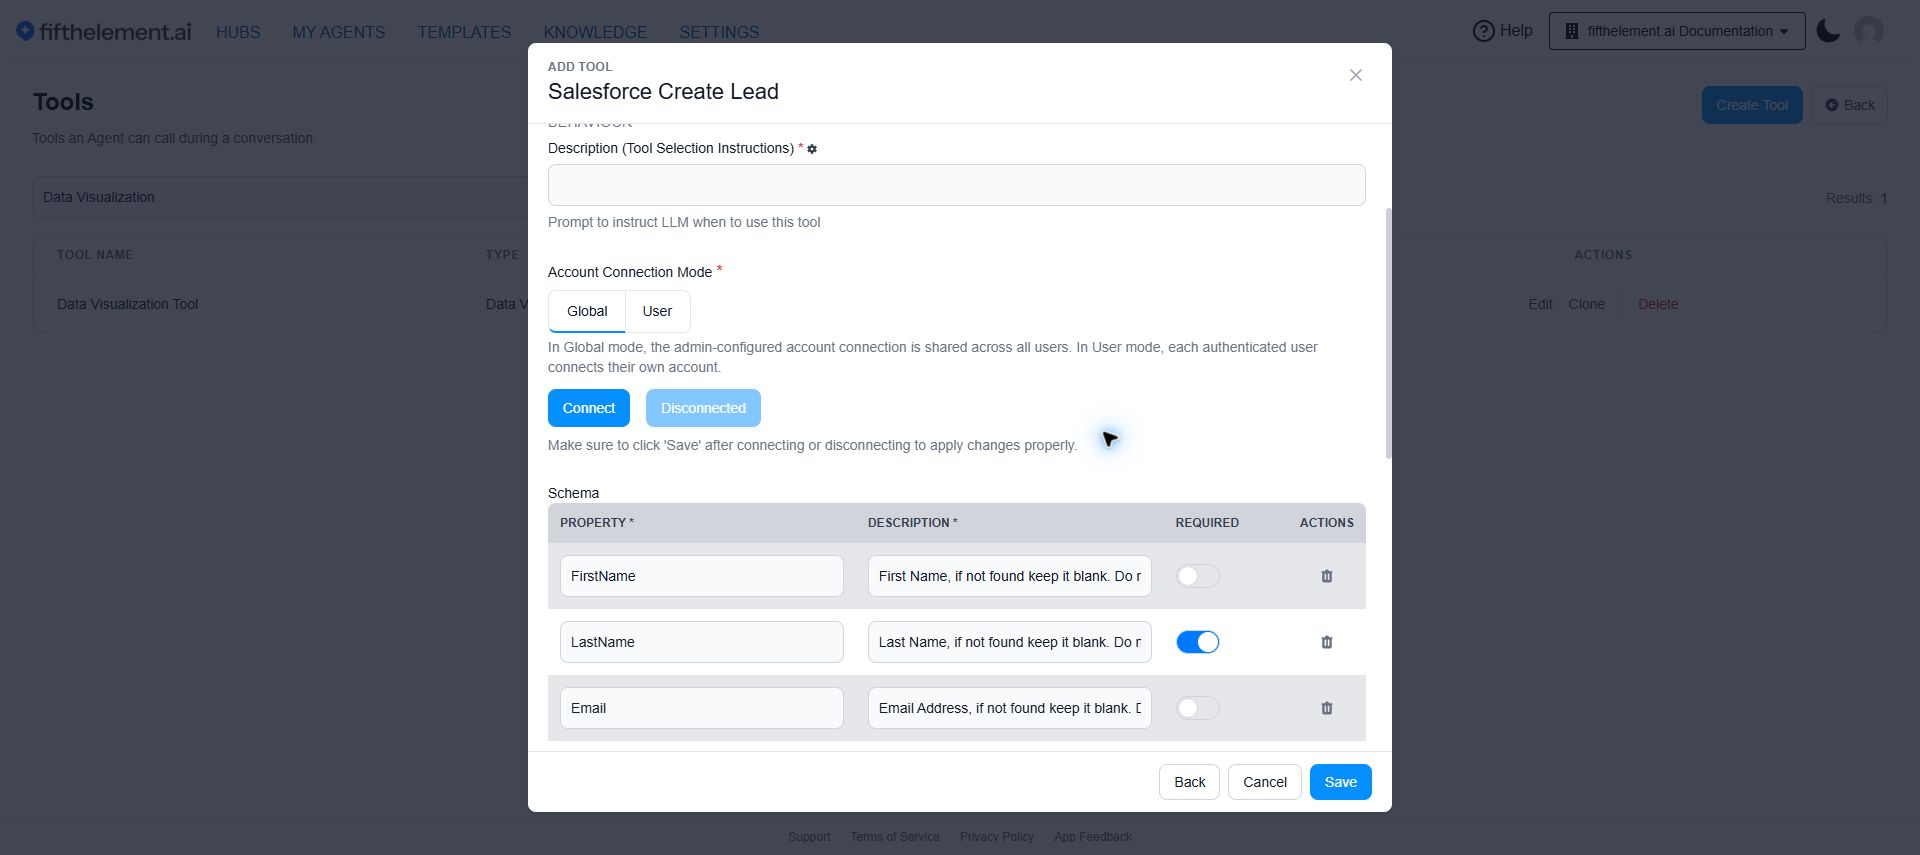
| Field | Required | Description |
|---|---|---|
| Tool Name | Yes | Descriptive name |
| Description (Tool Selection Instructions) | Yes | Prompt instructing the LLM when to use this tool |
| Account Connection Mode | Yes | Global (admin-configured account shared across all users) or User (each authenticated user connects their own account) |
| Connect | Yes | Authenticate with Salesforce. Click Save after connecting or disconnecting |
| Schema | Yes | Properties the LLM extracts from the conversation (FirstName, LastName, Email, Phone, Company, Description) |
| Lead Payload | Yes | JSON template mapping schema properties to Salesforce fields. Supports {{schema.property}} and {{data.parameter}} placeholders |
| Error Message | No | Message to LLM if the operation fails |
| Create Task | No | Optionally add a task when creating the lead |
Hubspot Create Lead
Tool for interacting with HubSpot APIs, focusing on lead management. Works identically to the Salesforce tool but maps to HubSpot's API structure.
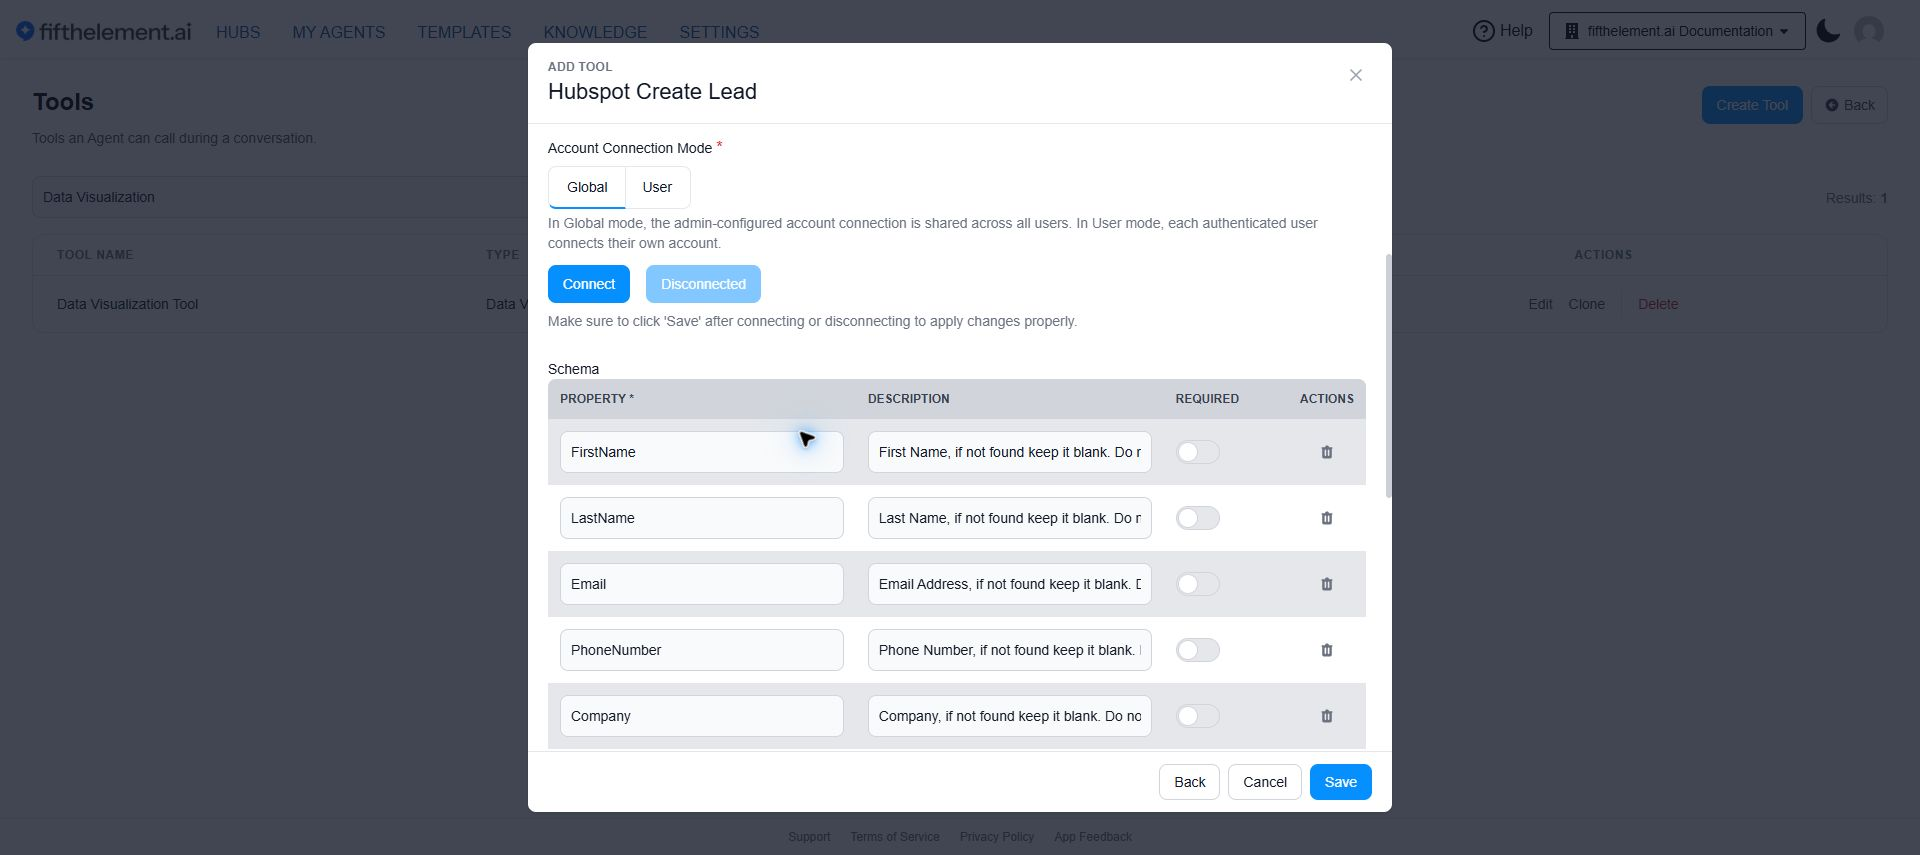
| Field | Required | Description |
|---|---|---|
| Tool Name | Yes | Descriptive name |
| Description (Tool Selection Instructions) | Yes | Prompt instructing the LLM when to use this tool |
| Account Connection Mode | Yes | Global or User (same as Salesforce) |
| Connect | Yes | Authenticate with HubSpot |
| Schema | Yes | Properties the LLM extracts (FirstName, LastName, Email, PhoneNumber, Company, Message) |
| Lead Payload | Yes | JSON template with properties object mapping to HubSpot fields |
| Error Message | No | Message to LLM if the operation fails |
| Create Task | No | Optionally add a task when creating the lead |
CRM Schema Best Practice
For both Salesforce and HubSpot, use descriptions like "if not found keep it blank. Do not construct anything of your own." to prevent the LLM from hallucinating contact details.
Account Connection Mode — Global vs User
Both Salesforce and HubSpot lead creation tools support a per-tool Account Connection Mode, letting admins choose how authentication is handled:
| Mode | Authentication | Lead Attribution | Notes |
|---|---|---|---|
| Global (default) | Admin-provided credentials configured at the tool level | All leads attributed to the shared configured account | Existing behavior — unchanged |
| User | Each authenticated user supplies their own credentials when creating a lead | Leads associated with the individual user | For Salesforce, users must also provide their Instance URL. HubSpot does not require an instance URL |
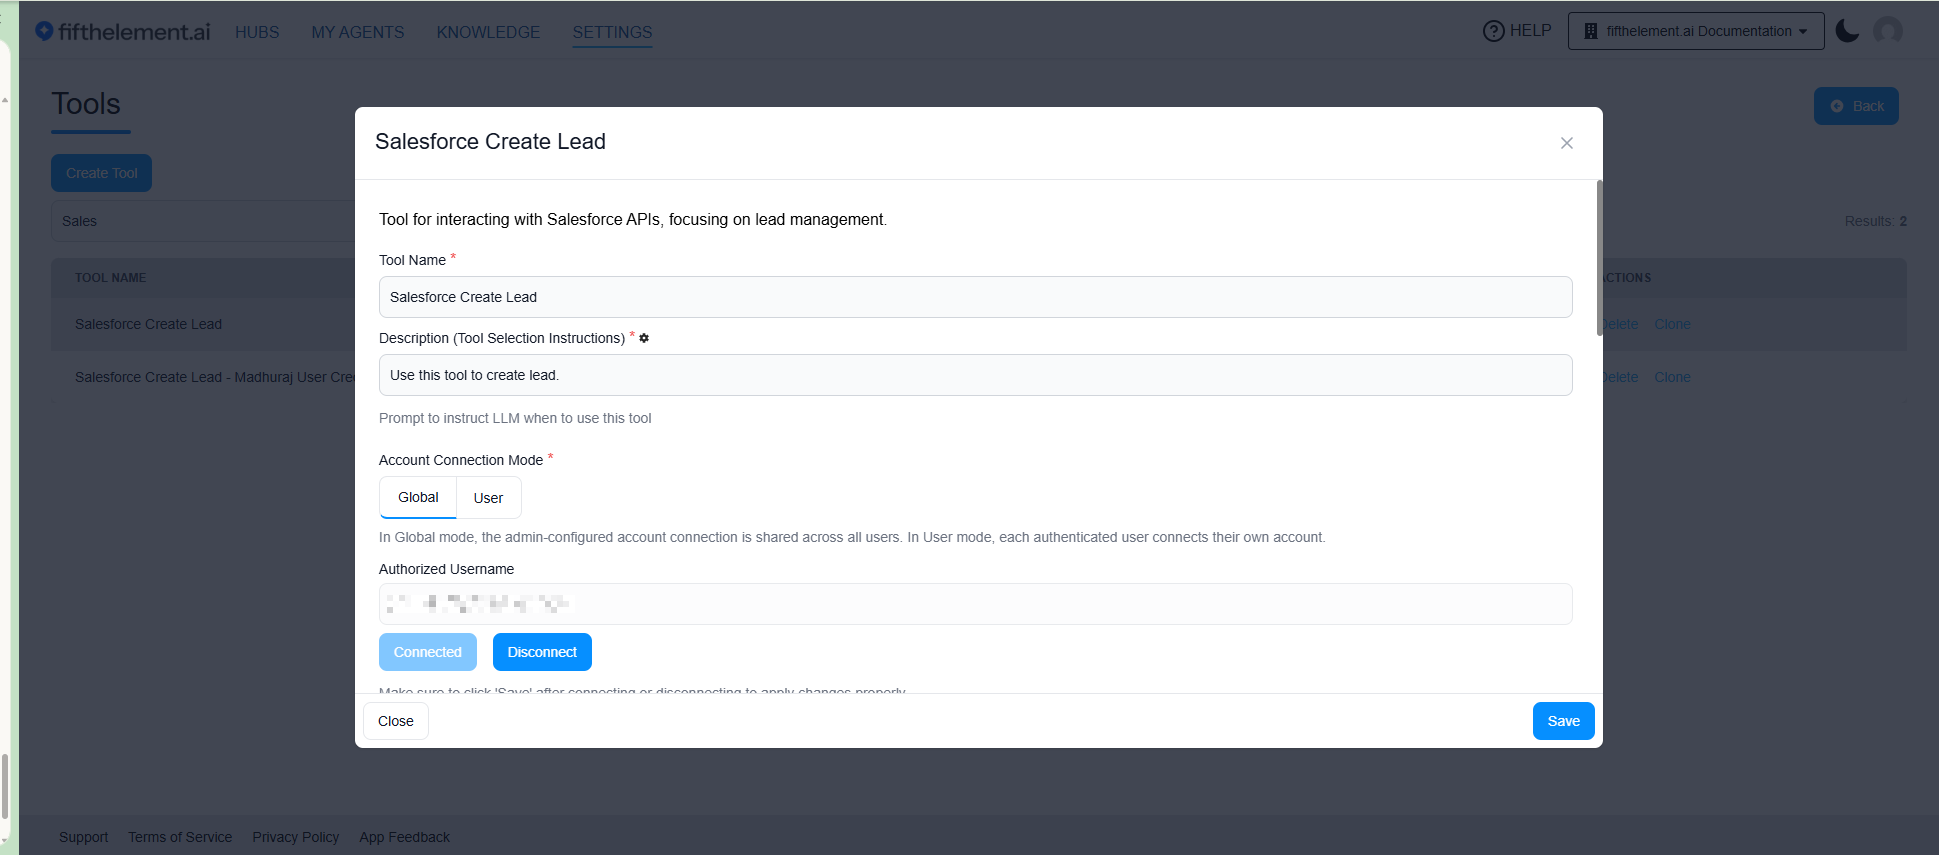
Salesforce Create Lead tool with Account Connection Mode set to Global — the connection is shared across users once configured. The blank form shown is disconnected. Helper text below the toggle summarizes both modes 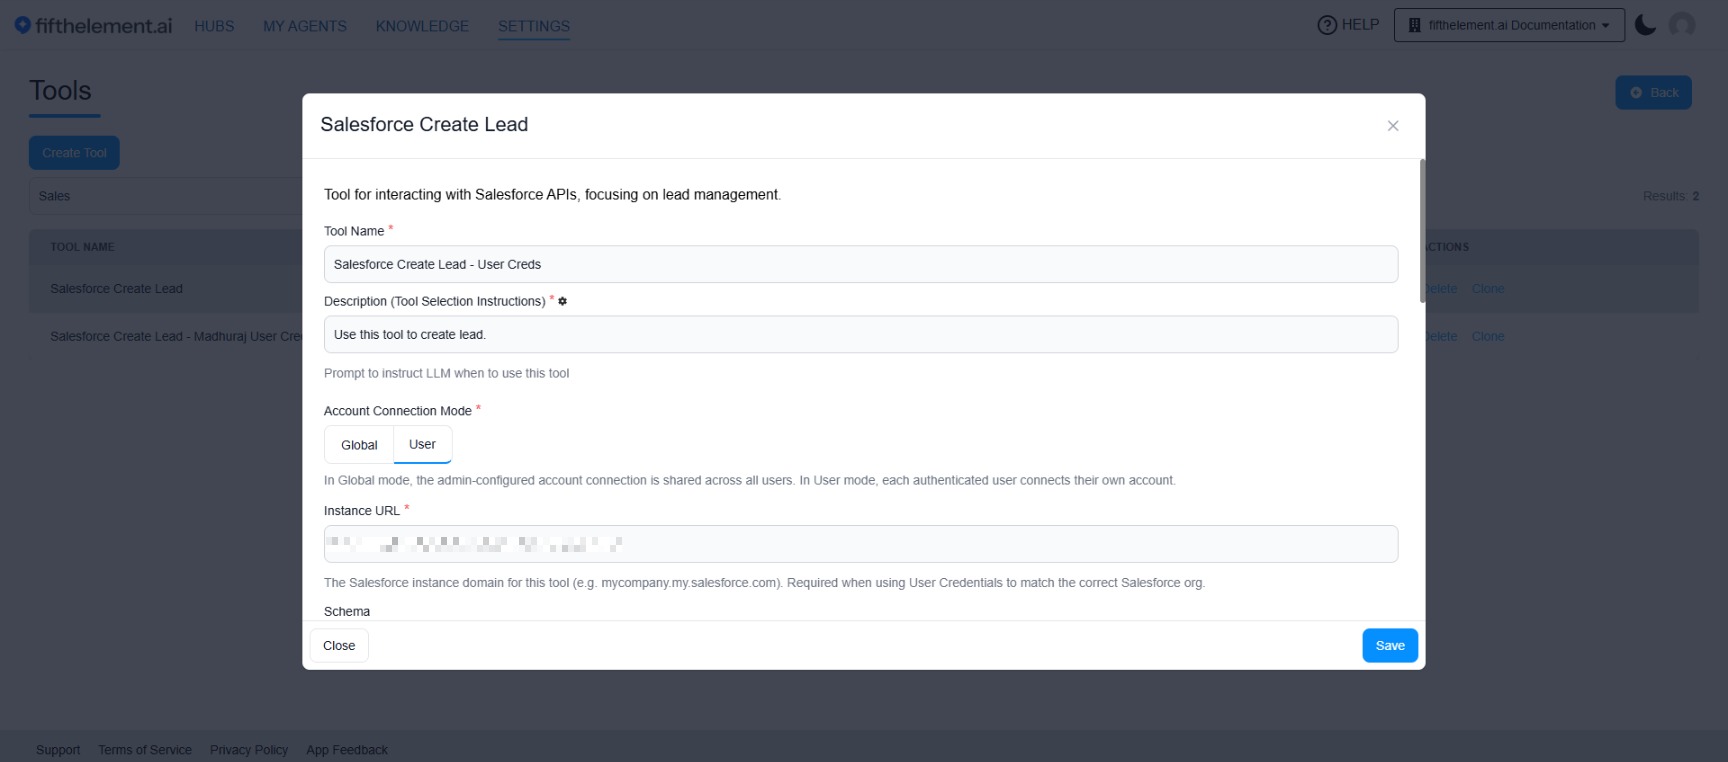
Salesforce in User mode — no shared admin credentials. An Instance URL field is required so each user's credentials resolve to the correct Salesforce org (e.g., mycompany.my.salesforce.com)
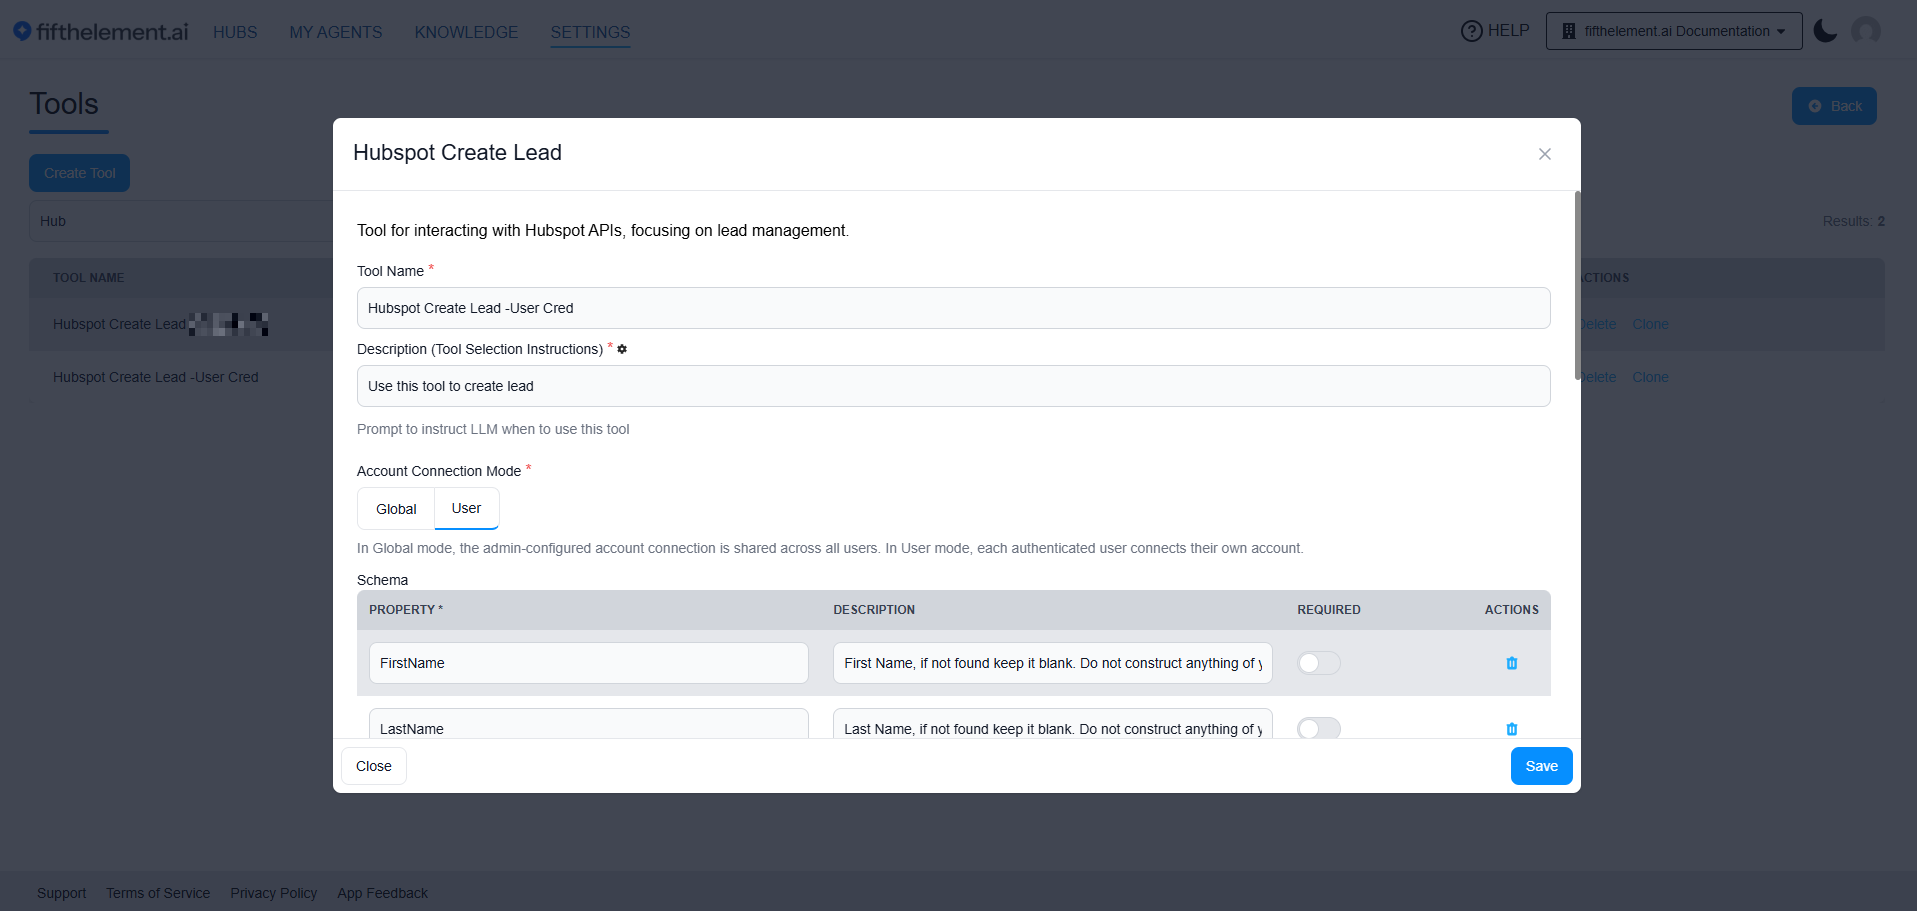
HubSpot in User mode — no Instance URL required; the form goes straight from the mode toggle to the Schema
User Mode — End-User Connection Persistence
Users can review their saved connections under Account menu > Account > Connected applications. Each application card shows its status, tool/account details, an instance address when applicable, and a Disconnect action. A card can show Reconnect required when its connection needs attention.
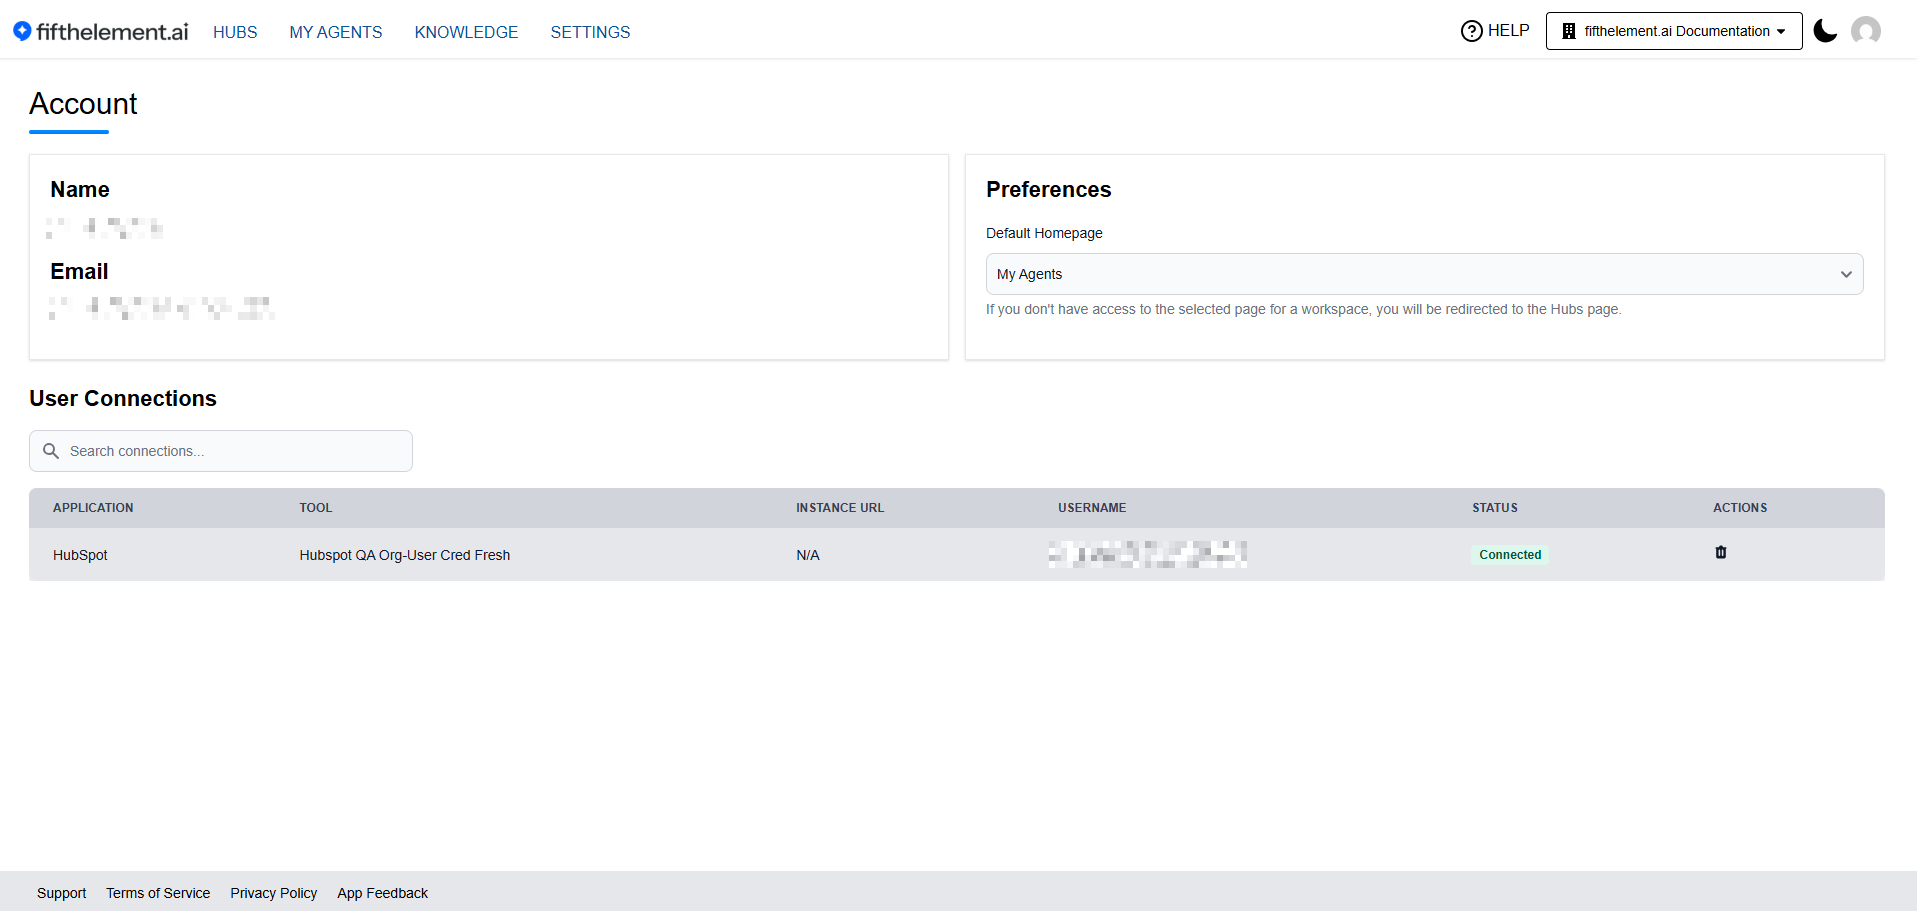
Connected application cards with profile, account and instance details blurred.
Calendly
Tool for scheduling meetings directly within agent conversations. When invoked, the agent displays a Calendly scheduling interface (inline or popup) to the user.
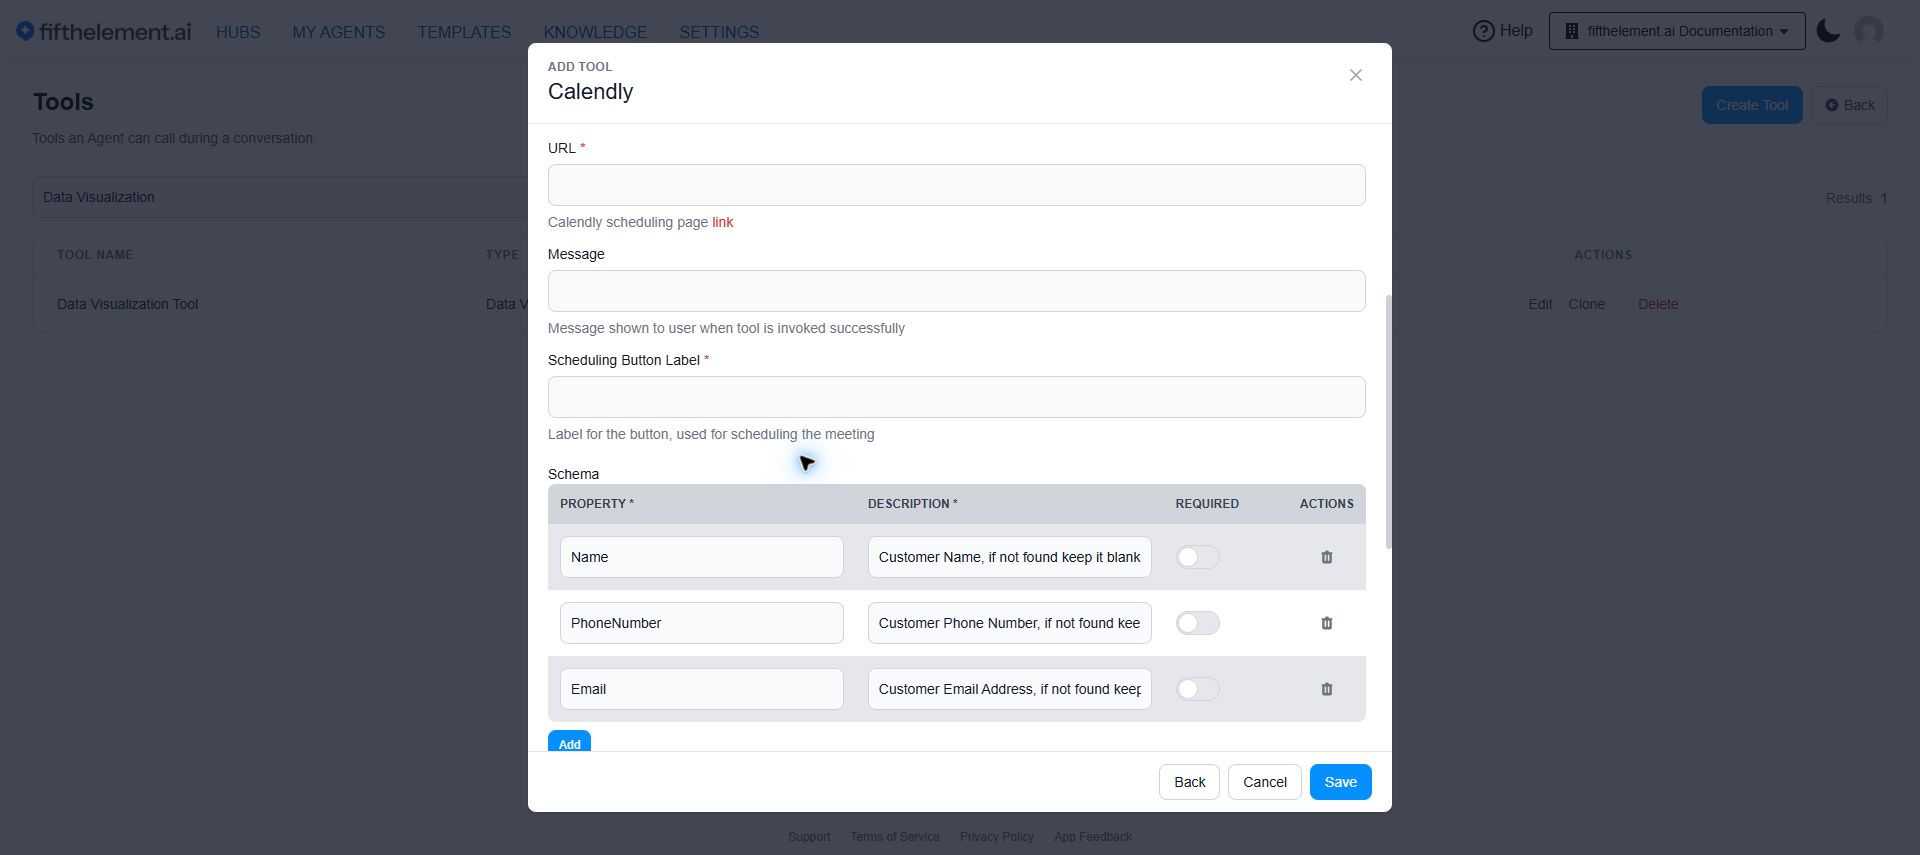
| Field | Required | Description |
|---|---|---|
| Tool Name | Yes | Descriptive name |
| Description (Tool Selection Instructions) | Yes | Prompt instructing the LLM when to use this tool |
| Personal Access Token | Yes | Personal access token from Calendly |
| URL | Yes | Calendly scheduling page link |
| Message | No | Message shown to user when the tool is invoked successfully |
| Scheduling Button Label | Yes | Label for the button used to open the scheduling interface |
| Schema | Yes | Properties the LLM extracts from the conversation (Name, PhoneNumber, Email) |
| Scheduling Payload | Yes | JSON template mapping schema properties to Calendly fields (e.g., {"name": "{{schema.Name}}", "email": "{{schema.Email}}"}) |
| Error Message | Yes | Message shown to user if the tool fails |
| Display Mode | Yes | Popup or Inline — controls how the Calendly interface appears in the chat |
Additional Parameters:
| Field | Description |
|---|---|
| Preprocessing Javascript Function | Runs before calling Calendly. Same capabilities as the Webhook preprocessor — access to data, schema, ld (lodash), llmUtil.call(), and getWorkspaceSecret() |
Data Visualization
A built-in tool type that renders interactive HTML visualizations directly in the chat. When invoked, the LLM authors a complete HTML document for the requested visualization (charts, diagrams, dashboards) and it renders inline in the chat inside a sandboxed iframe — supporting Tailwind CSS and external visualization libraries (Chart.js, Mermaid, D3, Plotly) loaded via CDN.
The in-product tool description reads: "Renders an interactive HTML visualization in the chat. Provide a description and data — the tool generates the HTML automatically using available libraries (Chart.js, Mermaid, D3, Plotly, etc.)."
Settings → Processors → Tools → Create Tool — Data Visualization appears in the Add Tool list alongside User Memory, Context Memory, Agent to Agent, and other built-in types 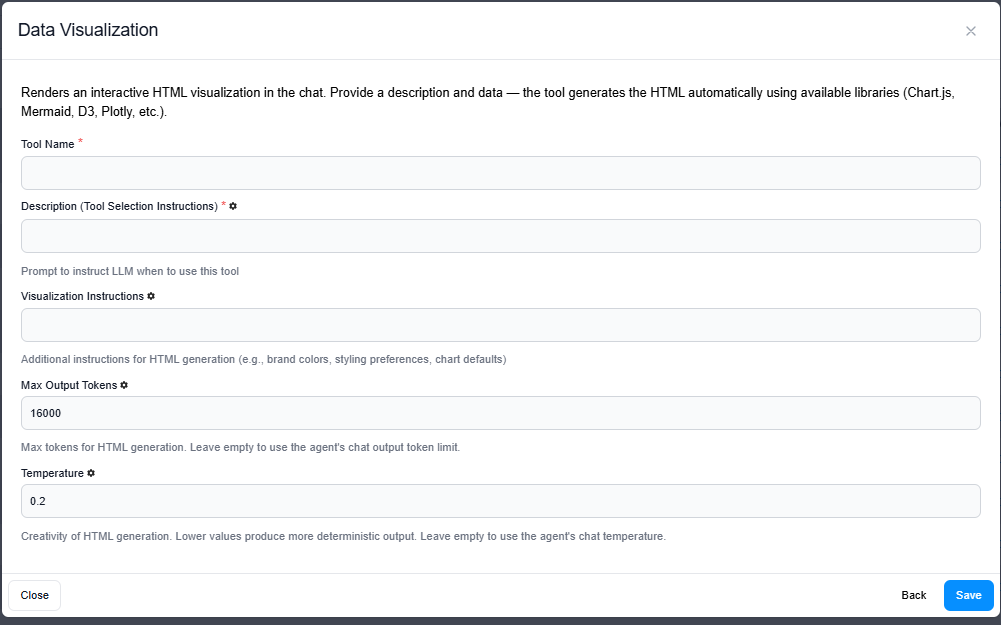
Data Visualization configuration — instructions, output-token limit, temperature and Brand Logo upload. 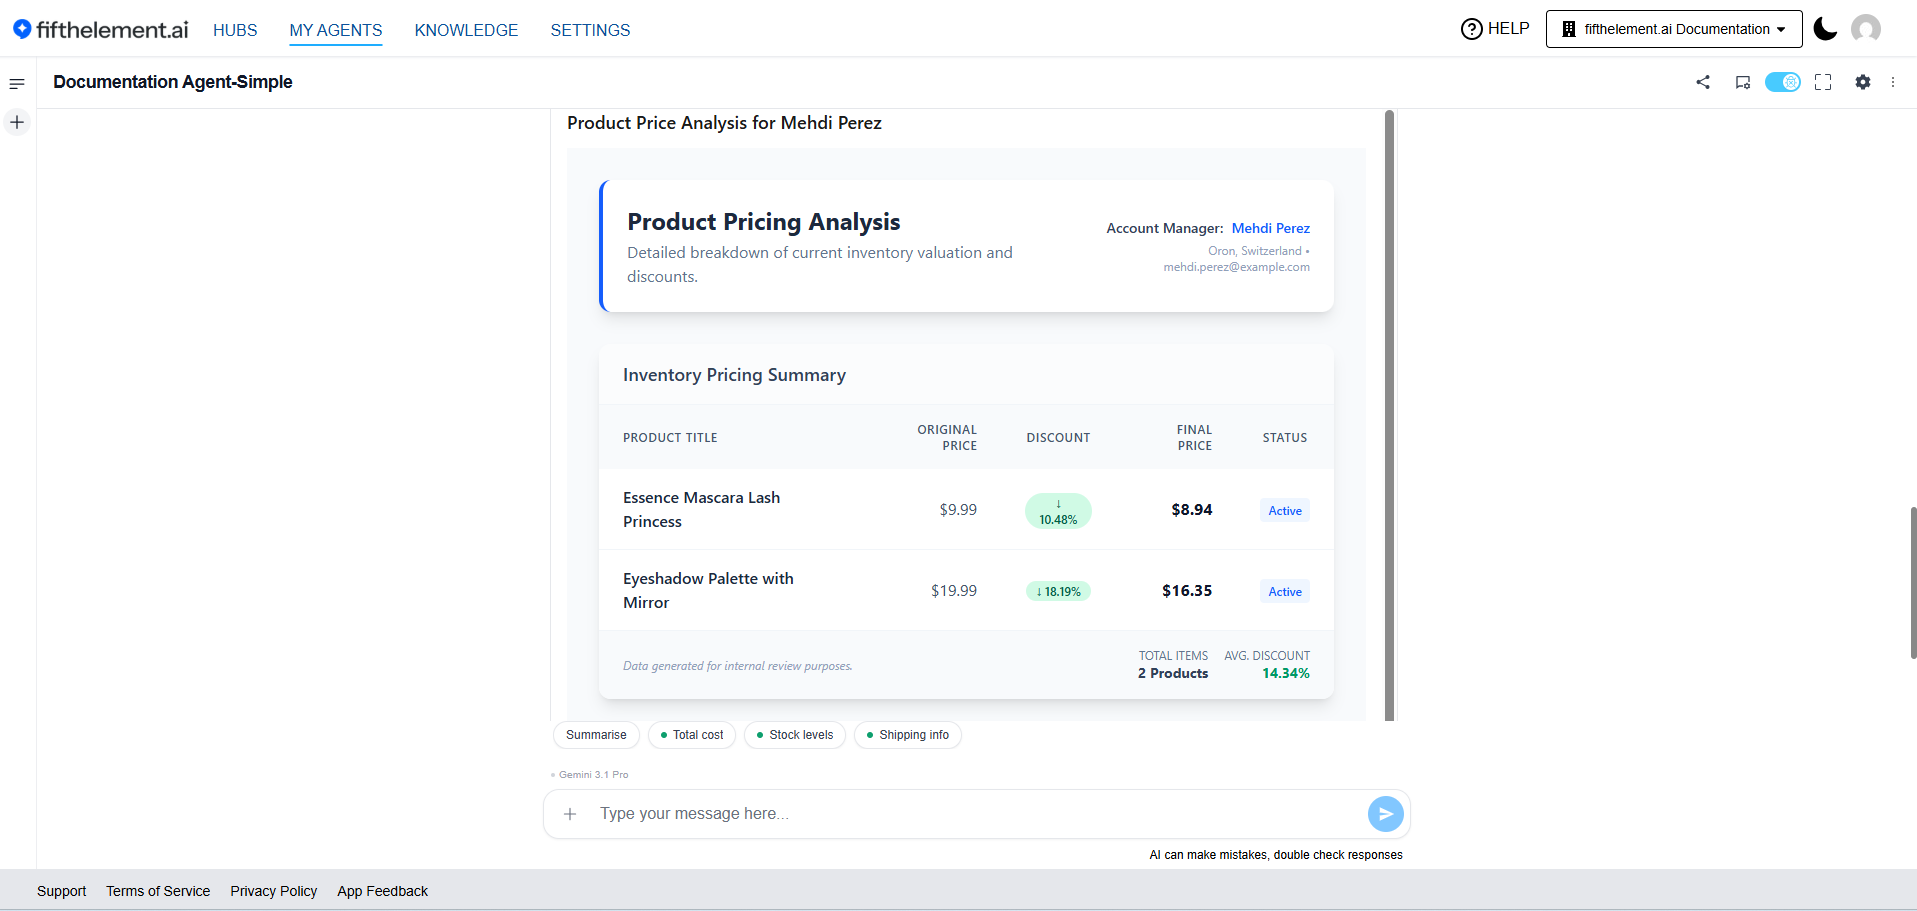
Inline bar chart using invented documentation data: Group A = 12, Group B = 18 and Group C = 9 sample units.
Check generated charts against the supplied values, labels and source. The model may introduce unsupported descriptions or attributions; correct them before sharing the visualization.
Key Capabilities
- Built-in tool type — Data Visualization appears as a new entry in the Add Tool list alongside Agent to Agent, User Memory, Context Memory, Human Agent, Salesforce / HubSpot Create Lead, etc.
- Sandboxed rendering — Generated HTML renders inside an iframe in the chat, free to use external CDN libraries and Tailwind CSS without affecting the host page.
- Author-controlled defaults — Visualization Instructions are appended to the system prompt for the generation call, so admins can lock in brand colors, chart defaults, and styling preferences without re-stating them on every query.
Configuration Fields
| Field | Required | Default | Description |
|---|---|---|---|
| Tool Name | Yes | — | Display name of the tool instance |
| Description / Tool Selection Instructions | Yes | — | Prompt instructing the LLM when to use this tool |
| Visualization Instructions | No | — | Additional instructions for HTML generation (e.g., brand colors, styling preferences, chart defaults) |
| Max Output Tokens | No | 16000 | Max tokens for HTML generation. Leave empty to use the agent's chat output token limit |
| Temperature | No | 0.2 | Creativity of HTML generation. Lower values produce more deterministic output. Leave empty to use the agent's chat temperature |
How to Configure & Use
- Create the tool — Navigate to Settings > Processors > Tools > Create Tool and select Data Visualization from the Add Tool list.
- Configure parameters — Fill in Tool Name, Description, optional Visualization Instructions, and tune Max Output Tokens / Temperature if needed, then Save.
- Add to an agent — Open the target agent's Tools & Artifacts section → Add, search for the tool by name, and select it from the picker.
- Generate visualizations — The agent now renders visualizations inline in chat based on the user's prompt — e.g., a product pricing analysis card showing per-product original price, discount, final price and status, with totals.
Available Libraries
| Library | Use Case |
|---|---|
| Chart.js | Bar, line, pie, and other standard charts |
| Mermaid | Flowcharts, sequence diagrams, Gantt charts |
| D3 | Complex, custom data visualizations |
| Plotly | Interactive scientific and statistical charts |
| Three.js | 3D visualizations |
| Anime.js | Animations |
| KaTeX | Mathematical notation |
| Markmap | Mind maps |
Brand Logo on AI-Generated Visualizations
Upload a Brand Logo in the Data Visualization tool form. The form recommends a single PNG/WebP with transparency or an SVG for sharp scaling, with top-right placement by default.
Use Visualization Instructions to specify placement, size and styling; these instructions take precedence over the built-in defaults. Configure the logo on the workspace tool or the agent's tool configuration as appropriate. Workspace tool changes do not automatically update existing agent copies.
Rules for AI-Generated Visualizations
- Use only Tailwind CSS classes for styling (loaded automatically)
- Only request libraries actually used
- Write clean, self-contained HTML with inline
<script>tags - Content renders inside an iframe — no external navigation or form submissions
- Keep visualizations responsive and accessible
Assigning Tools to Agents
- Navigate to the agent's Tools & Artifacts module
- Click "Add Tool"
- Select a configured tool from the list
- Configure tool-specific settings for this agent
- Click "Save"
Tool Configuration Scope
Changes to tools at the workspace level (Settings > Processors > Tools) do not automatically propagate to existing agent configurations. To update a tool for an agent, edit it directly within the agent's tool configuration.
Related Topics
- Pre-Processors — Process user input before the agent responds
- Post-Processors — Process conversations after responses
- Agent Builder — Advanced Configuration — Assign tools to agents
- Knowledge Overview — Set up knowledge repositories for Context and Retrieval tools
- Back to Settings