Managing Hubs
View, edit, and delete hubs from the workspace management interface.
Viewing All Hubs
Navigate to HUBS from the top navigation bar to see all hubs you have access to.
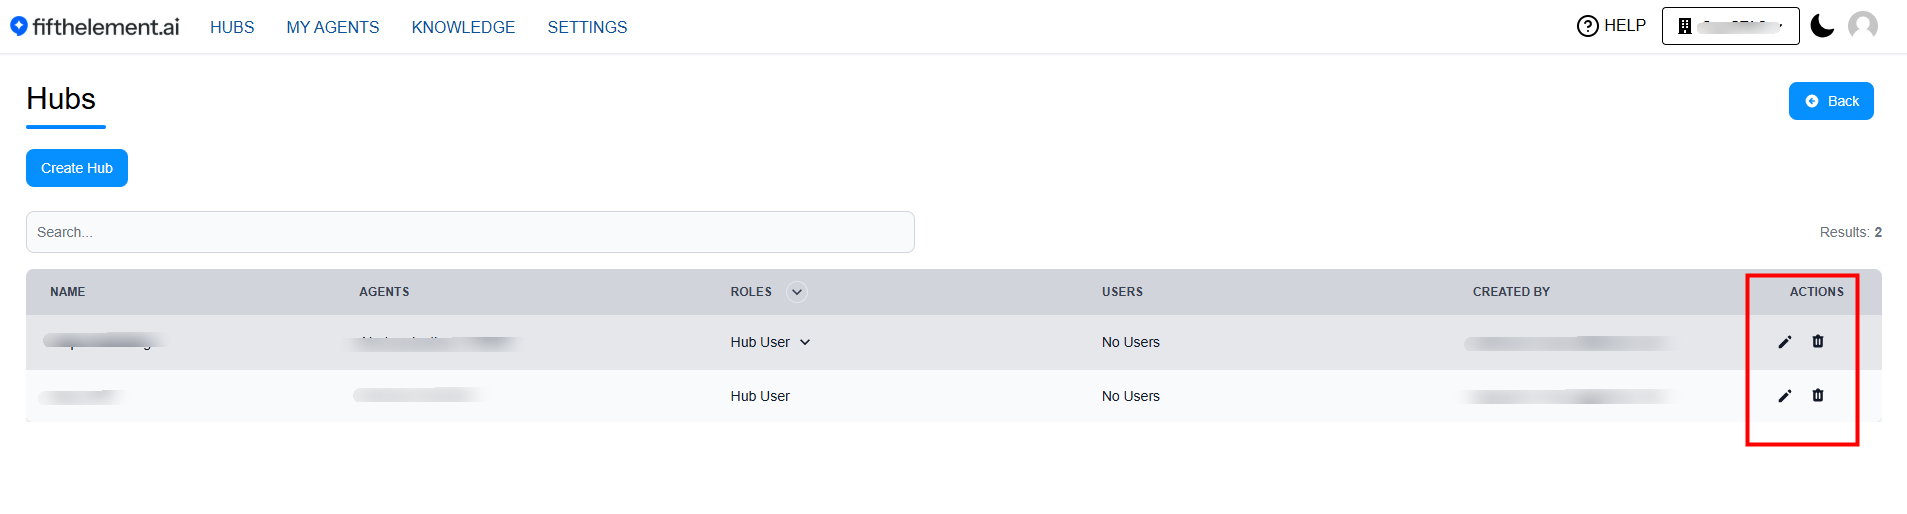 Hubs page showing all accessible hubs with edit and delete actions
What You'll See
The hubs management page displays:
- Hub Name: The name of each hub
- Roles: Which roles have access to this hub
- Users: Specific users assigned to this hub
- Agents: Number of agents in the hub
- Created By: Who created the hub
- Actions: Edit and delete icons (only for hubs you created or if you're an admin)
Filtering and Search
- Use the search bar to find specific hubs by name
- Filter by workspace if you have access to multiple workspaces
- Sort by creation date, name, or number of agents
Editing a Hub
You can edit hubs you created or hubs in workspaces where you have admin permissions.
How to Edit a Hub
- Navigate to Workspace > Hubs
- Locate the hub you want to edit in the list
- Click the Edit icon (pencil icon) next to the hub
- The hub configuration modal will open
What You Can Edit
- Hub Name: Rename the hub
- Roles: Add or remove roles with access to the hub
- Users: Add or remove individual users
- Agents: Add or remove agents from the hub
Editing Best Practices
- Communicate Changes: Notify users if you remove their access
- Test After Editing: Verify changes by logging in as an affected user
- Document Changes: Keep track of major modifications
- Avoid Frequent Changes: Stability helps users know where to find agents
Saving Changes
- After making your modifications, click Save
- Changes take effect immediately
- Users will see updated agent lists on their next login or page refresh
Deleting a Hub
Permanent Action
Deleting a hub is permanent and cannot be undone. However, it only removes the hub container—agents within the hub are not deleted.
How to Delete a Hub
- Navigate to Workspace > Hubs
- Locate the hub you want to delete
- Click the Delete icon (trash icon) next to the hub
- Confirm the deletion in the dialog that appears
What Happens When You Delete a Hub
- Hub is removed from the workspace permanently
- Users lose access to the hub (but not to the agents themselves)
- Agents remain intact in their original workspace
- User assignments are cleared for this hub
- No impact on other hubs or workspace settings
Before Deleting
Consider these questions:
- Are users actively using this hub?
- Should you create a replacement hub?
- Do you need to notify users about the deletion?
- Have you documented which agents were in this hub?
Cannot Delete a Hub?
Issue: Delete button is grayed out or not visible
Possible Reasons: - You don't have permission to delete this hub - You are not the creator and don't have admin role - The hub is part of a protected workspace configuration
Solution: - Contact the hub creator or workspace admin - Request admin permissions if you need to manage hubs regularly
Bulk Operations
Managing Multiple Hubs
If you need to perform operations on multiple hubs:
- Create a Standard Template: Define standard hub configurations for consistency
- Document Hub Structure: Keep a record of which hubs exist and their purpose
- Regular Audits: Review hub usage and access quarterly
- Coordinate Deletions: Plan hub deletions to minimize user disruption
Monitoring Hub Usage
Tracking Agent Access
To understand hub effectiveness:
- Navigate to Reports (if available in your workspace)
- Filter by hub to see agent usage statistics
- Identify underutilized hubs for consolidation
- Monitor most-accessed agents to optimize hub organization
User Feedback
- Collect feedback from users about hub organization
- Adjust agent assignments based on usage patterns
- Create new hubs if users request specific groupings
Common Management Tasks
Reorganizing Agents
Scenario: You need to move agents between hubs
Steps: 1. Edit the source hub and remove the agent 2. Edit the destination hub and add the agent 3. Save both changes 4. Notify users of the reorganization
Updating Access Permissions
Scenario: A team structure changed, affecting hub access
Steps: 1. Edit the affected hub 2. Update role assignments to reflect new team structure 3. Add/remove individual users as needed 4. Test access with affected users 5. Document the permission changes
Deprecating Old Hubs
Scenario: A project ended and its hub is no longer needed
Steps: 1. Notify users that the hub will be deleted 2. Identify if any agents should be moved to other hubs 3. Set a deletion date 4. Delete the hub after the notice period 5. Confirm users can still access needed agents elsewhere
Hub Lifecycle Management
Creation Phase
- Define hub purpose and scope
- Identify target users and roles
- Select relevant agents
Active Phase
- Monitor usage and access
- Add/remove agents as needs evolve
- Adjust permissions based on team changes
Maintenance Phase
- Regular access audits
- Agent reorganization
- Performance optimization
Retirement Phase
- User notification
- Agent migration (if needed)
- Hub deletion
- Documentation update
Related Topics
- Creating Hubs - How to create new hubs
- User Access & RBAC - Configure permissions
- My Agents - Manage the agents within hubs
- Workspaces > RBAC Settings > RBAC Roles - Role management