Creating Hubs
Learn how to create and configure hubs to organize your AI agents.
Prerequisites
Before creating a hub, ensure you have:
- Admin Role or custom role with "Create Hub" permission (configured in Workspaces > Roles)
- Access to at least one workspace
- At least one agent created (optional, but recommended)
How to Create a Hub
Follow these steps to create a new hub:
Step 1: Navigate to Workspace Settings
- Click on Settings (gear icon) in the top navigation
- Select Workspaces from the left sidebar
- Choose the workspace where you want to create a hub
Step 2: Access Hubs Management
Click on the Hubs card within your workspace settings.
 Navigate to Workspace settings and click the Hubs card
Step 3: Create New Hub
Click the Create Hub button to open the hub configuration modal.
Step 4: Configure Hub Details
Fill in the required information:
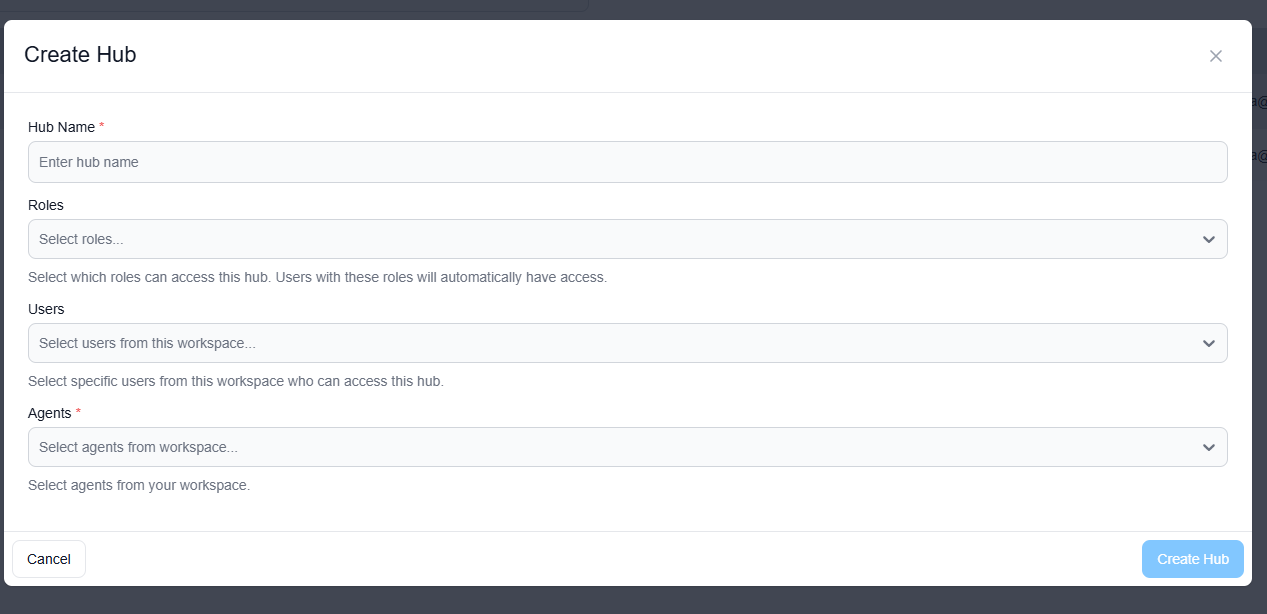 Create Hub modal with all required fields
| Field | Description | Required |
|---|---|---|
| Hub Name | Unique name for your hub | Yes |
| Roles | Workspace roles that can access this hub | At least one role or user |
| Users | Specific users who can access this hub | At least one role or user |
| Agents | Agents from your workspace to include | No |
| Agent URL | URLs of agents from external workspaces you can access | No |
Hub Name
- Must be unique within your workspace
- Use descriptive names (e.g., "Customer Support Hub", "Sales Team Hub")
- Character limit: 100 characters
Roles
- Select workspace roles that should have access to this hub
- All users with selected roles will automatically see this hub
- Can select multiple roles
Users
- Add specific users who should access this hub
- Useful for granting access outside of role assignments
- Can be used in combination with role assignments
Agents
- Select agents from your current workspace
- Can select multiple agents
- Agents can be added/removed later
Step 5: Save Hub
Click Save to create your hub. The hub will be immediately available to assigned users and roles.
Hub Configuration Best Practices
Naming Conventions
- Be Descriptive: "Marketing Campaign Hub" instead of "Hub 1"
- Include Purpose: "Customer Support - Tier 1" vs just "Support"
- Use Consistent Format: Decide on a naming pattern and stick to it
Access Management
- Prefer Roles Over Users: Assign hubs to roles for easier scaling
- Use Direct User Assignment Sparingly: Only for exceptions
- Document Access Rules: Keep track of why certain roles/users have access
Agent Organization
- Group by Function: Keep related agents together
- Limit Hub Size: Don't add too many agents to one hub (recommended: 5-15)
- Create Multiple Hubs: Better to have focused hubs than one large hub
Post-Creation Steps
After creating a hub:
- Test Access: Log in as a user with assigned role to verify access
- Add More Agents: Edit the hub to add additional agents as needed
- Monitor Usage: Check which agents are being used most
- Iterate: Adjust agent assignments based on user feedback
Common Issues
Cannot See "Create Hub" Button
Issue: The "Create Hub" button is not visible in Workspace > Hubs
Solution: - Verify you have admin role or a custom role with "Create Hub" permission - Check RBAC settings: Workspaces > Roles > Manage Roles - Contact your workspace admin to grant the necessary permissions
Hub Not Appearing for Users
Issue: Created a hub but users cannot see it
Solution: - Verify the user's role is assigned to the hub, OR - Verify the user is directly assigned to the hub - Check that the user is a member of the workspace - Ensure the hub was saved successfully
Agents Not Showing in Hub
Issue: Added agents to hub but they don't appear
Solution: - Refresh the page - Verify agents are still active and not deleted - Check that agents belong to the correct workspace - Re-add agents to the hub if necessary
Related Topics
- Managing Hubs - Edit and delete hubs
- User Access & RBAC - Configure permissions
- Workspaces > RBAC Settings > RBAC Roles - Role management
- My Agents - Create agents to add to hubs