Agent Builder - Basic Configuration
Essential configuration steps to get your AI agent up and running quickly.
Overview
This guide covers the core agent configuration, followed by channel setup and a first test.
The Agent Builder opens with a mandatory core — Identity and Brain — and nothing else. Every other capability is a self-contained module you add when you need it. Review the required fields and channel settings before testing the agent.
For the module system and everything it contains, see Agent Builder - Advanced Configuration.
Prerequisites
Before you begin, ensure you have:
- Access to https://PLATFORM-URL-PLACEHOLDER platform
- Appropriate permissions to create new agents
- A defined purpose and synthetic test questions
- A configured language model and its provider credential
Quick Start: 4 Essential Steps
- Pick a mode — Chat or Search
- Identity — what the agent is called and how it introduces itself
- Brain — instructions and language model
- Create Agent
Then review Channels and follow Testing Your Agent below to check the user experience.
1. Pick a Mode
When to use
Always. Mode is the first choice you make, and it decides which modules and defaults the Builder pre-loads.
From My Agents, click New Agent. The Builder asks "What kind of Agent are you building?"
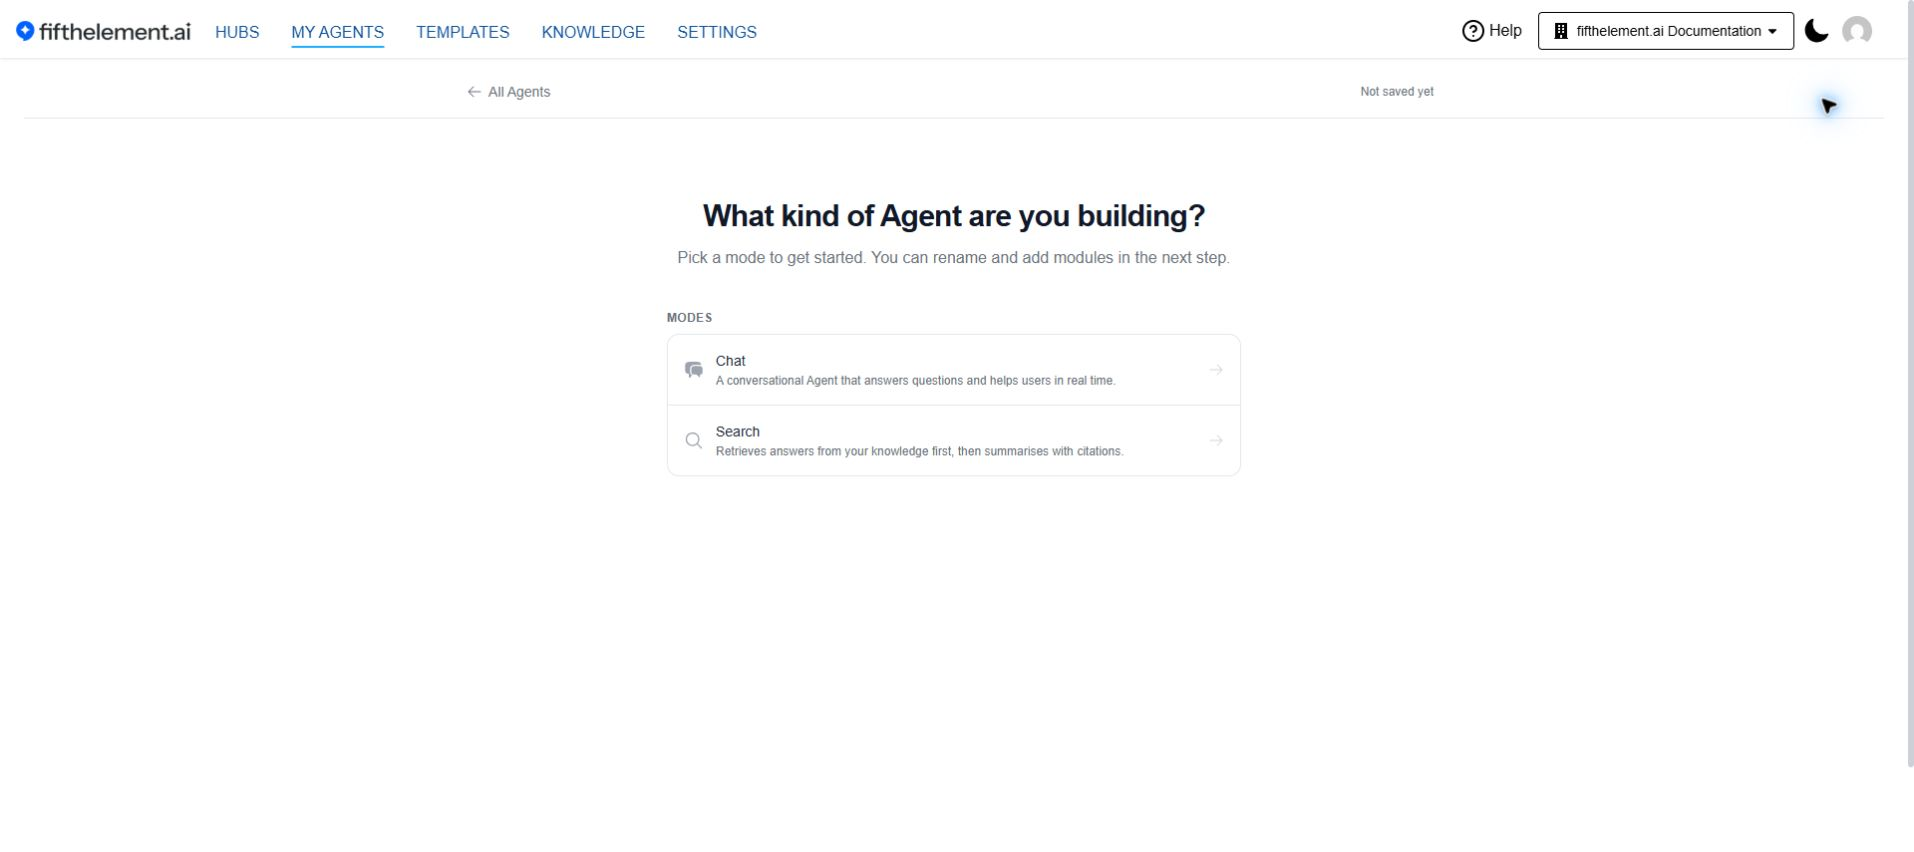
Pick a mode to get started — you can rename the agent and add modules in the next step
| Mode | Description |
|---|---|
| Chat | A conversational Agent that answers questions and helps users in real time |
| Search | Retrieves answers from your knowledge first, then summarises with citations |
The mode you choose is shown as a chip at the top of the Builder. While creating an agent, Change Mode next to that chip returns to the mode picker.
Review configuration after changing mode
Changing mode returns to the mode picker and changes the available sections. Some entered settings can remain. Review the resulting configuration before creating the agent.
What differs in Search mode:
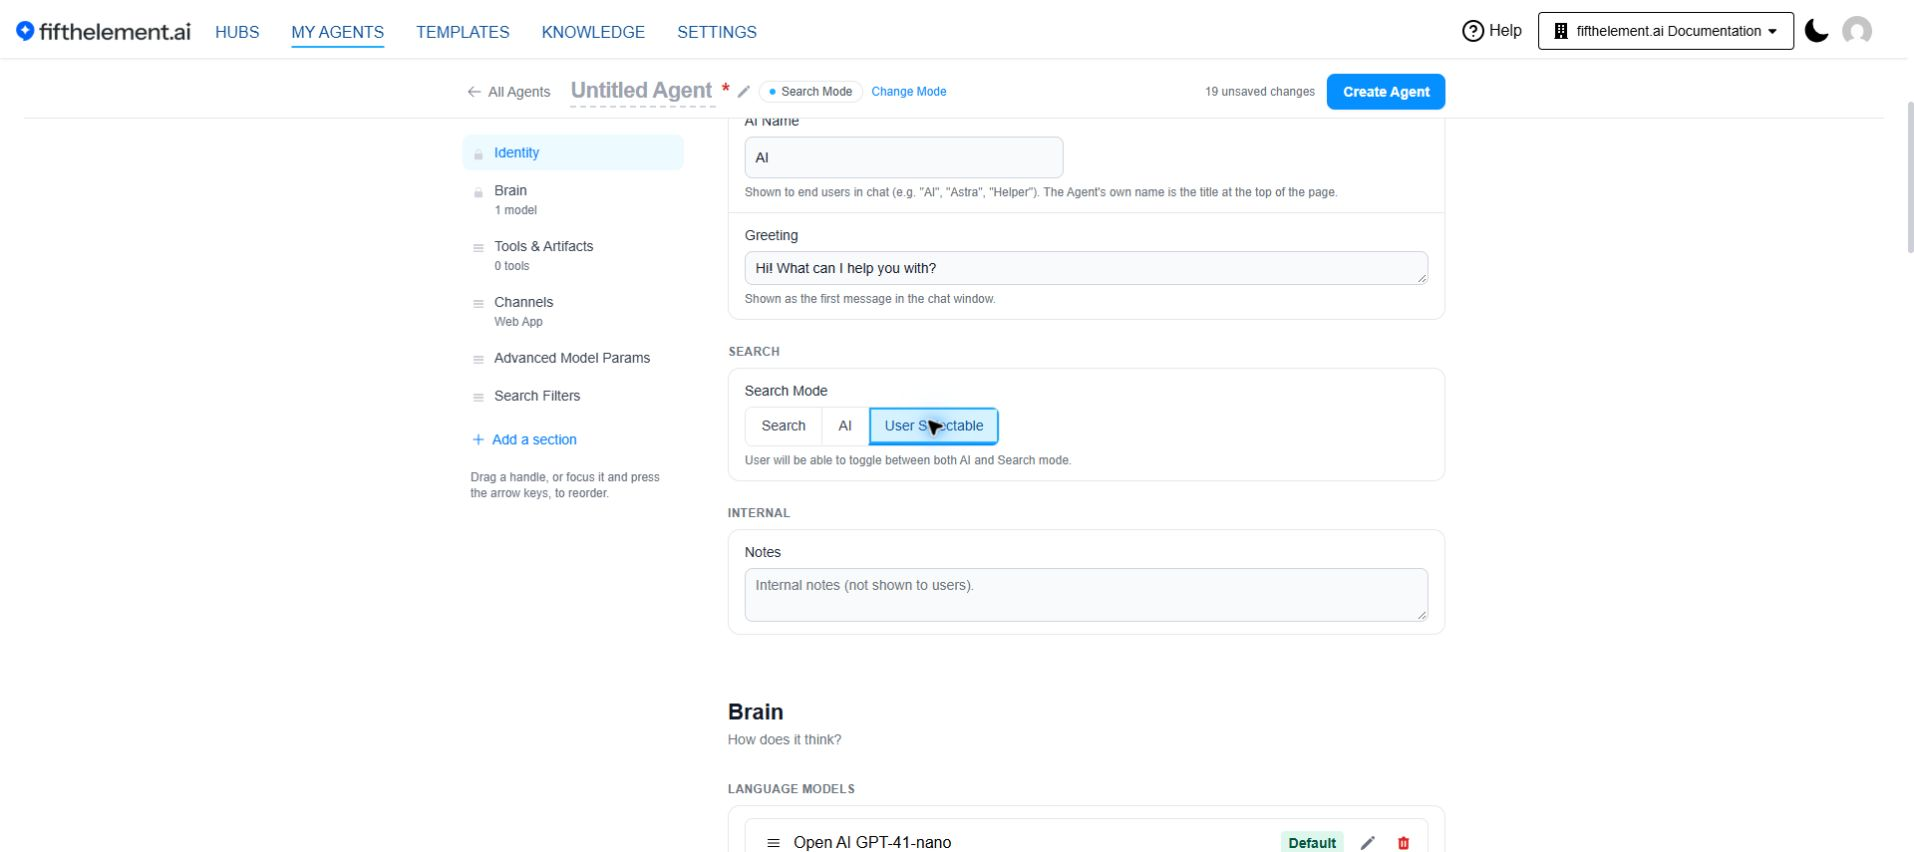
- Identity gains a Search Mode selector — see Search Mode below
- A Search Filters section is on the page from the start
- The module chooser offers a smaller set — no Voice, Prompt Shortcuts, Artifacts, or Knowledge Bases
2. Identity
When to use
Always. Identity is mandatory and cannot be removed.
Identity answers "Who is this Agent?" — what it's called, how it greets people, and who can see it.
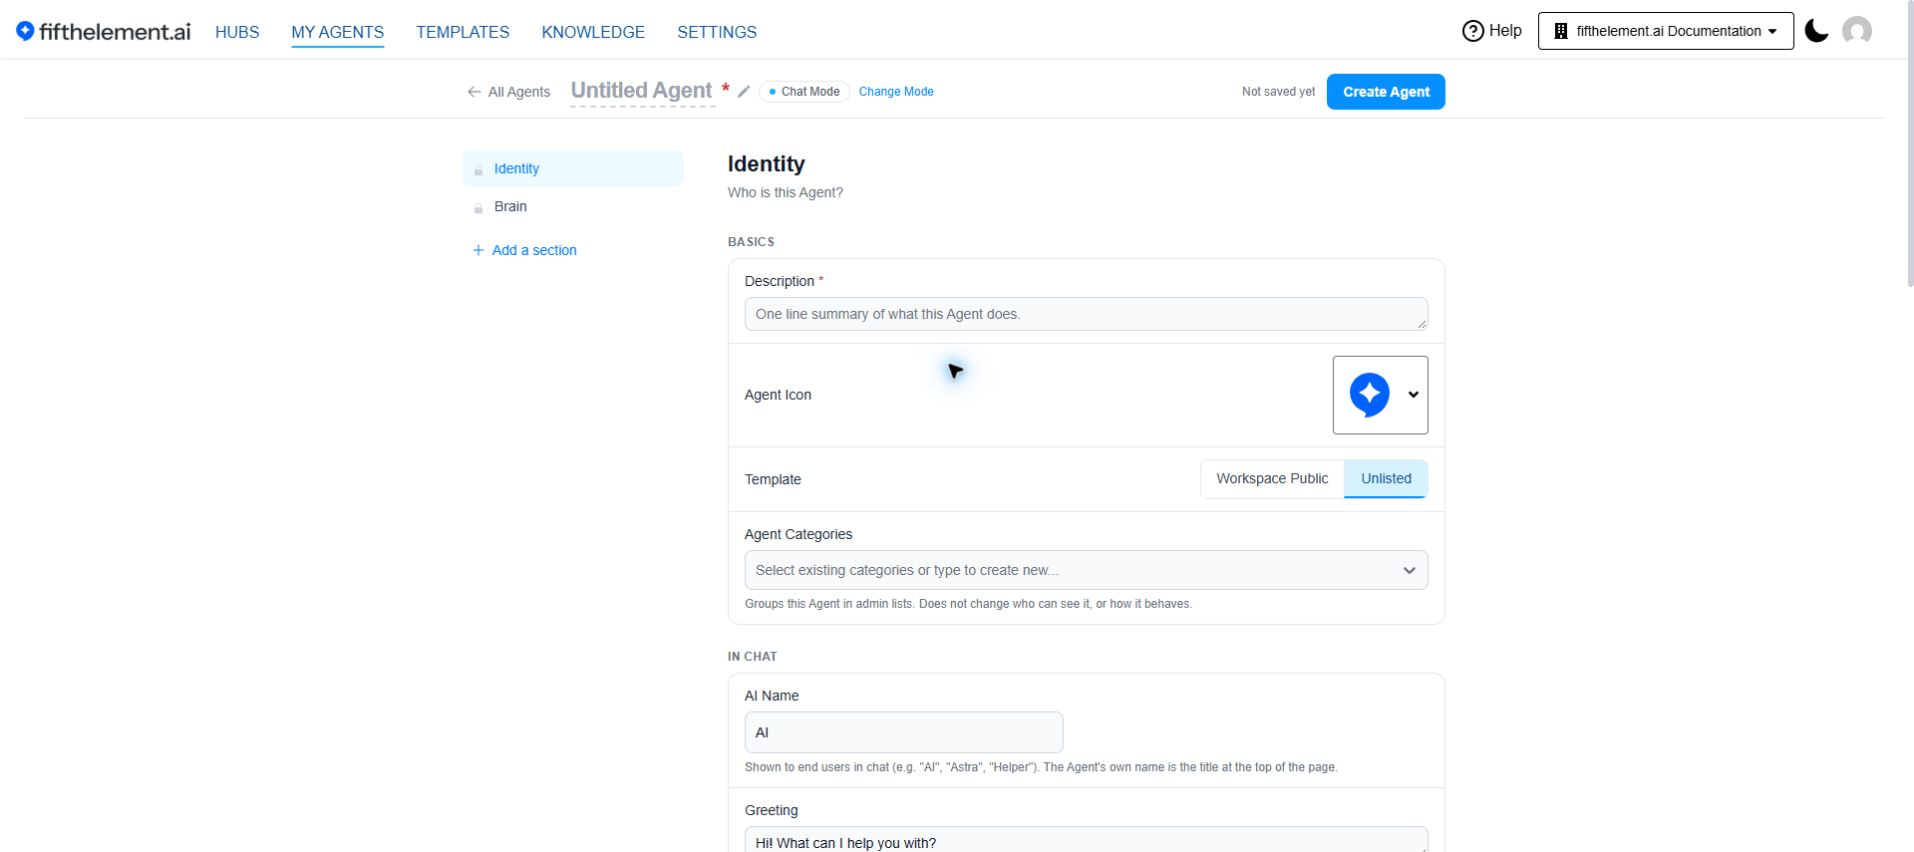
Fields
| Field | Required | Description |
|---|---|---|
| Agent name | Yes | Edited inline at the top of the page, where it reads Untitled Agent until you set it. This is the internal identifier used in the platform, logs, and management |
| Description | Yes | One line summary of what this Agent does |
| AI Name | No | Shown to end users in chat (e.g. "AI", "Astra", "Helper"). Defaults to AI |
| Greeting | No | Shown as the first message in the chat window. Defaults to "Hi! What can I help you with?" |
| Notes | No | Internal notes, not shown to users |
| Agent Icon | No | Picked from a dropdown; displayed before the agent's name in the chat interface |
| Template | No | Visibility — Workspace Public (visible to all workspace members) or Unlisted (the default) |
| Agent Categories | No | Groups the agent in admin lists; does not change visibility or behavior |
When you edit an existing agent, Identity also shows a read-only Remarks line recording how the agent came to be — for example, that it was cloned from another agent, with the source name, ID and version.
Search Mode (Search agents only)
Search agents carry one extra Identity control:
| Option | Behaviour |
|---|---|
| Search | Answers come from knowledge retrieval |
| AI | Answers come from the language model |
| User Selectable | The end user can toggle between AI and Search mode. This is the default |
3. Brain
When to use
Always. Brain is mandatory and cannot be removed.
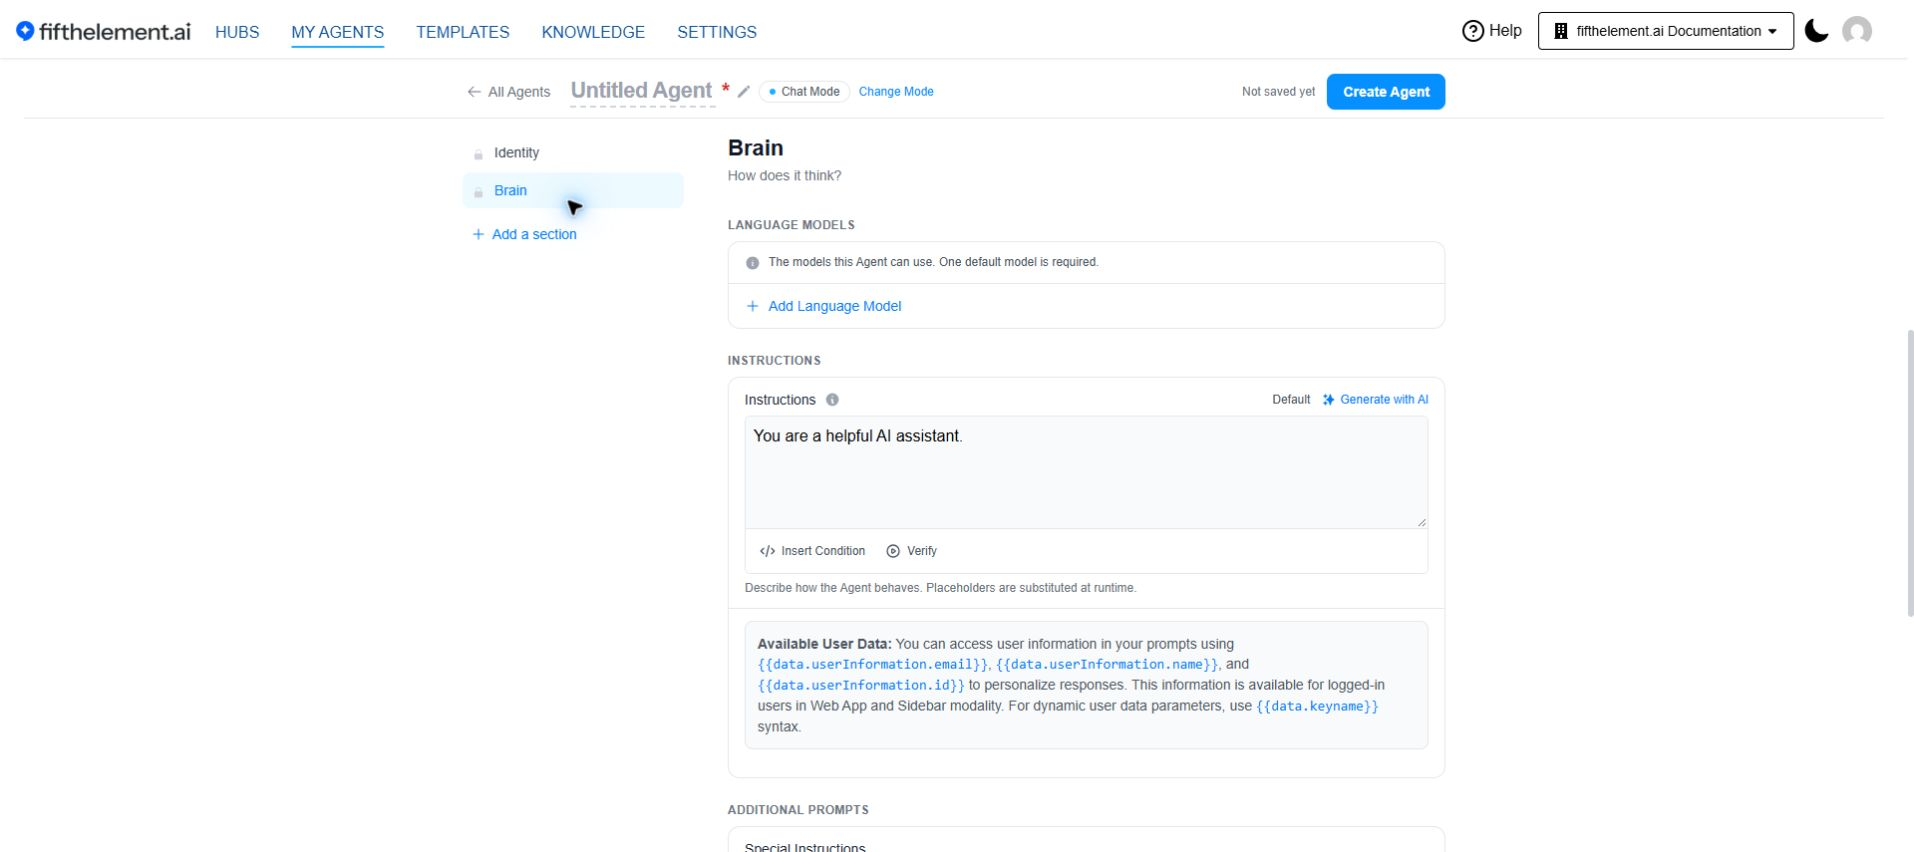
Brain answers "How does it think?" — the instructions that steer the agent and the models that run it.
Instructions
The system instruction that steers every reply — describe how the Agent should behave, its tone, and what it should refuse.
Four controls sit above the field:
| Control | What it does |
|---|---|
| Default | Restores the built-in wording |
| Generate with AI | Drafts a full instruction set from a short prompt, for you to review and refine before applying |
| Insert Condition | Adds a conditional instruction block |
| Verify | Checks the instruction |
You can use {special_instructions} and {user_instructions} as placeholders; they are substituted with the special instructions and user instructions respectively.
Personalising with user data
Brain shows an Available User Data callout listing the placeholders you can use in prompts — {{data.userInformation.email}}, {{data.userInformation.name}} and {{data.userInformation.id}} — available for logged-in users on Web App and Sidebar. For dynamic user data parameters, use {{data.keyname}}.
What to include:
Role Definition:
You are a customer support agent for fifthelement.ai, specializing in
helping users understand our AI platform features.
Responsibilities:
Your responsibilities include:
- Answering questions about platform features
- Helping users troubleshoot configuration issues
- Providing step-by-step guidance for agent setup
- Escalating complex technical issues when necessary
Behavior Guidelines:
Communication Style:
- Professional yet friendly tone
- Concise and action-oriented responses
- Use bullet points for clarity
- Provide examples when explaining concepts
Constraints:
Limitations:
- Do not provide information about pricing (direct to sales team)
- Do not make promises about future features
- Admit when you don't know something rather than guessing
Brain also holds Special Instructions, Current Message Prompt, Conversation Inactivity Message and an + Add Instruction action. These are covered in Builder — Advanced Configuration.
Available Language Models
Required. Click + Add Language Model and choose from the models configured for your workspace.
Each model you add gets its own row with these controls:
- Default / Set Default — which model handles the conversation unless a tag says otherwise
- Tag — limits that model's scope to conversations carrying a specific tag
- Edit (pencil) — opens Modify Language Model for this model's own parameters: Display Name, Description, Temperature, Max Output Tokens, Per 1k Tokens Price, Max Messages in History and History Tokens Threshold
- Delete — removes the model from the agent
Which parameters live where
Settings that apply to one model sit behind the pencil. Settings that apply to the whole agent — Use Chat History, summarization, condense-question, and the Large Context Processing Algorithm — sit in the Advanced Model Params module instead.
Choosing a model
Match the model to the job: lighter, faster models for FAQ-style agents; stronger reasoning models for complex support or technical work. Response quality, speed and cost all vary by model. See Language Models for the full catalogue.
Voice agents
Language Models are not used during Realtime Voice interactions.
Embedding Model
An embedding model is not part of the core Brain form. Configure it in Advanced Model Params when using the Embeddings large-context algorithm.
4. Create Your Agent
Use Create Agent in the sticky header after completing the required configuration.
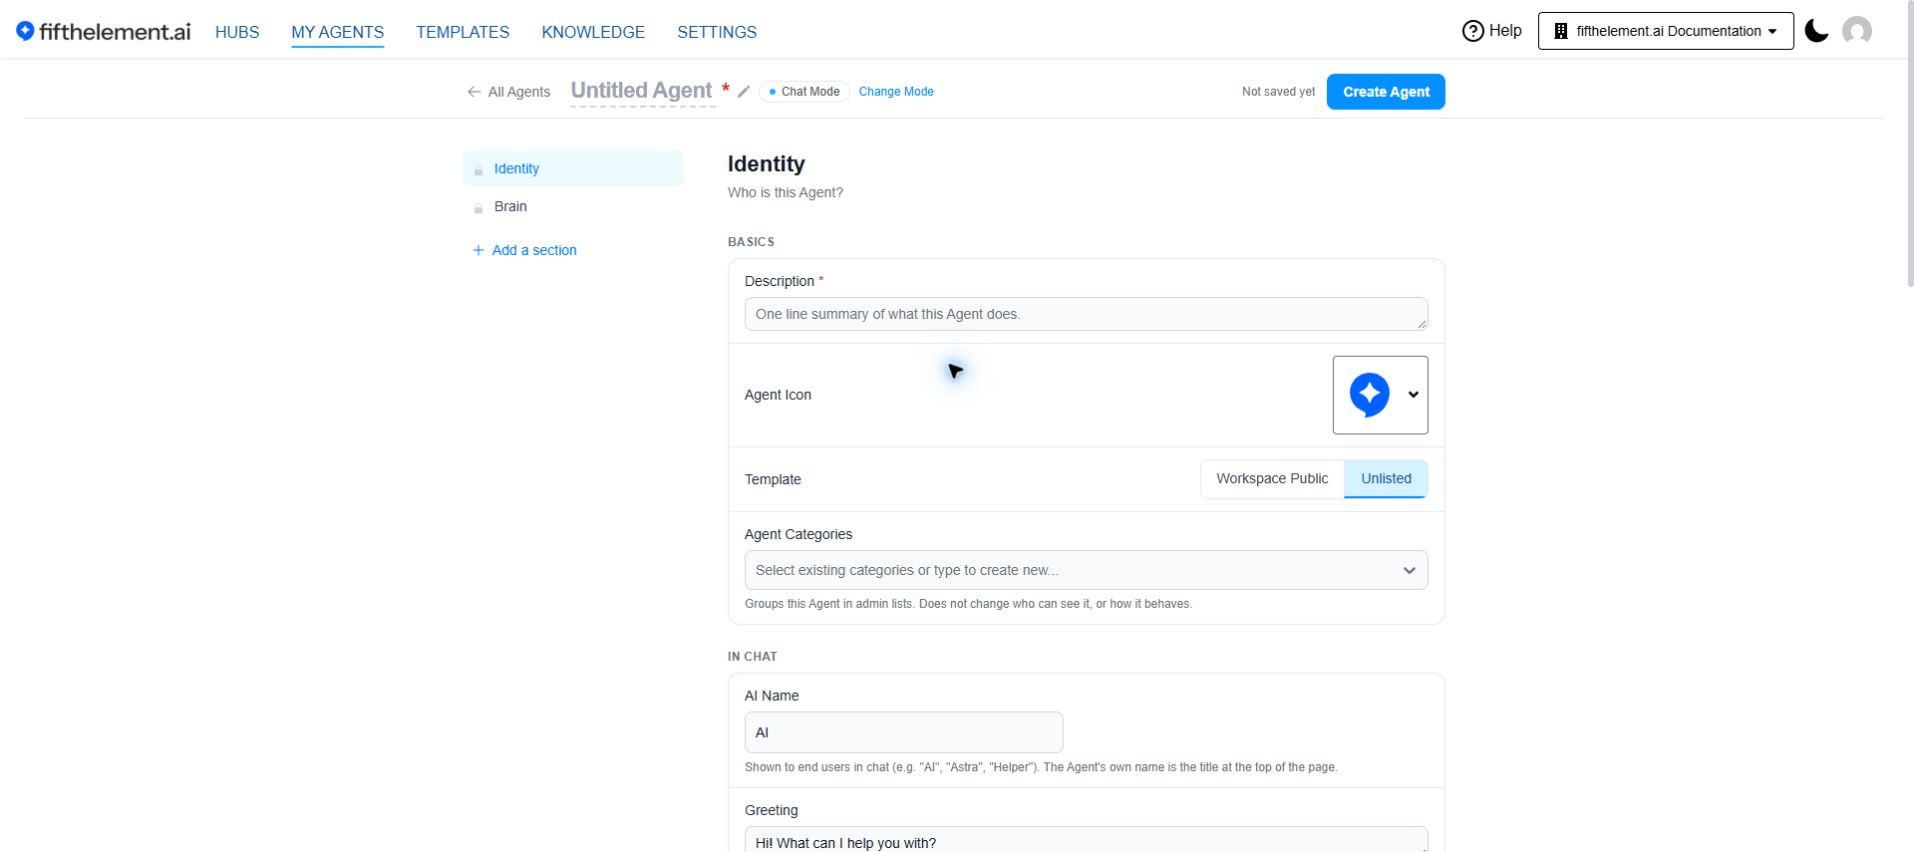
The header shows Not saved yet or an unsaved-change count while creating an agent. Existing agents use Save and show All saved after saving.
Adding Your First Module
Add Channels to review where people can reach the agent and its sign-in requirements.
Click Add a section, then pick Channels from the DISTRIBUTION group.
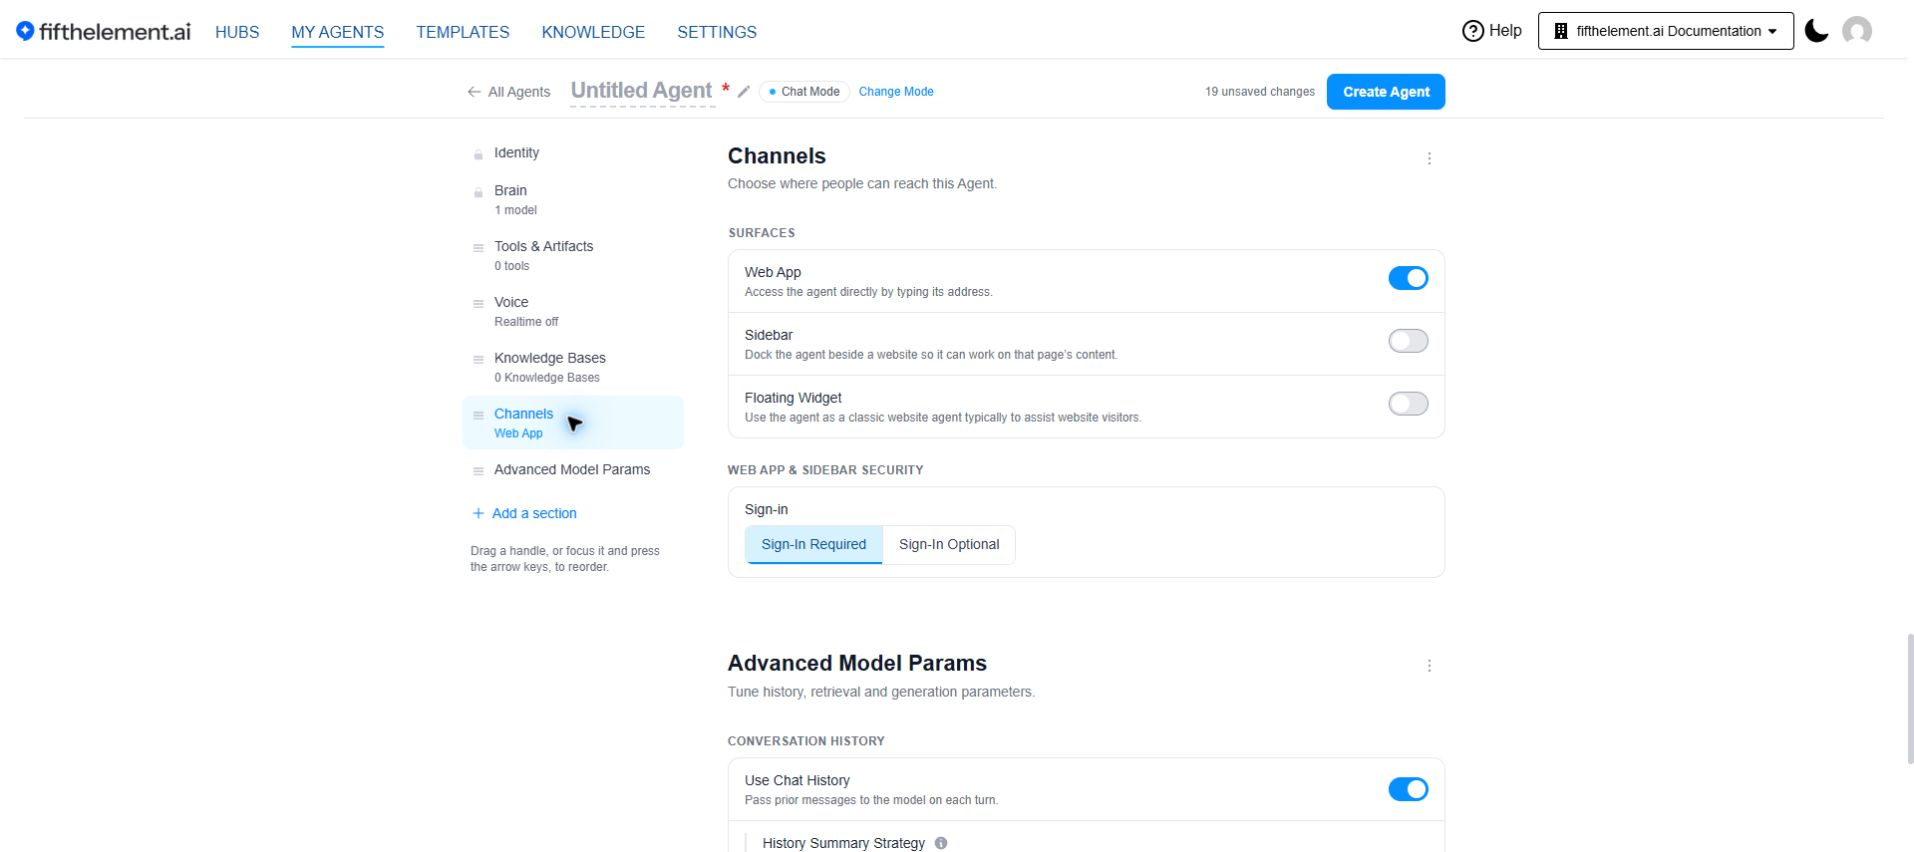
| Channel | Description | Best For |
|---|---|---|
| Web App | Access the agent directly by typing its address | Standalone agents that don't need embedding |
| Sidebar | Use the agent as a sidebar to an internal or external website. Recommended when the agent is performing tasks on the content of the website | Documentation sites, internal portals, content-aware assistance |
| Floating Widget | Use the agent as a classic website agent, typically to assist website visitors | On-the-spot assistance for website visitors |
Channels also carries Web App & Sidebar Security:
| Option | Description |
|---|---|
| Sign-In Required | Users must sign in before they can interact with the agent. Provides user attribution and conversation tracking |
| Sign-In Optional | Users can interact without signing in |
Floating Widget has its own authentication module — see Floating Widget Auth.
Testing Your Agent
After creating the agent, test it:
- Navigate to the Web App URL
- Send a few test queries
- Verify responses match your instructions
- Check that the agent behaves as expected
Open the agent card’s three-dot menu and choose Embed On Website. The Bookmarklet option is inside that modal.
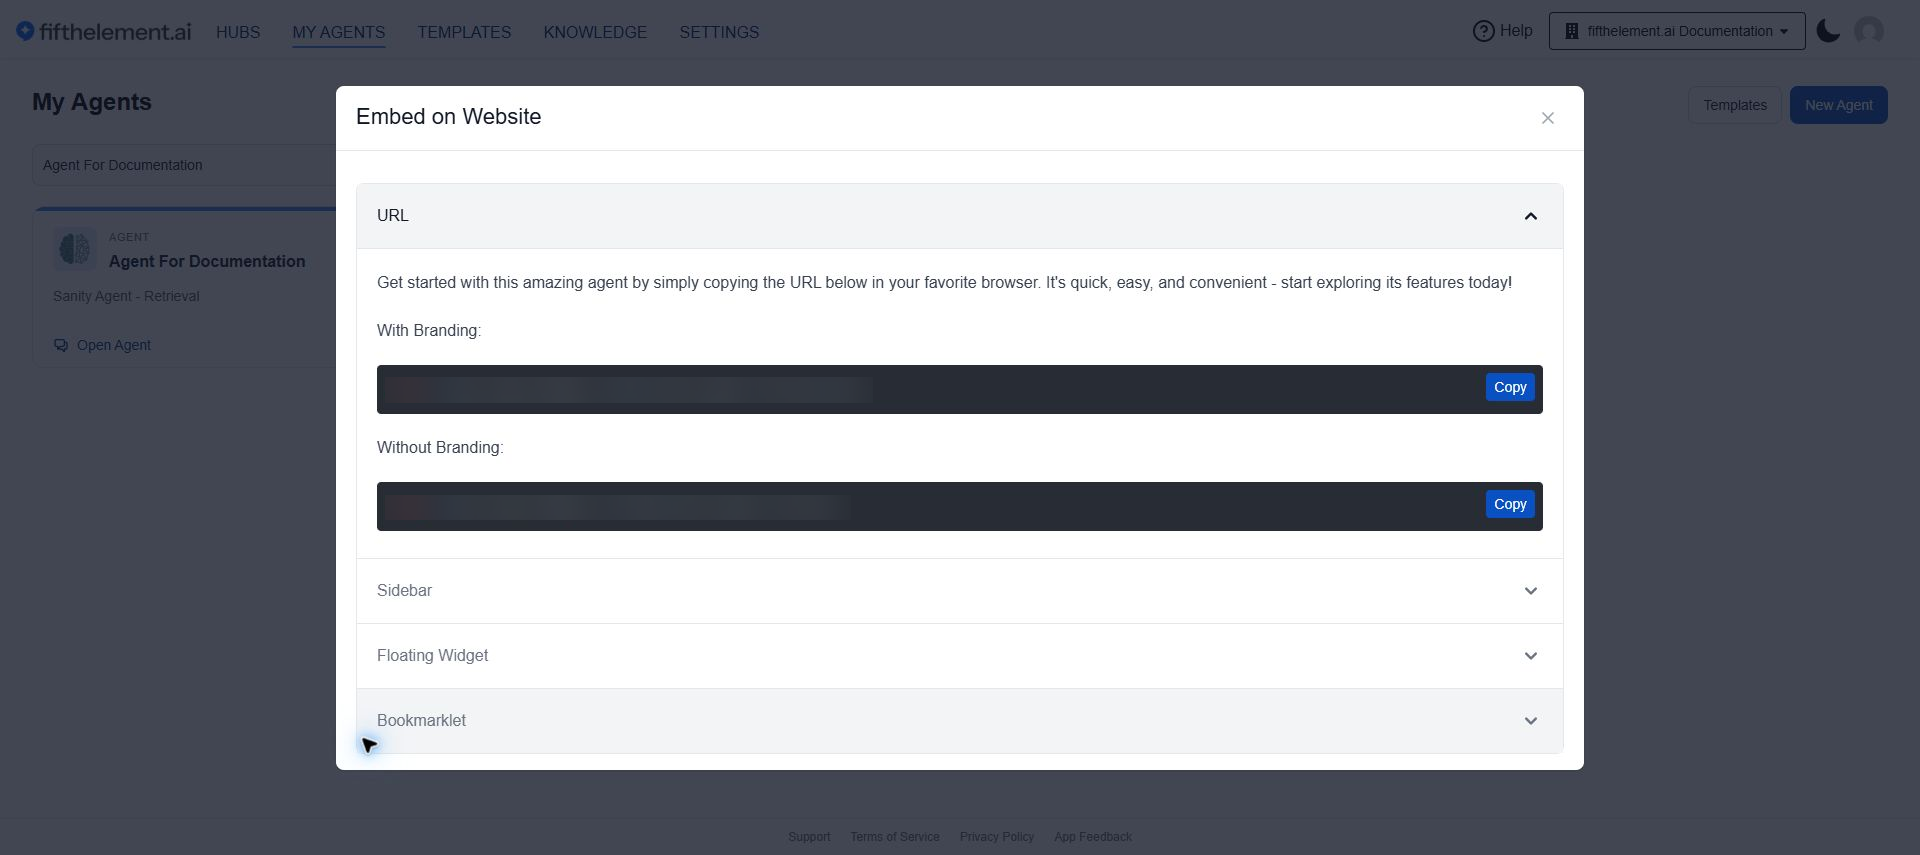
The Embed on Website modal provides four sections:
| Section | Description |
|---|---|
| URL | Direct link to the agent's Web App |
| Sidebar | Code snippets to embed the agent as a sidebar on your website |
| Floating Widget | Code snippets to add a chat bubble to the bottom right of your website |
| Bookmarklet | Drag-and-drop bookmarklet for testing the agent on any domain (allowed by CORS) without embedding |
For Sidebar and Floating Widget, two script options are provided:
- Minimal Script (Recommended) — Simple way to add the widget with minimal configuration and default settings
- Extensible Script (Advanced) — Allows advanced customization, overriding default behaviors, and passing dynamic user data via a
getUserDatafunction
Bookmarklet testing:
- Click and hold the bookmarklet button (e.g., "Agent Name (Floating)" or "Agent Name (Sidebar)")
- Drag it to your browser's bookmarks bar
- Navigate to any domain allowed by CORS
- Click the bookmarklet to load the agent (may take up to 30 seconds)
- Chat controls appear on the page — click the chat icon to open the agent
Refreshed Chat UI
The chat experience on Web App, Sidebar, Conversations, and Human Agent screens has been revamped for a sleeker, more conversational layout:
- Agent and user interactions appear aligned to the middle of the screen
- The language-model picker and attach-file option are now inside the message input box
- Stop generation and Regenerate response are now part of the message input box (saving space)
- Prompt shortcuts appear in a sleeker arrangement
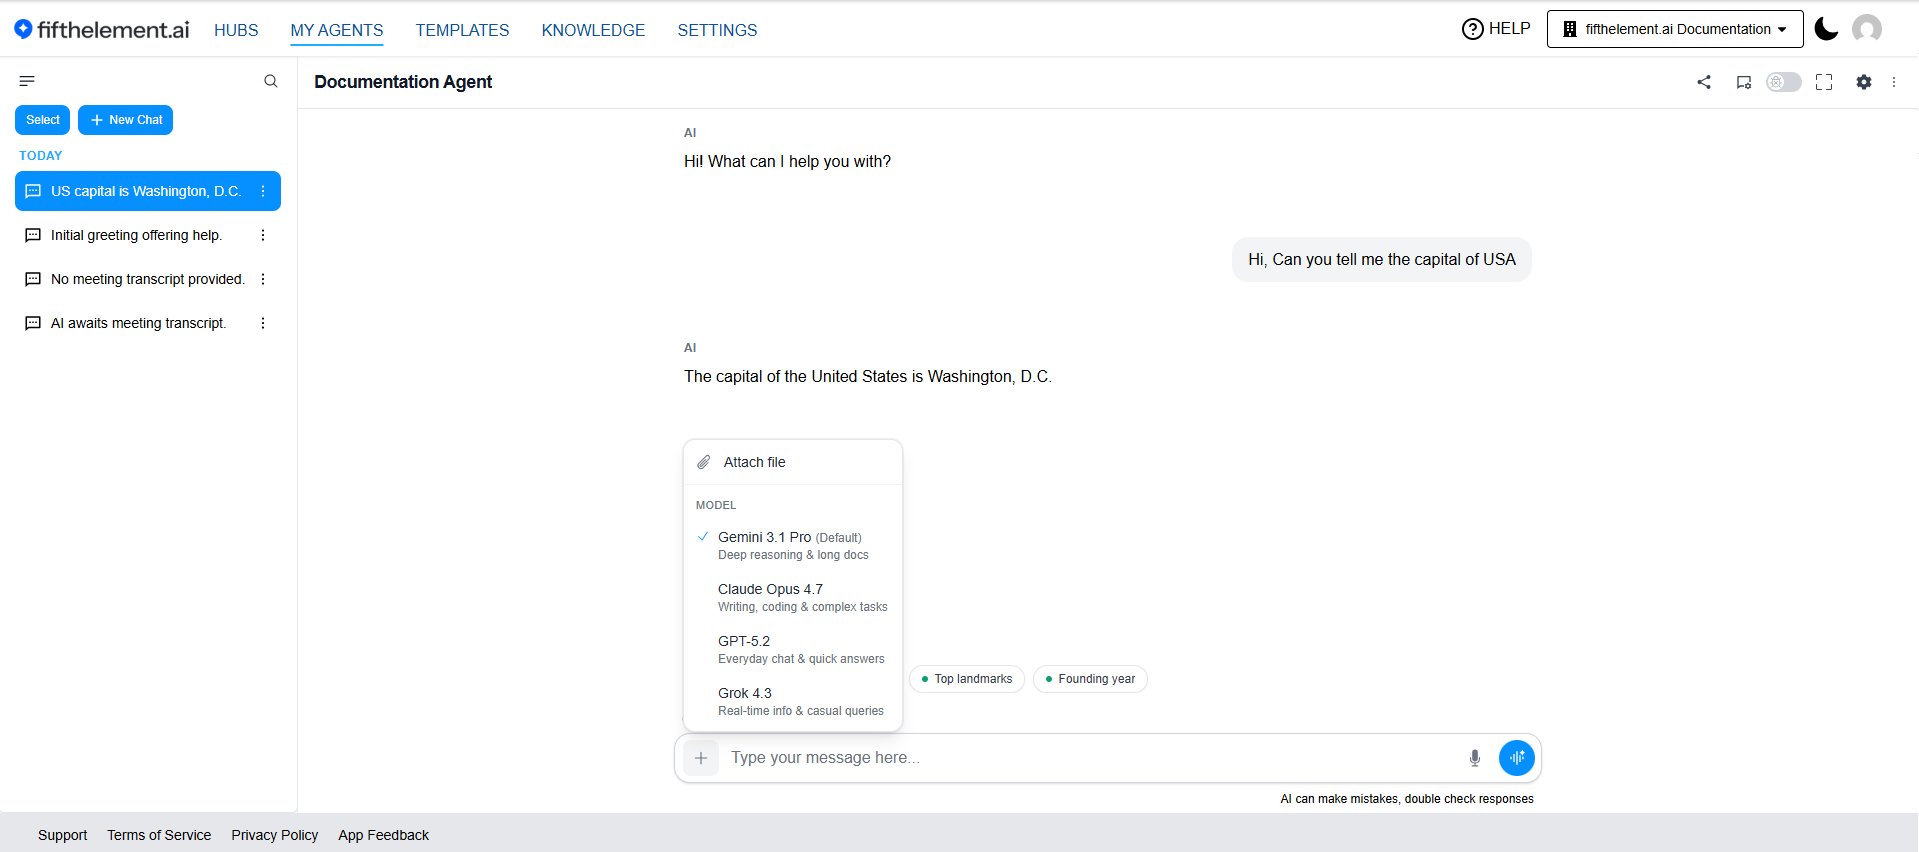
Refreshed Web App chat — language-model picker and attach-file inside the message input, prompt shortcuts in a sleek arrangement 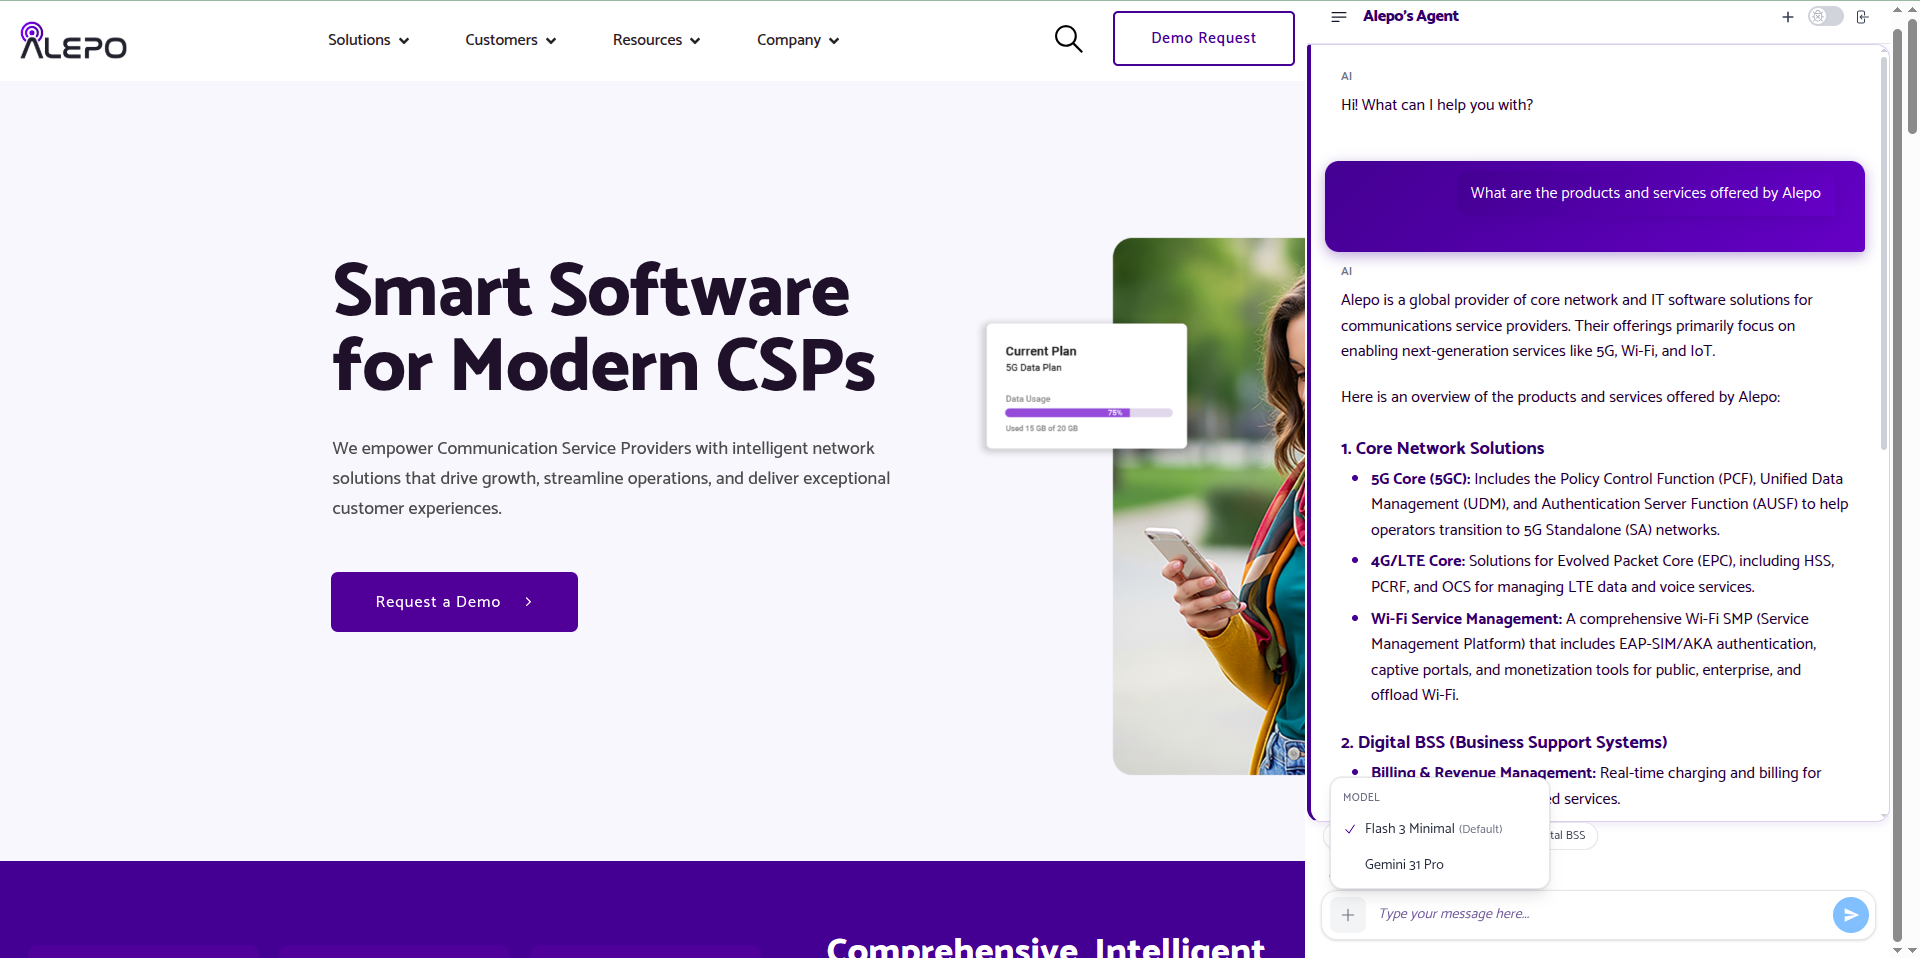
Sidebar opened on a local example host using the agent's embed script. The welcome screen, prompt shortcuts and message controls are visible.
Next Steps
Your agent is functional. Consider these modules next:
- Knowledge Bases — connect documents or Knowledge Bases (Knowledge Bases)
- Tools & Artifacts — add retrieval, API calls, and document generation (Tools & Artifacts)
- Prompt Shortcuts — create quick actions for common tasks (Prompt Shortcuts)
- Voice — enable speech and realtime voice (Voice)
- Behavior Flags — turn on debugging, attachments, transcripts and more (Behavior Flags)
- Look & Feel — brand your agent's appearance (Look & Feel)
For the full module system, see Agent Builder - Advanced Configuration.
Related Topics
- Agent Builder - Advanced Configuration - The module system and every optional module
- Agent Builder - Full reference for every section and field
- Agent Reports - Monitor agent performance and analytics
- Agent's Look & Feel - Customize branding and appearance
- Cloning an Agent - Duplicate and modify existing agents
- Version Control - Manage agent versions and rollback