Agent Builder - Advanced Configuration
The module system and every optional module you can add to an agent.
Overview
Beyond the mandatory Identity and Brain core, everything in the Agent Builder is a module — a self-contained section you add only when you need it.
This guide covers the module system itself and then each module in turn. For the core setup, see Agent Builder - Basic Configuration.
The Module System
Adding a Module
Click Add a section in the left Agent sections sidebar. Search by section name or browse the groups, then click Add beside a section. Added sections remain listed with an Added indicator.
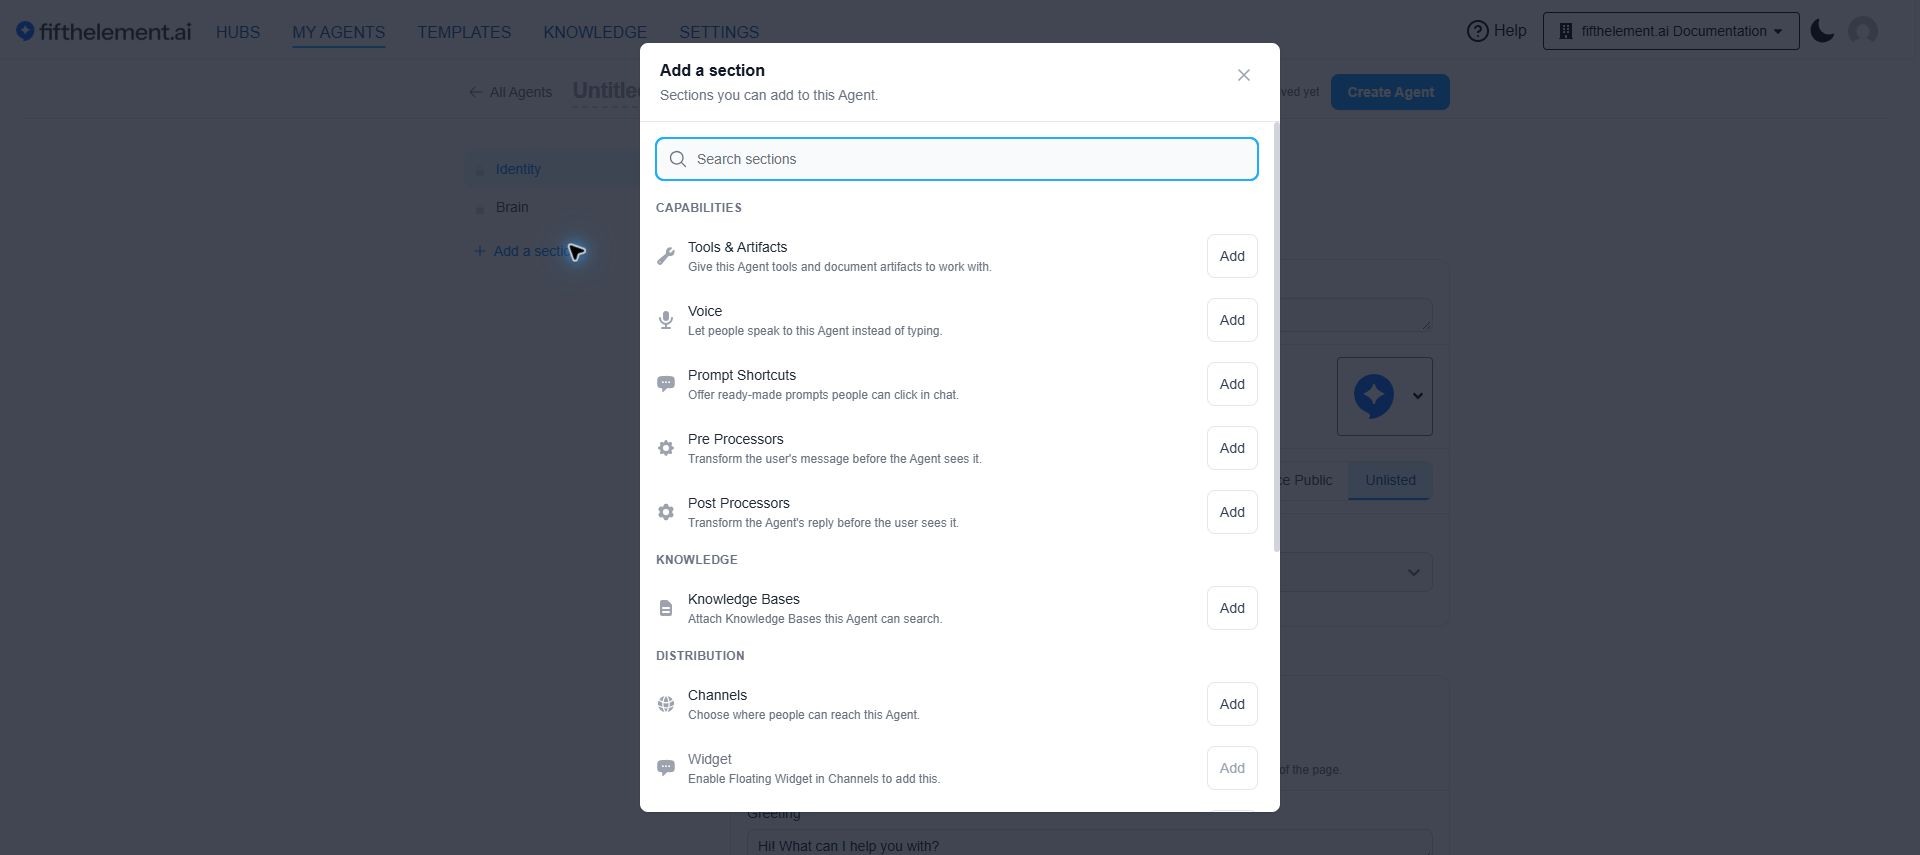
Modules are grouped by intent — Capabilities, Knowledge, Distribution and Tuning
Modules are grouped by intent:
| Group | Modules (Chat mode) |
|---|---|
| CAPABILITIES | Tools & Artifacts, Voice, Prompt Shortcuts, Pre Processors, Post Processors |
| KNOWLEDGE | Knowledge Bases |
| DISTRIBUTION | Channels, Widget, Floating Widget Auth, Translation |
| TUNING | Behavior Flags, Advanced Model Params, Agent Parameters, Documentation |
Widget and Floating Widget Auth are unavailable until Floating Widget is enabled in Channels.
Search agents offer fewer modules
In Search mode the chooser offers Tools, Pre Processors and Post Processors under Capabilities, plus Channels and the Tuning group. Voice, Prompt Shortcuts and document Artifacts are unavailable. The Knowledge group contains Search Filters, which is added from the start.
The Agent Sections Sidebar
A sidebar on the left lists every section currently on the agent and navigates to it.
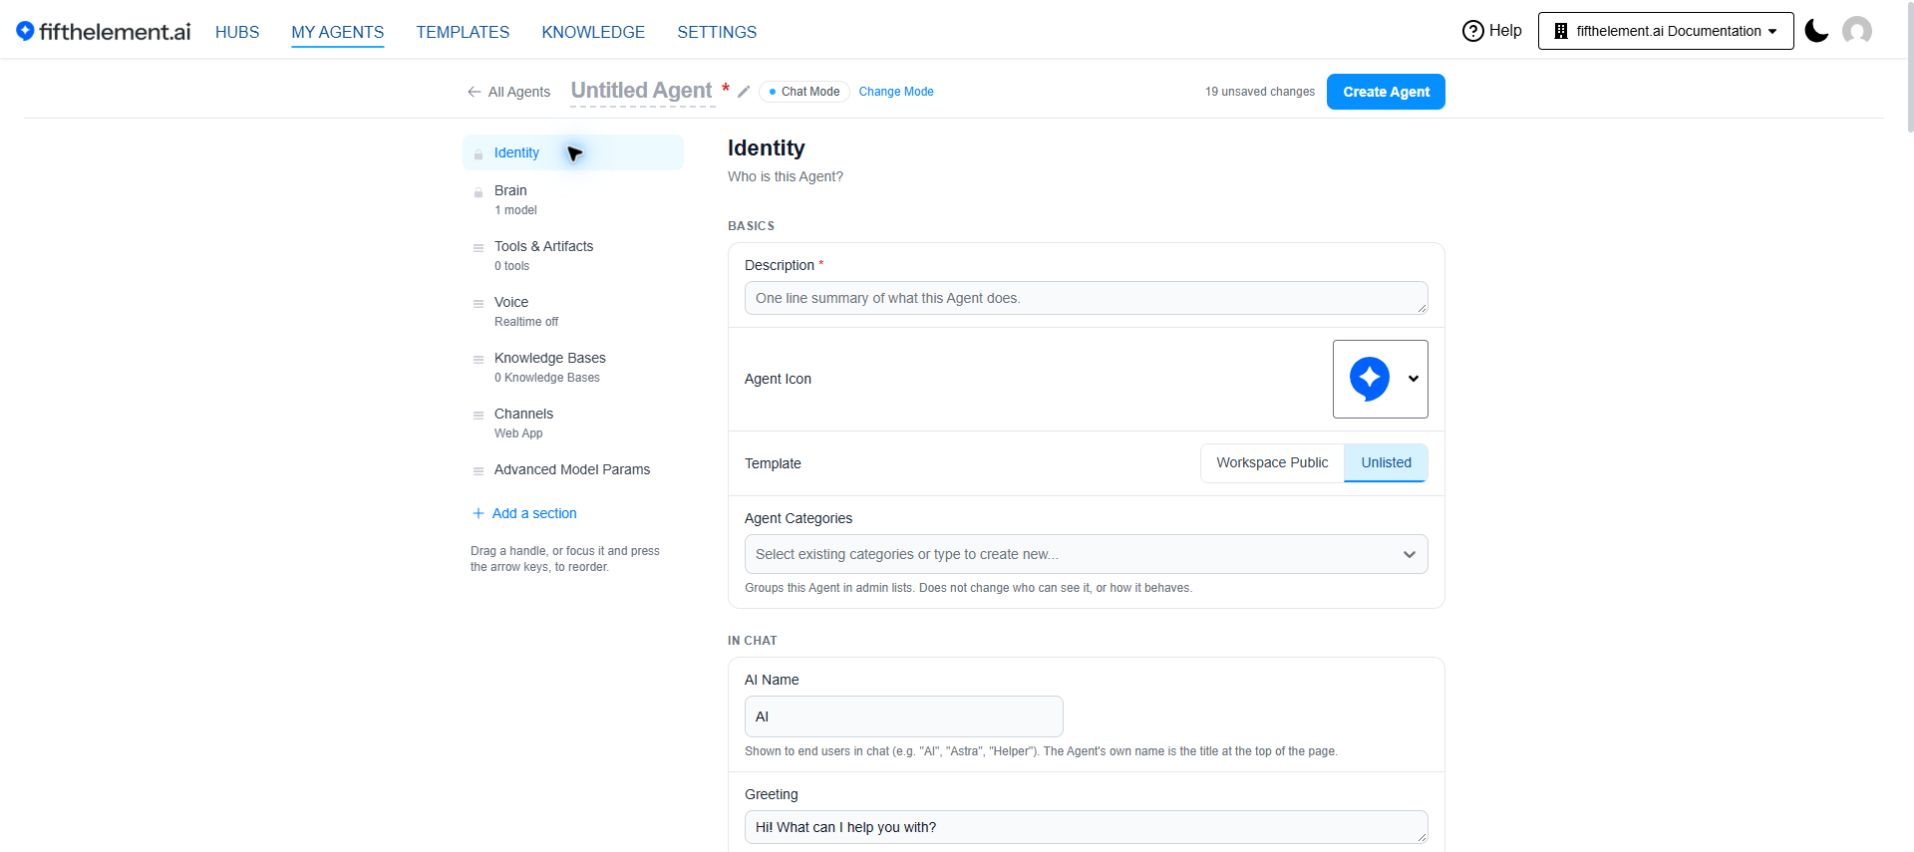
- Identity and Brain carry a lock icon — they are mandatory and cannot be removed
- Every other module carries a drag handle
- Drag the handle to reorder sections, or focus it and press the arrow keys
Removing a Module
Open an optional section's actions menu to remove it. Removing it takes its configuration off the page.
Removing a module removes its configuration
Take a module off only when the agent genuinely should not have that capability. Use Version Control to roll back if you remove one by mistake.
Brain — Advanced Instructions
When to use
Use these when you need conditional behavior based on tags, role-based special instructions, or per-message prompt manipulation. For the basic Instructions field, see Builder — Basic Configuration.
Brain holds more than the main Instructions field.
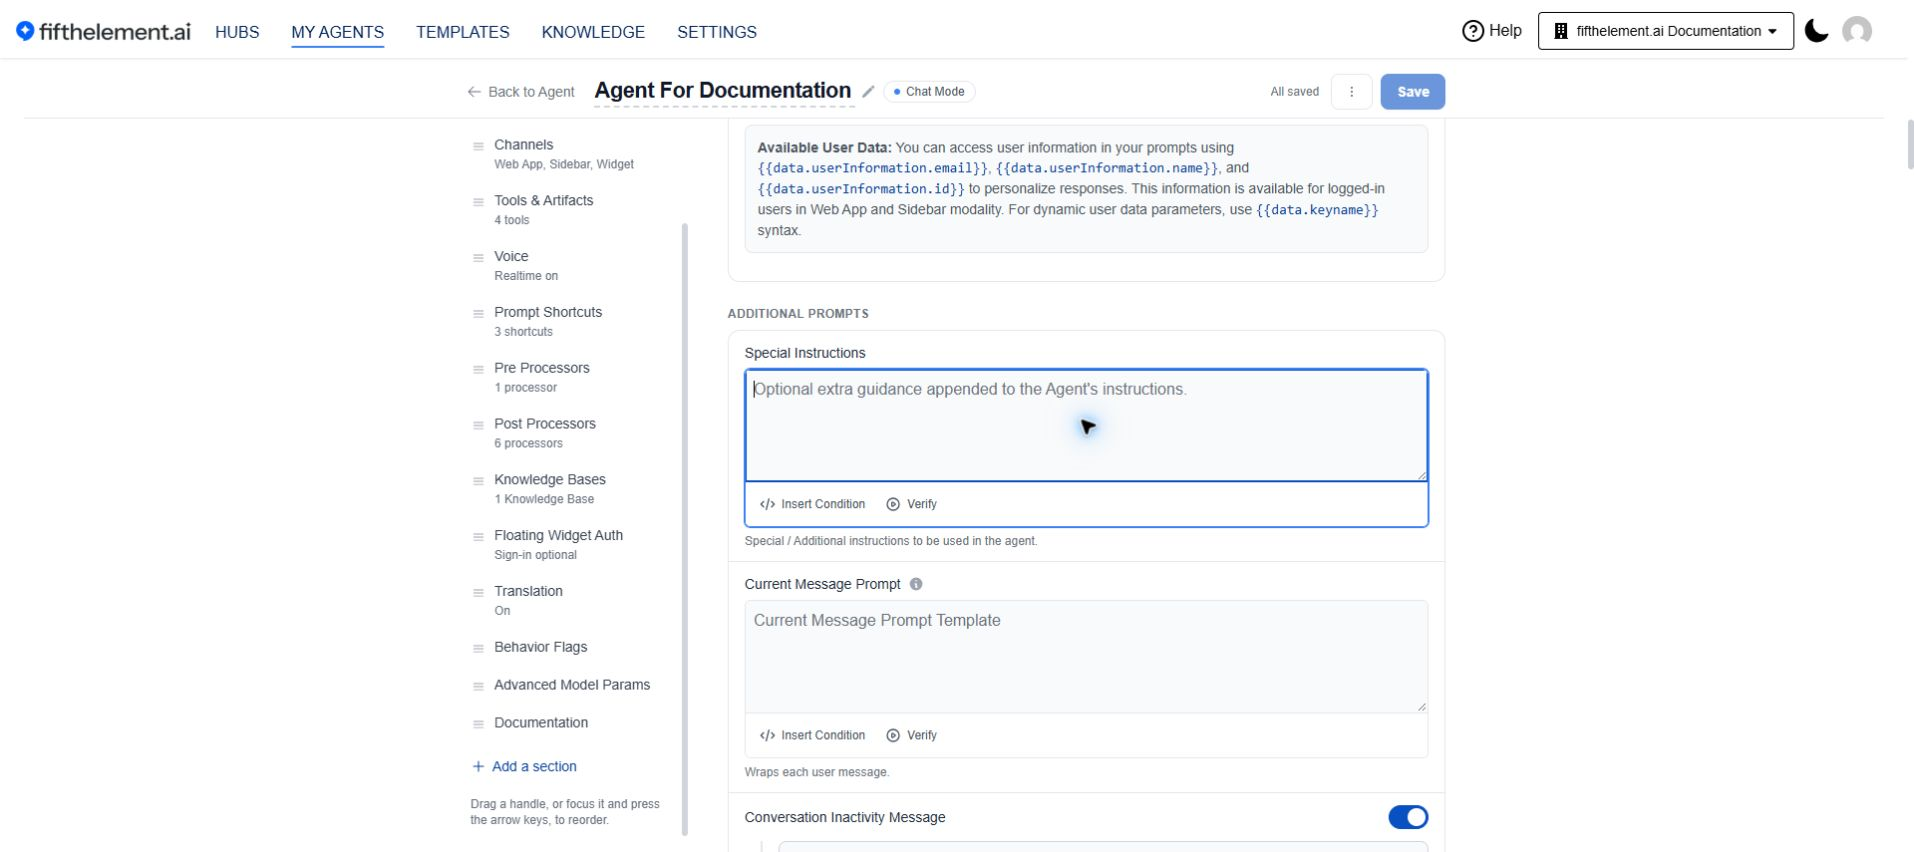
Additional prompts: Special Instructions and Current Message Prompt, each with Insert Condition and Verify.
Special Instructions
Special / additional instructions to be used in the agent. These are typically set by the Co-Admin role but can also be set by Owner, Admin, Workspace Admin, and Co-Admin.
Use {special_instructions} as a placeholder in your Agent Instructions to control where special instructions are inserted.
Current Message Prompt
A secondary mechanism to steer the agent's responses, appending or prepending instructions to each user prompt message.
- To create a dynamic prompt, use
{message}as a placeholder in your text - If
{message}is not included, the current message is appended at the end automatically
When to use
Use this when language models do not pay enough attention to the system prompt, or when attention to system prompt instructions fades over long conversations. This is a fallback mechanism — try the system prompt alone first.
Conditional Instructions
Conditional Instructions apply different instruction blocks based on tag criteria — for example a separate instruction when the user is authenticated versus unauthenticated.
They apply to Instructions, Special Instructions, and Current Message Prompt.
- Use the Insert Condition button to add a condition block
- Use the Verify button to validate the condition syntax
- Common instructions can precede conditional blocks, reducing redundancy
- Backward compatible with existing instruction sets
Conversation Inactivity Message
Enable Conversation Inactivity Message and enter the message in Brain > Additional prompts. The current help text says the message is sent exactly as written when the conversation becomes inactive.
First idle pass only
A separate tag, internal_end_of_conversation_first, fires once, on a conversation's very first idle pass. internal_end_of_conversation continues to fire on every idle pass. Use the first-idle tag when the opening wrap-up should differ from repeat ones — greeting copy, follow-up nudges, escalation rules. Both are selectable wherever tags are chosen.
Permission
Access to this setting is RBAC-controlled and provided to the Admin role by default.
Add Instruction
Click + Add Instruction to add additional instruction blocks, allowing multiple instruction sets on the same agent.
Channels
When to use
Add Channels as soon as the agent needs to be reachable. Without it there is no surface for users to interact through.
Select the channels through which users interact with your agent. Multiple channels can be enabled simultaneously.
| Channel | Description |
|---|---|
| Web App | Access the agent directly by typing its address |
| Sidebar | Use the agent as a sidebar to an internal or external website. Recommended when the agent is performing tasks on the content of the website |
| Floating Widget | Use the agent as a classic website agent, typically to assist website visitors |
A Customize widget action sits alongside them — see Look & Feel.
Web App & Sidebar Security
| Option | Description |
|---|---|
| Sign-In Required | Users must sign in before they can interact with the agent. Provides user attribution and conversation tracking |
| Sign-In Optional | Users can interact without signing in |
Tools & Artifacts
When to use
Add tools to extend your agent's capabilities beyond conversation: retrieving knowledge, calling APIs, escalating to humans, returning fixed text, or executing custom logic.
Adding Tools
Each tool appears as a row with its type badge, a Tag selector, and edit / delete actions
Click + Add Tool and pick from the tools configured for your workspace — the picker offers a search field to filter by name. Each tool appears as a row showing its name and type.
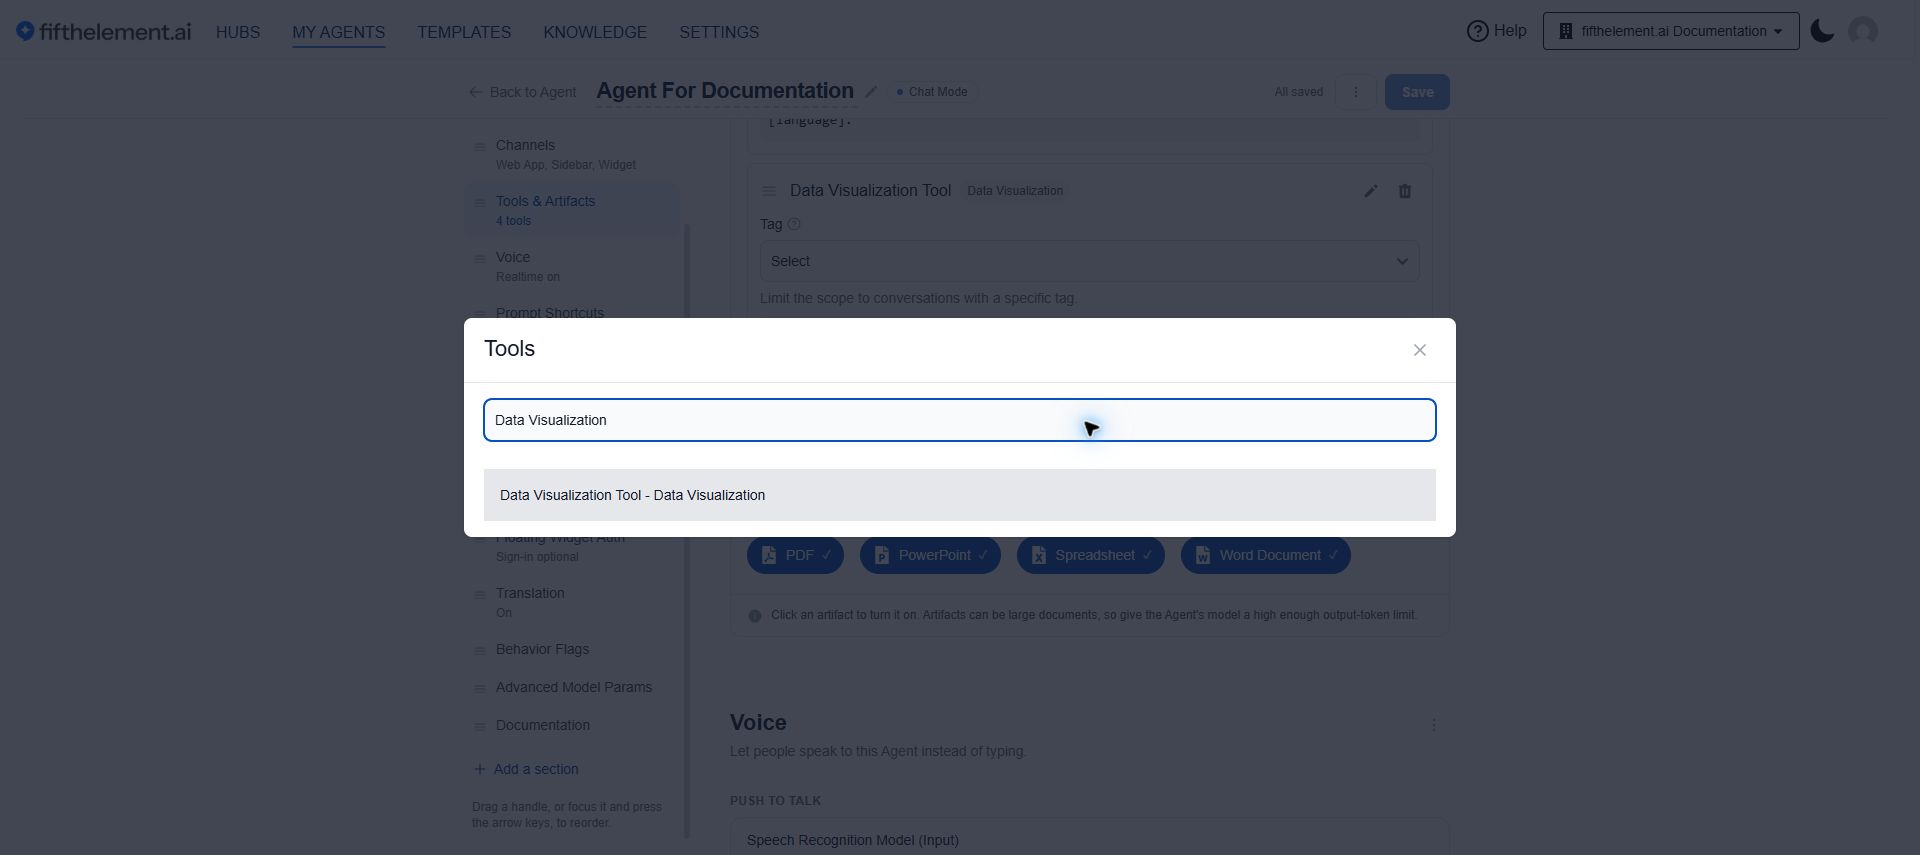
The + Add Tool picker — search, then click a tool to attach it to the agent
Tool types you will see include:
| Type | What it does |
|---|---|
| Retrieval | Queries a knowledge base |
| Context | Enables use of the Context module |
| Playbook | Returns a preconfigured block of static text — playbooks, scripts, policies — on demand |
| Webhook | HTTP tool for calling APIs. The API should respond in 10 seconds |
| Custom | JavaScript-based custom logic |
| User Memory | Reads and writes durable per-user memory |
| Data Visualization | Renders an interactive HTML visualization in the chat. Provide a description and data — the tool generates the HTML automatically using available libraries (Chart.js, Mermaid, D3, Plotly, etc.) |
For creating and configuring tools, see Settings > Tools.
Scope Limiting (Tag-Based)
When to use
Use tag-based scope limiting to control tool availability based on user authentication, subscription tier, or any custom condition.
Every tool row carries a Tag selector — "Limit the scope to conversations with a specific tag." For example, make "Transfer to Human" available only when the tag needs_escalation is present.
Improving retrieval quality
Retrieval tools show an inline reminder to add the following to your agent instructions, replacing the placeholders:
Artifacts
When to use
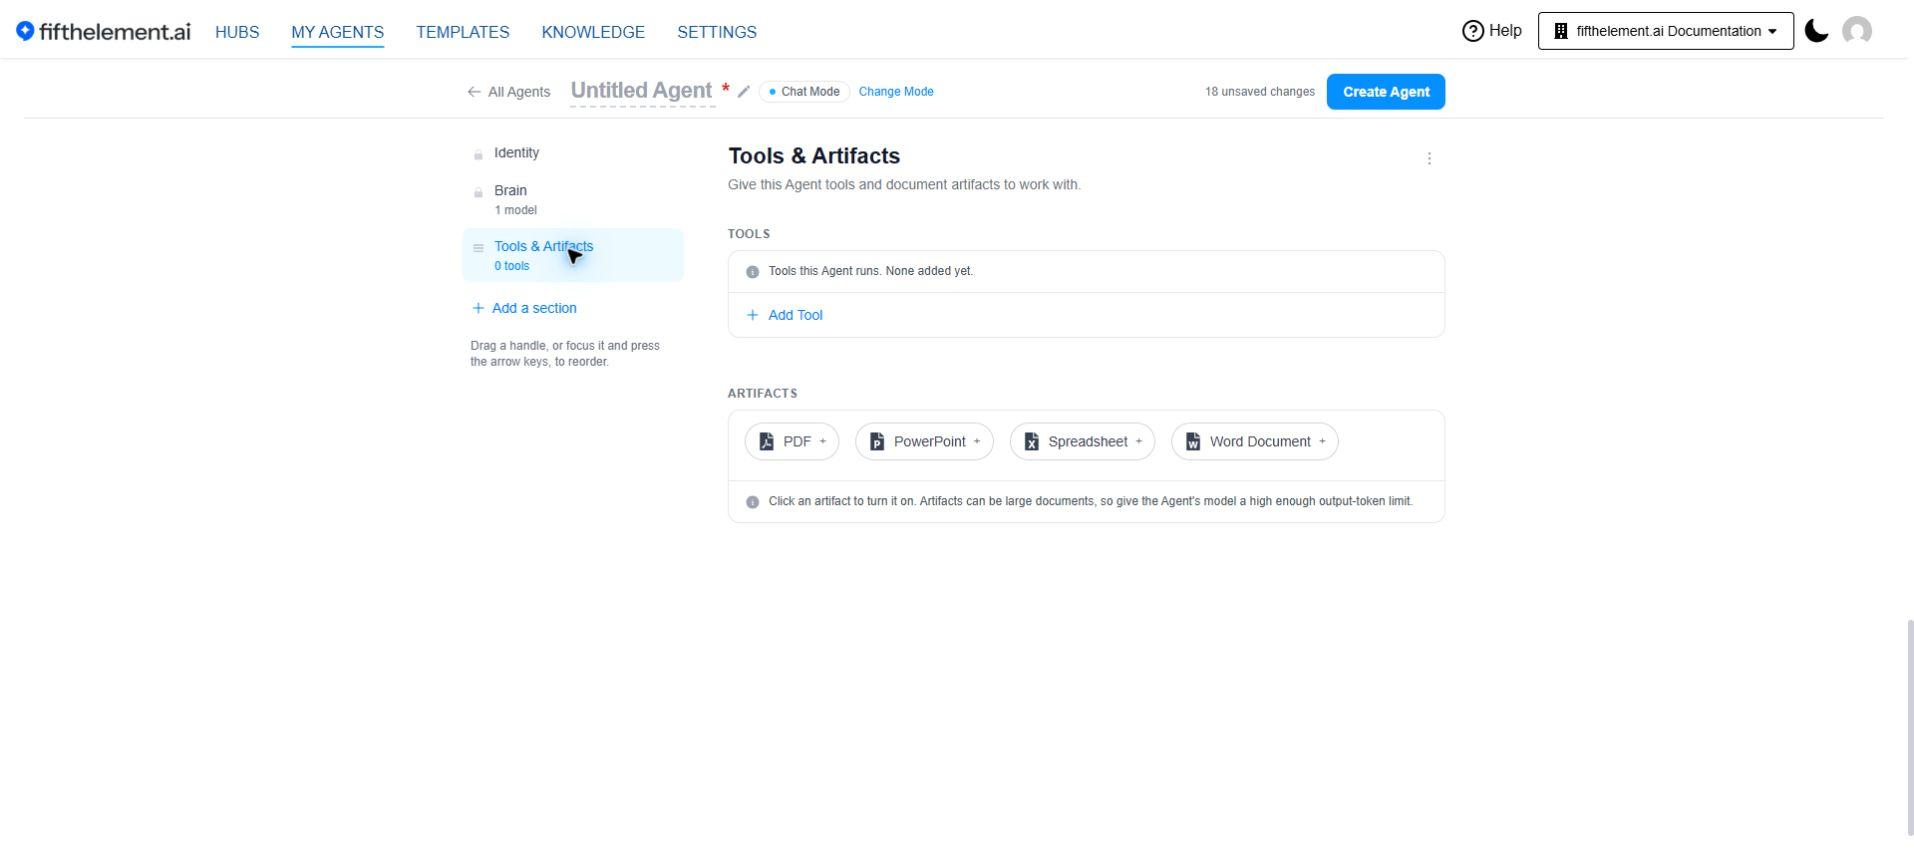
Enable Artifacts when the agent should produce downloadable document artifacts mid-conversation — PDF, Spreadsheet, PowerPoint, or Word.
An Artifact is a per-agent capability that lets the agent generate a finished document directly from a chat turn. Artifacts are defined at the Global Level, made available to a workspace, and then enabled per agent. In the Artifacts group, click PDF, PowerPoint, Spreadsheet or Word Document to toggle it on or off.
Supported artifact types: PDF, PowerPoint, Spreadsheet, Word Document.
Model-agnostic: Works across Anthropic Claude, Google Gemini, and OpenAI ChatGPT model families.
Max Output Tokens
Artifacts can be large documents. Set a sufficient output-token budget within the selected model's displayed maximum; a prefilled value may exceed that maximum. Review the per-model recommendations before saving.
RBAC
The ability to configure Artifacts on an agent is RBAC-controlled — enabled by default for the seeded Admin role.
For the full feature reference, see Artifacts.
Voice
When to use
Configure voice when deploying agents for telephone support (SIP) or web-based voice interactions (WebSocket). Essential for call center automation and voice-enabled customer support.
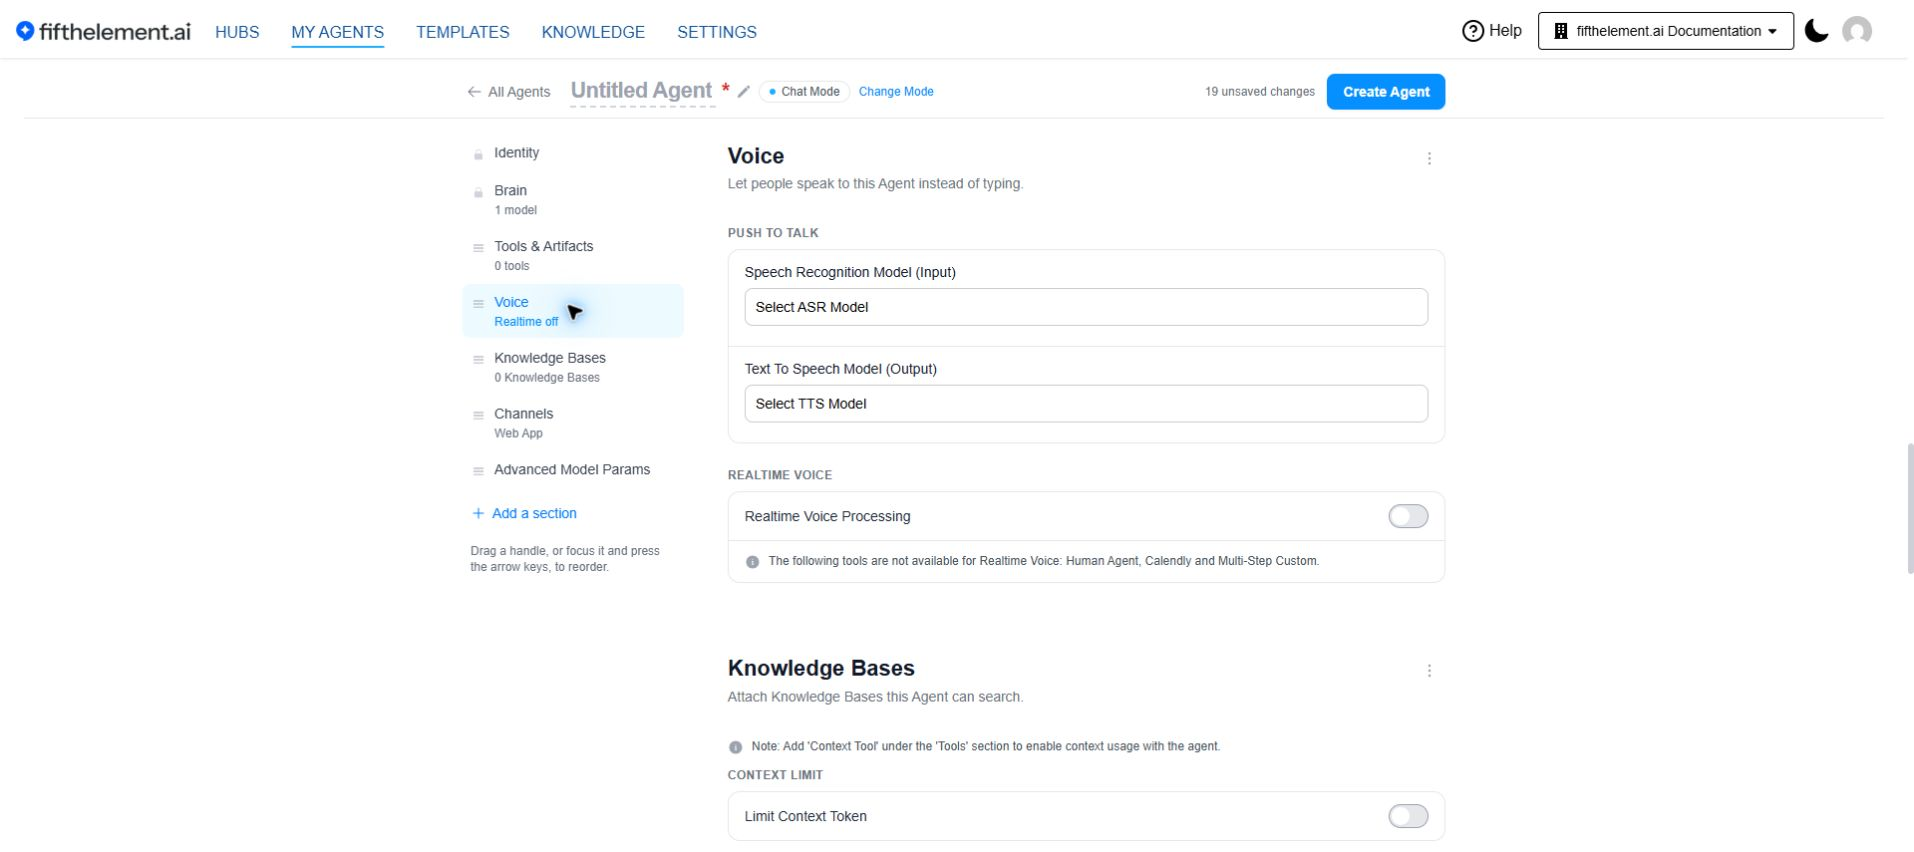
Speech Models
| Setting | Description |
|---|---|
| Push To Talk | Requires the user to hold to speak rather than streaming continuously |
| Speech Recognition Model (Input) | The ASR model that transcribes user speech. See ASR Models |
| Text To Speech Model (Output) | The TTS model that voices agent replies. See TTS Models |
Realtime Voice
Tool restrictions
The following tools are not available for Realtime Voice: Human Agent, Calendly and Multi-Step Custom.
| Setting | Description |
|---|---|
| Realtime Voice Processing | Enable / Disable. Turns on speech-to-speech handling |
| Launch in Voice Mode by Default | Enable / Disable. When enabled, opening the agent lands the user straight on the voice screen — Tap to start voice conversation — with a Continue with text chat link for anyone who prefers typing. Ships set to Disable, so existing agents are unaffected |
| Realtime Voice Model (Includes AI Listens) | Required. The realtime model used for voice interactions. See the help icon for runtime tags and AI Listens |
| SIP Realtime Voice Processing | Enable / Disable. For telephone/SIP integration and inbound/outbound call handling |
| Websocket Realtime Voice Processing | Enable / Disable. For browser-based voice chat and web applications requiring real-time voice responses |
Language models and voice
Language Models configured in Brain are not used during Realtime Voice interactions — the realtime model handles the turn end to end.
For realtime model configuration, including xAI Grok Voice, see Realtime Voice.
Prompt Shortcuts
When to use
Use shortcuts for common tasks, frequently asked questions, or guided workflows. They improve user experience by reducing typing and providing clear action paths.
Prompt Shortcuts are predefined prompts displayed as buttons in the end-user chat interface. Only the label is visible to the end user — not the prompt behind it.
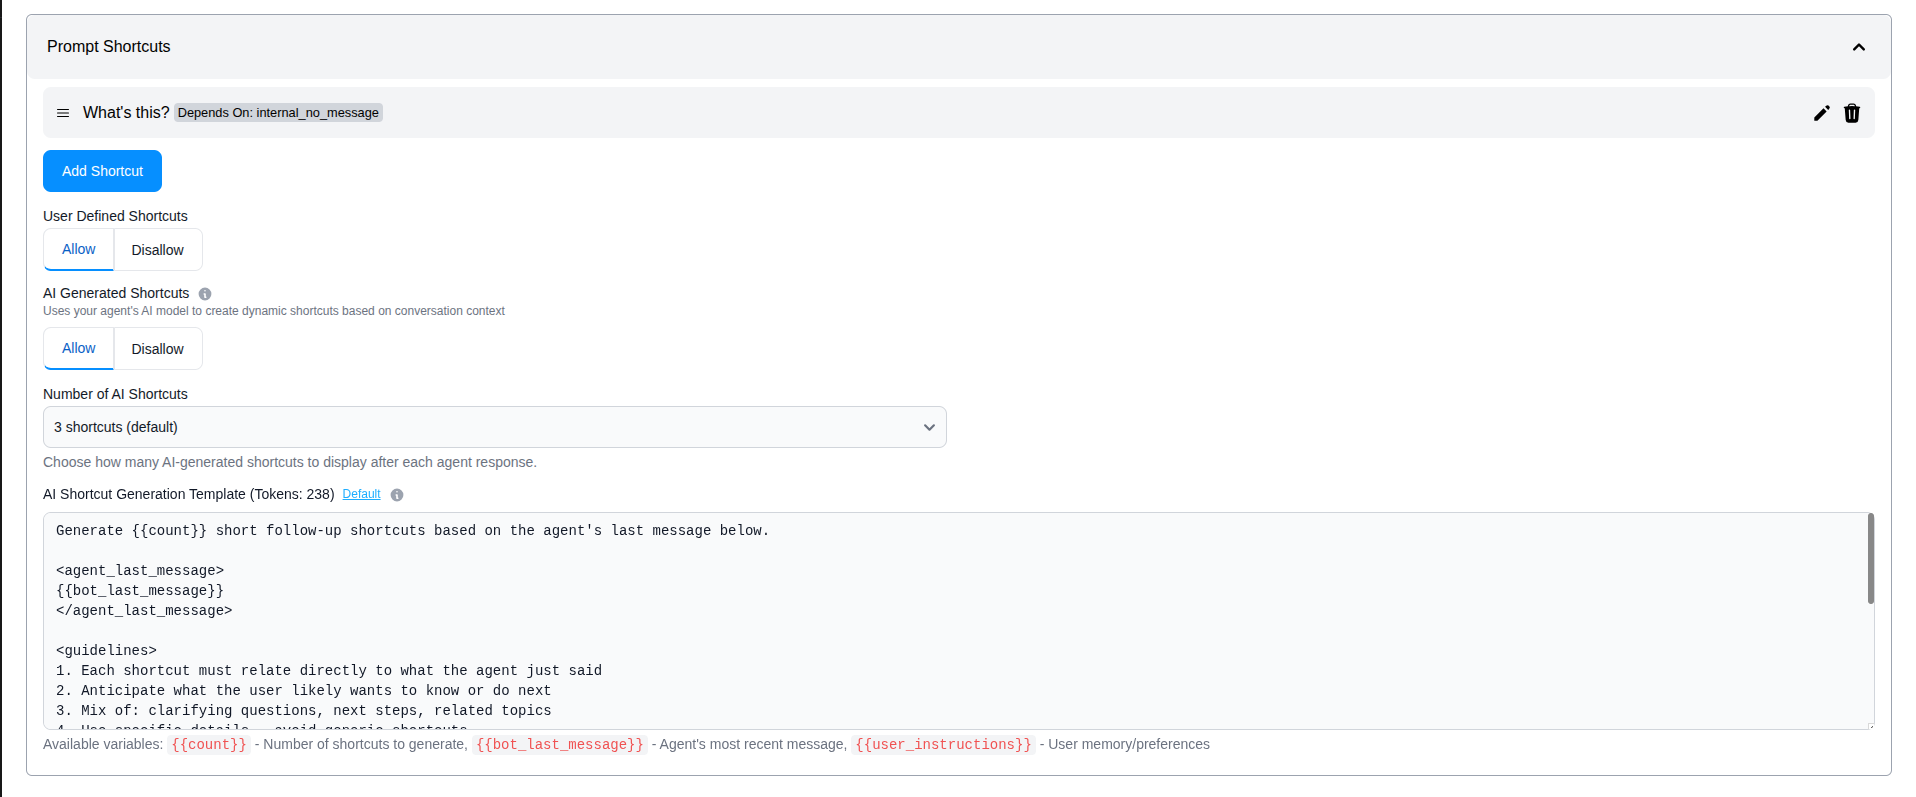
Shortcut Configuration Fields
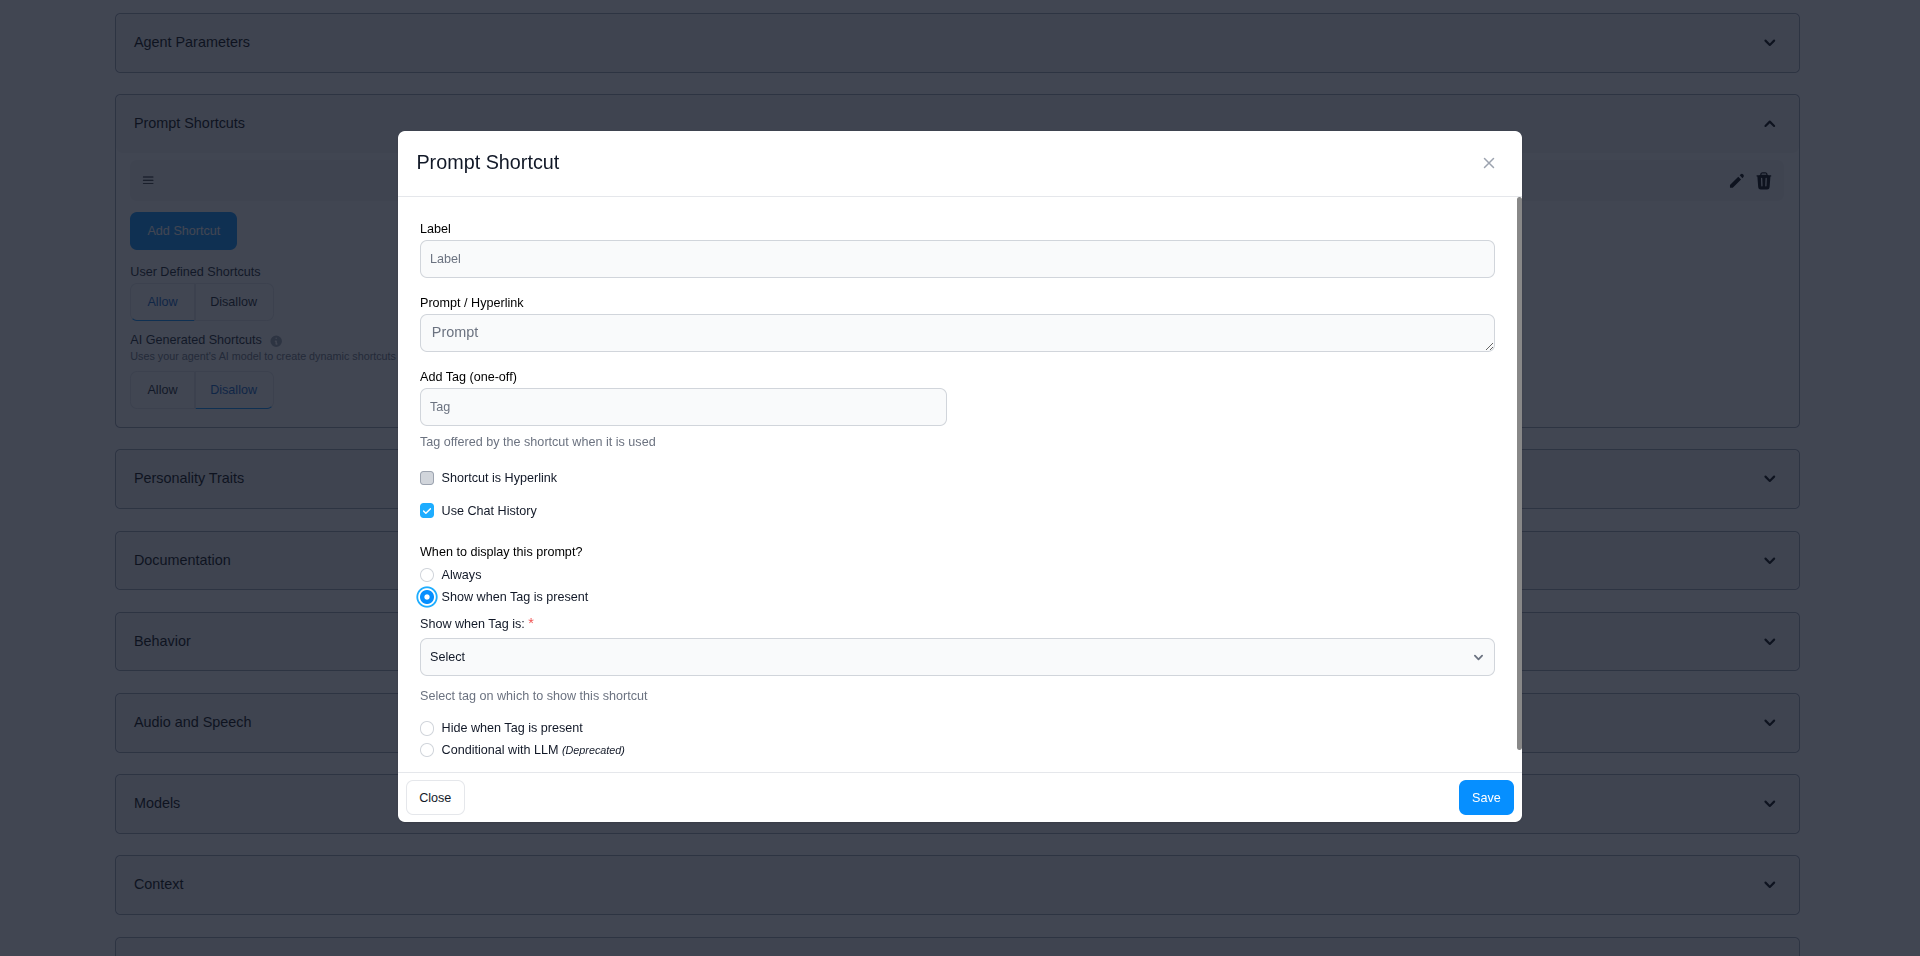
| Field | Required | Description |
|---|---|---|
| Label | Yes | Brief text displayed on the button. Should be concise and indicate what to expect |
| Prompt / Hyperlink | Yes | The actual prompt sent when clicked. If "Shortcut is Hyperlink" is enabled, this becomes a URL that opens in a new tab |
| Add Tag (one-off) | No | A tag offered by the shortcut when it is used. Useful for tracking which shortcuts users click |
| Shortcut is Hyperlink | No | When checked, the shortcut opens the URL in a new tab instead of sending a prompt |
| Use Chat History | No | Include conversation history when using this shortcut |
When to Display This Prompt
| Option | Description |
|---|---|
| Always | Shortcut is always shown in the chat |
| Show when Tag is present | Only visible when a specific tag is active on the session |
| Hide when Tag is present | Hidden when a specific tag is active — shown otherwise |
| Conditional with LLM (Deprecated) | LLM decides whether to show the shortcut. Deprecated and will be removed in a future release |
Use Case
Show different shortcuts based on user authentication status. Use a pre-processor to set authenticated / unauthenticated tags, then:
- "View My Account" → Show when Tag is present:
authenticated - "Sign Up for Free" → Hide when Tag is present:
authenticated
User Defined Shortcuts
Turn the switch on or off. End users can create their own shortcuts for messages they use frequently.
How end users create shortcuts:
- Within the chat interface, hover over or select a message from chat history
- A + icon appears on the right side of the message
- Click or tap and hold the icon to create a shortcut
- The agent auto-generates a short label based on the message
- The shortcut appears at the end of the chat area
Managing user shortcuts:
- Edit: Click and hold the shortcut to edit the label inline
- Delete: Click the trash can icon that appears when editing
- Mobile: Long press on a message to create a shortcut
AI Generated Shortcuts
Turn the switch on or off. Uses your agent's AI model to create dynamic shortcuts based on conversation context.
| Setting | Description |
|---|---|
| Number of AI Shortcuts | How many AI-generated shortcuts to display after each agent response — 1 to 5, default 3 shortcuts |
| AI Shortcut Generation Template | The prompt that defines how the AI anticipates user needs. Default restores the built-in wording, and a live token count is displayed |
Available template variables:
| Variable | Description |
|---|---|
{{count}} | Number of shortcuts to generate |
{{bot_last_message}} | Agent's most recent message |
{{user_instructions}} | User memory/preferences |
Initial Session Tagging
A system-level tag internal_no_message is automatically applied at conversation start and removed on the first user message. Use it to trigger initial prompt shortcuts before a user has typed anything — for example, a welcome menu of options.
Pre Processors
When to use
Use pre processors when you need dynamic agent behavior based on user authentication, location, subscription status, or any runtime context.

Pre Processors run before the agent handles the user query. Script Pre Processor can set tags using JavaScript; OpenAI Moderation and Prompt Classifier provide other processing options. Configure the selected type in Settings before attaching it here.
Workflow:
- User sends a message
- Pre Processor executes (JavaScript snippet)
- Pre Processor returns tags based on logic
- Tags determine agent behavior, shortcuts visibility, tool availability
- Query is sent to the LLM with tag context
Steps:
- Configure the pre processor in Settings (see Settings > Processors)
- Click + Add Pre Processor
- Select the configured pre processor from the list
- Review the attached processor and any displayed tags. Tag-generation logic belongs to its configuration in Settings.
Static Agent Tags
Static tags are predefined labels set by agent administrators to customize agent behavior and appearance without modifying the underlying template. These tags can enable or disable specific features.
Use Case: Identity-Based Display Tags
Use a trusted identity field to choose which shortcuts to display. These custom tags do not authenticate a user or grant access to protected data.
// preprocessor example
const subscriberid = ld.get(data, 'user_data.subscriberid', null);
if (typeof subscriberid === "string" && subscriberid.trim().length > 0) {
  ctx.addTag('authenticated');
} else {
  ctx.addTag('unauthenticated');
}
- Tag:
authenticated→ Shows "View My Account", "Order History" shortcuts - Tag:
unauthenticated→ Shows "Sign Up", "Learn More" shortcuts
Post Processors
When to use
Use post processors for quality assurance, compliance checking, sentiment analysis, conversation summarization, or post-conversation analytics.

Post Processors analyze agent responses by sending them to an LLM for evaluation, quality checks, or additional processing. Click + Add Post Processor to attach one.
Turn Post Processor
Executes after each user-agent exchange, analyzing individual responses in real time.
Use cases: sentiment analysis per response, compliance checking, quality scoring, real-time flagging.
Conversation Post Processor
Executes after the conversation goes idle, triggered by the Conversation Inactivity Duration.
Use cases: overall conversation summary, CSAT prediction, conversation categorization, post-conversation analytics.
See Settings > Processors for configuration.
Knowledge Bases
When to use
Add context when your agent needs to reference specific information: documents, knowledge bases, product data, or company policies. Essential for RAG use cases.
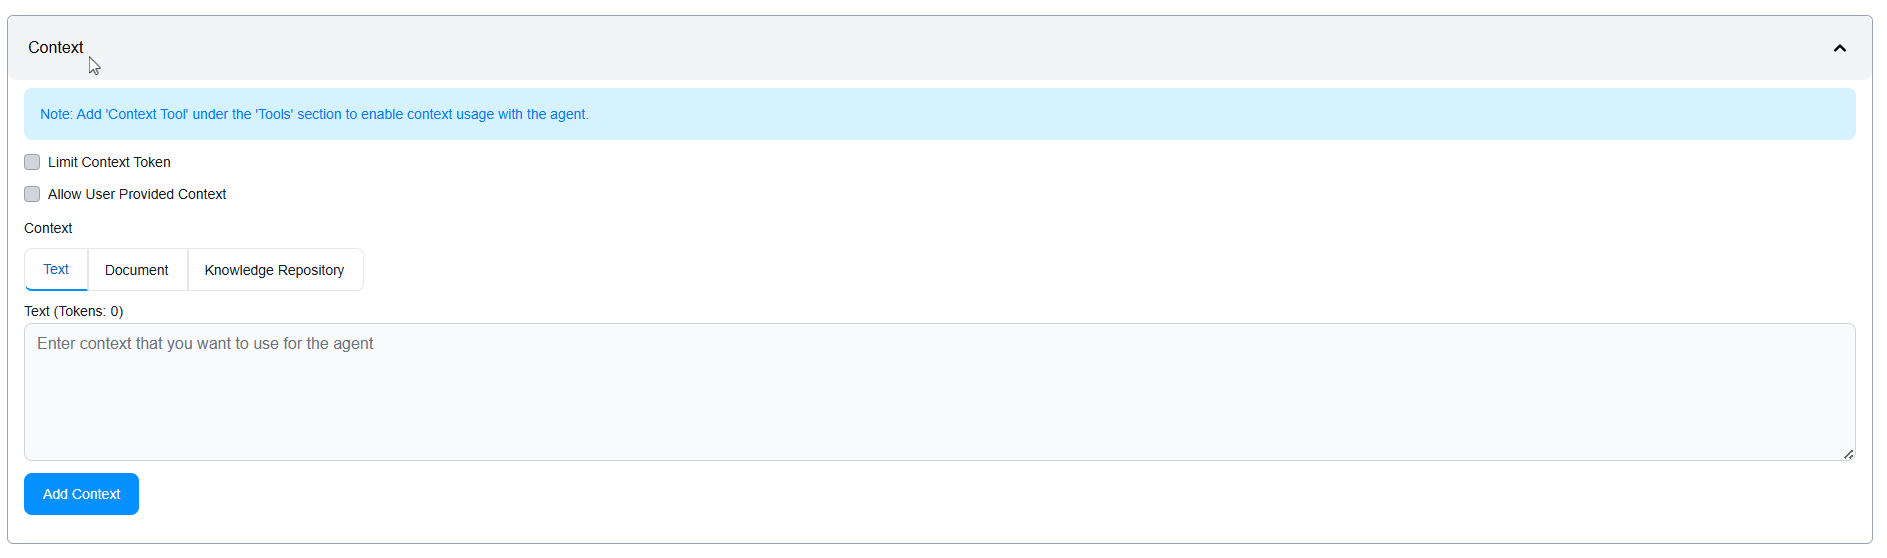
Context needs a tool
Add the Context Tool under Tools & Artifacts to enable context usage with the agent.
Context Types
Choose a type under Retrieval > Context:
| Type | Description | When to use |
|---|---|---|
| Text | Direct text input, with a token count displayed | Quick facts, guidelines, policies, or small amounts of structured data that don't change frequently |
| Document | Upload a document, processed and embedded for retrieval | User manuals, technical documentation |
| Knowledge Base | Use an existing knowledge base | Large-scale knowledge bases, full documentation sites, FAQs, support articles |
Use Connected Knowledge Bases > Add Knowledge Base to attach bases the agent can search.
Context Options
| Setting | Description |
|---|---|
| Limit Context Token | Restricts context size to prevent exceeding model limits. Recommended for cost control |
| Context Token Limit | The cap itself. If the available tokens are less than the limit defined, the available tokens are used |
| Use Dynamic Context from the Webpage for Floating Widget/Sidebar Agent | Lets the agent read the host page's content at runtime |
Behavior Flags
When to use
Configure behavior flags to fine-tune debugging, cost display, feedback, conversation encryption, analytics, and more.
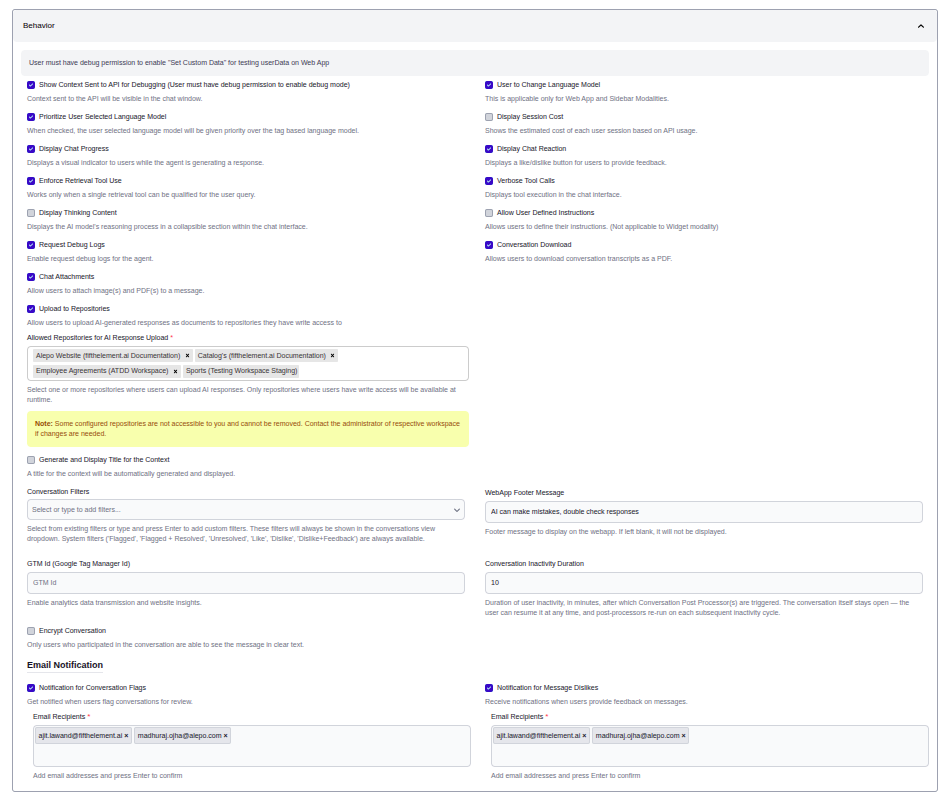
Debug Permission
User must have debug permission to enable "Set Custom Data" for testing userData on Web App.
Debug and Development
| Setting | Description |
|---|---|
| Show Context Sent to API for Debugging | Context sent to the API will be visible in the chat window. User must have debug permission to enable debug mode |
| Show What the Agent is Doing | Displays tool execution in the chat interface |
| Request Debug Logs | Enable request debug logs for the agent |
| Display Thinking Content | Displays the AI model's reasoning process in a collapsible section within the chat interface |
What Show What the Agent is Doing shows
While a tool or sub-agent runs, the chat shows an animated indicator plus a short AI-generated phrase describing the current step — for example "Searching for available offer letters" or "Considering User Input" — rather than a stack of static "Using <ToolName>…" rows. Turn the flag off for agents where that step detail is unwanted.
Language Model Control
| Setting | Description |
|---|---|
| User to Change Language Model | Allows users to switch language models. Applicable only for Web App and Sidebar modalities |
| Prioritize User Selected Language Model | When checked, the user-selected model takes priority over tag-based language model selection |
User Experience
| Setting | Description |
|---|---|
| Display Session Cost | Shows the estimated cost of each user session based on API usage |
| Include Tokens in Price Info | Token count for the session will be visible |
| Display Chat Progress | Displays a visual indicator to users while the agent is generating a response |
| Display Chat Reaction | Displays a like/dislike button for users to provide feedback |
| Enforce Retrieval Tool Use | Works only when a single retrieval tool can be qualified for the user query |
User Capabilities
| Setting | Description |
|---|---|
| Allow User Defined Instructions | Allows users to define their instructions. Not applicable to Widget modality. Requires the {user_instructions} placeholder in agent instructions |
| Conversation Download | Allows users to download conversation transcripts as a PDF |
| Chat Attachments | Allow users to attach image(s) and PDF(s) to a message |
| Upload to Knowledge Bases | Allow users to upload AI-generated responses as documents to repositories they have write access to |
When Upload to Knowledge Bases is enabled, configure Allowed Knowledge Bases — one or more knowledge bases where users can upload AI responses. Only knowledge bases where users have write access are available at runtime.
Inaccessible repositories
Some configured repositories may not be accessible to you and cannot be removed. Contact the administrator of the respective workspace if changes are needed.
Context and Title Generation
| Setting | Description |
|---|---|
| Generate and Display Title for the Context | A title for the context will be automatically generated and displayed |
| Dynamic Title Prefix | A specified prefix added before the automatically generated title |
| Context Token Limit for Dynamic Title Generation | Context sent for title generation is restricted based on the provided value |
Conversation Management
| Setting | Description |
|---|---|
| Conversation Filters | Select from existing filters or type and press Enter to add custom ones. These are always shown in the conversations view dropdown. System filters (Flagged, Flagged + Resolved, Unresolved, Like, Dislike, Dislike+Feedback) are always available |
| WebApp Footer Message | Footer message to display on the webapp. If left blank, it is not displayed |
| Conversation Inactivity Duration | Duration of user inactivity, in minutes, after which Conversation Post Processor(s) are triggered. The conversation itself stays open — the user can resume it at any time, and post-processors re-run on each subsequent inactivity cycle. See Continuous Conversations |
Security and Encryption
Encrypt Conversation — only users who participated in the conversation are able to see the message in clear text. Supervisors monitoring conversations see encrypted values.
| Encryption Type | Description |
|---|---|
| Encrypt PII | Only PII data in the message will be encrypted |
| Encrypt Message | The entire message will be encrypted |
Analytics
GTM Id (Google Tag Manager Id) — enable analytics data transmission and website insights. Tracks agent events like widget open, message sent, AI response received, new conversation created, and sharing of conversation transcripts.
Email Notification
Prerequisite
Both options require SMTP to be configured for the workspace. Otherwise the section reads "SMTP not enabled. Please contact administrator."
| Setting | Description |
|---|---|
| Notification for Conversation Flags | Get notified when users flag conversations for review. Add email addresses and press Enter to confirm |
| Notification for Message Dislikes | Receive notifications when users provide feedback on messages. Only visible if Display Chat Reaction is enabled |
Administrators can customize notification email templates from Settings > Templates > Email Template for both "Conversation Flag" and "Message Dislike" notifications.
Advanced Model Params
When to use
Use this module to control how much conversation history reaches the model, how oversized context is handled, and which cheaper models run the supporting steps.
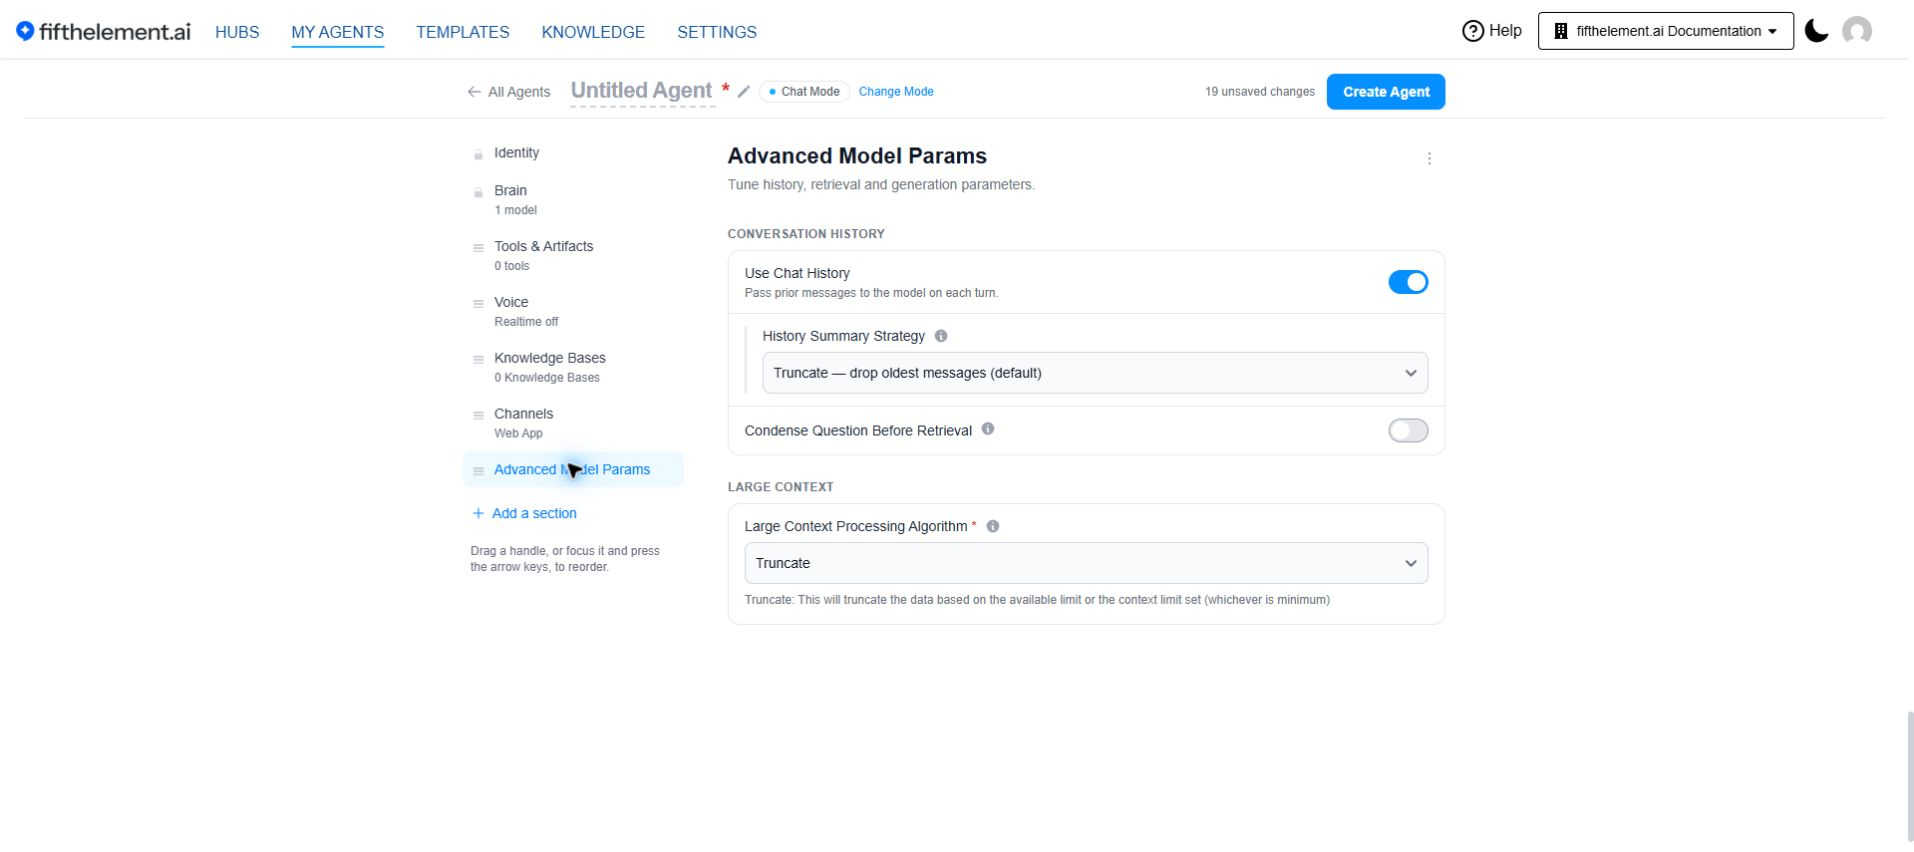
Chat History
| Setting | Description |
|---|---|
| Use Chat History | Pass prior messages to the model on each turn |
| History Summary Strategy | Truncate — drop oldest messages (default), or Summarize — keep a rolling summary of older messages |
| Summarizer Model | Required when summarizing. Which model runs the summary step |
| History Summary Instructions | Instructions for the model that maintains the running history summary |
Pick a cheap summarizer
The summarizer only condenses past messages, so you don't need your most capable reasoning model for it — a faster, cheaper model is usually the right call. The primary chat turn still runs on the agent's configured model.
The summary step runs once per turn that crosses the history token threshold, folding the dropped messages into the conversation's rolling summary. Default restores the built-in wording. Keep {max_summary_tokens} where you want the summary size cap — it is replaced with the live value on every call.
Retrieval
| Setting | Description |
|---|---|
| Condense Question Before Retrieval | Rewrites the user's question into a standalone query before retrieval runs |
| Condense-Question Model | Required when condensing. Which model performs the rewrite |
Large Context Processing Algorithm
Required. Controls how the agent handles context that exceeds the allowed token count.
| Algorithm | Description | When to use |
|---|---|---|
| Truncate | Cuts off context when it exceeds model limits. Fast and simple | Short conversations, simple queries, FAQ agents |
| LLM Prompt Chaining | Breaks large contexts across multiple prompts | Complex, multi-step tasks requiring extensive context |
| Embeddings | Embeds the context temporarily based on the embedding model selected | Knowledge-intensive agents with RAG capabilities |
Embeddings and repositories
Embeddings are not supported for repository context.
Embedding Model — required when the Embeddings algorithm is selected.
Widget
When to use
Configure this when the agent is deployed as a Floating Widget.
| Setting | Description |
|---|---|
| Allow Users to Start a New Conversation | Shows a "New conversation" button in the widget toolbar |
| Error Message | Shown in the widget when the Agent cannot respond |
| Allowed Domains | Comma-separated hostnames. Leave blank to allow all origins |
For visual customization, see Look & Feel.
Floating Widget Auth
When to use
Add this when the Floating Widget needs to know who the user is.
Choose Authentication Mode:
| Option | Description |
|---|---|
| No Authentication | No authentication required. All users can access the agent without logging in |
| Required Login | Users must complete internal authentication to interact with the agent |
| Optional Login | Users can choose to interact in authenticated or unauthenticated mode |
Widget Authentication
Widget authentication uses internal, email-based authentication. A working SMTP configuration on the workspace is required for sending authentication codes. When enabled, the system tags internal_authenticated and internal_unauthenticated become available for conditional behavior.
Documentation
When to use
Add user-facing documentation when deploying agents in Web App or Sidebar modalities. Helps users understand agent capabilities and how to get the best results.

Title and rich-text Content on a staging example agent. The example content describes its own fictional product.
Users open this content from the documentation button in the Web App header. Its label follows the configured Title; this example uses About this Agent.
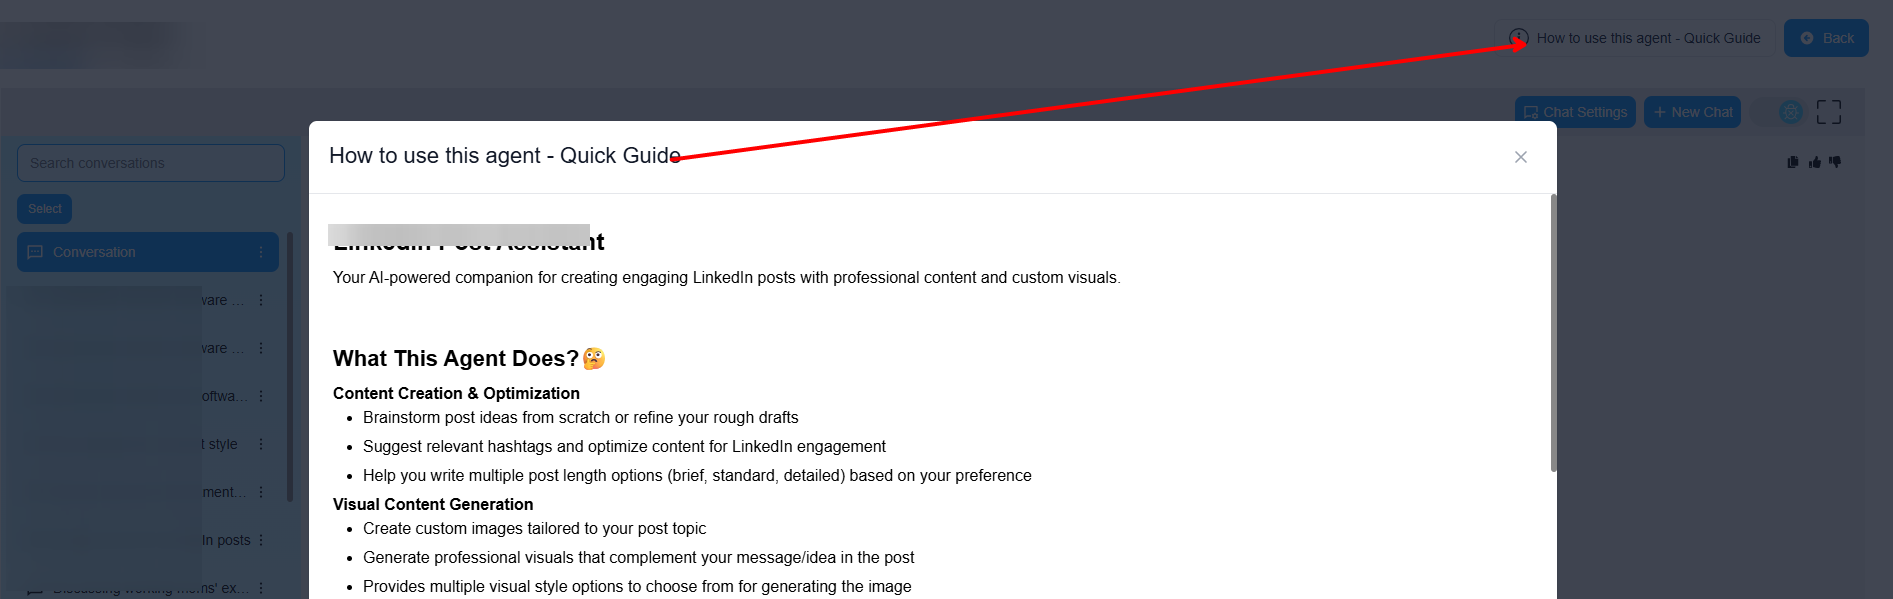
Title — the title displayed above the documentation. For example "Quick Start Guide", "Agent Capabilities", "How to Use".
Content — rich text. Recommended content:
1. Agent Purpose:
This agent helps you find information about our products,
troubleshoot common issues, and connect with support.
2. What It Can Do:
✓ Answer product questions
✓ Provide troubleshooting steps
✓ Search documentation
✓ Escalate to human agents
3. How It Works:
1. Ask your question in natural language
2. The agent will search our knowledge base
3. Receive instant answers with source links
4. Use shortcuts for common tasks
4. Best Practices:
• Be specific in your questions
• Use shortcuts for faster results
• Provide error messages when troubleshooting
• Rate responses to help improve the agent
5. Limitations:
This agent cannot:
- Process refunds (contact support@company.com)
- Modify account settings directly
- Provide pricing quotes (contact sales)
Welcome Screen HTML
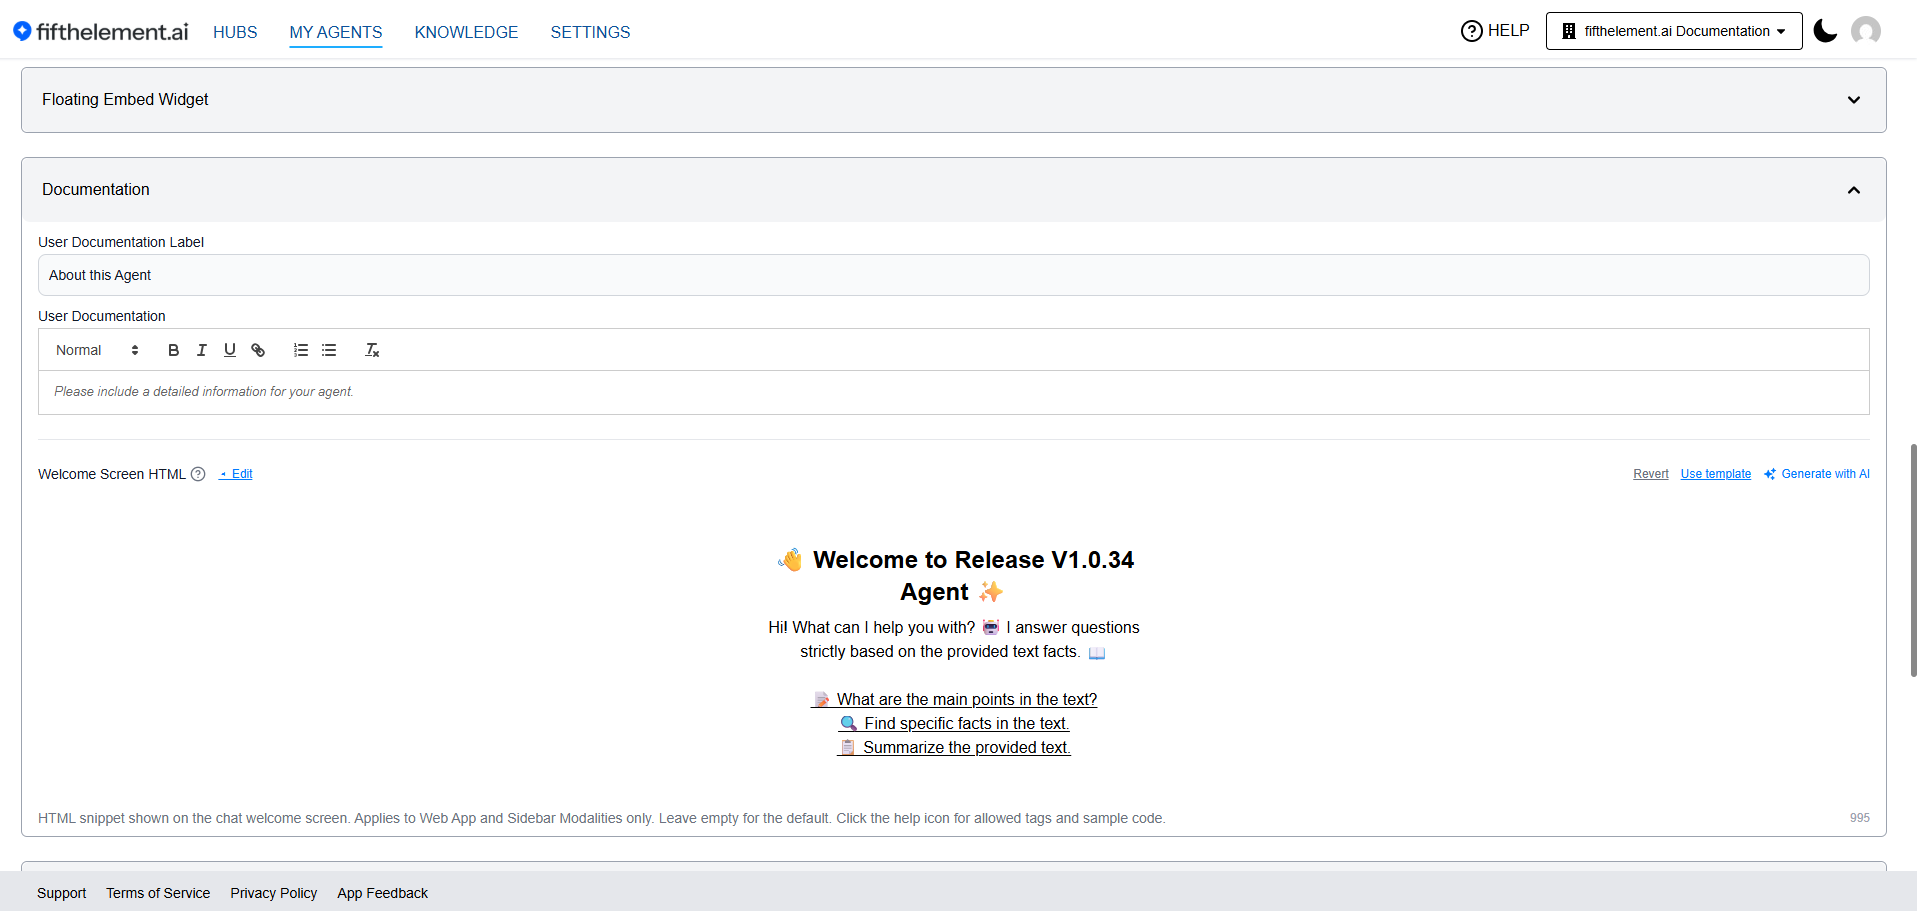
Replaces the blank state shown on a new chat with a configurable Welcome Screen. Admins author the landing experience — a greeting, a short description of the agent's purpose, documentation, suggested starter questions, or anything else users should see first. Applies to Web App and Sidebar modalities only; leaving it empty preserves the default empty state.
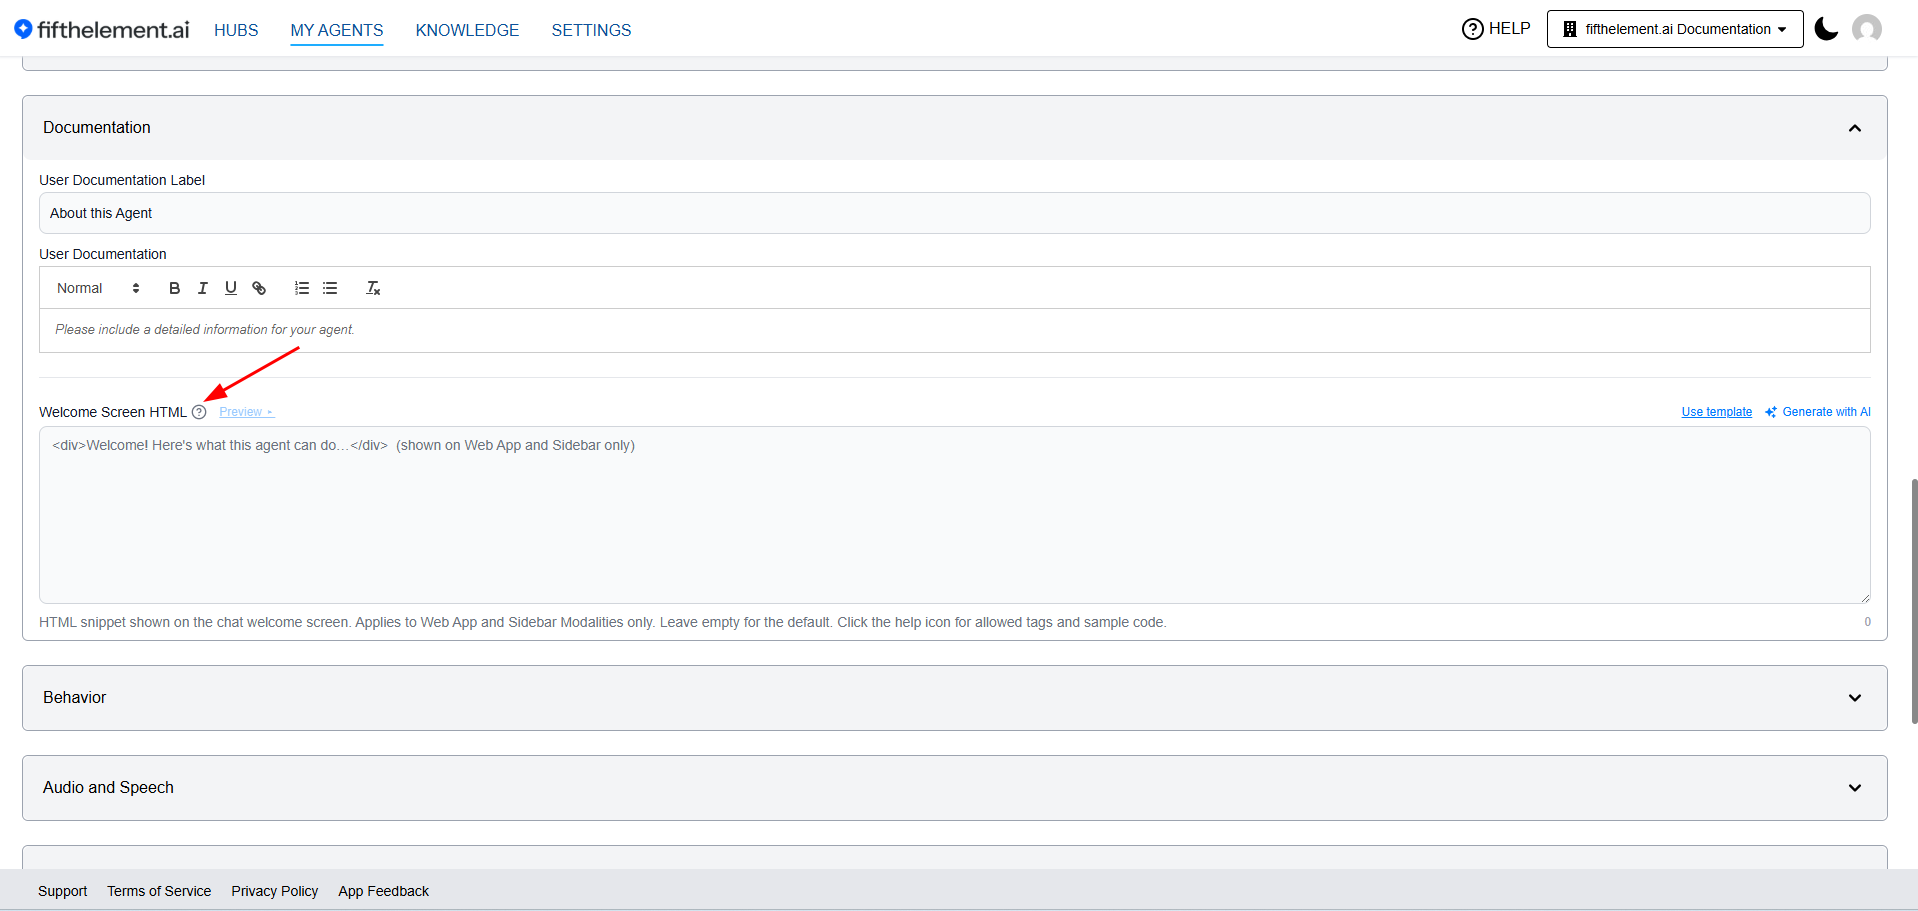
The ? icon next to the field documents allowed tags and provides sample code.
Permissions
Welcome Screen HTML lives inside the Documentation module and is editable by Admins plus any role granted access to that module via RBAC.
Author Affordances
| Control | Behavior |
|---|---|
| Preview / Edit toggle | Flip between the raw HTML editor and a live rendered preview without leaving the page or saving |
| Use template | Inserts a working starter HTML template into the field |
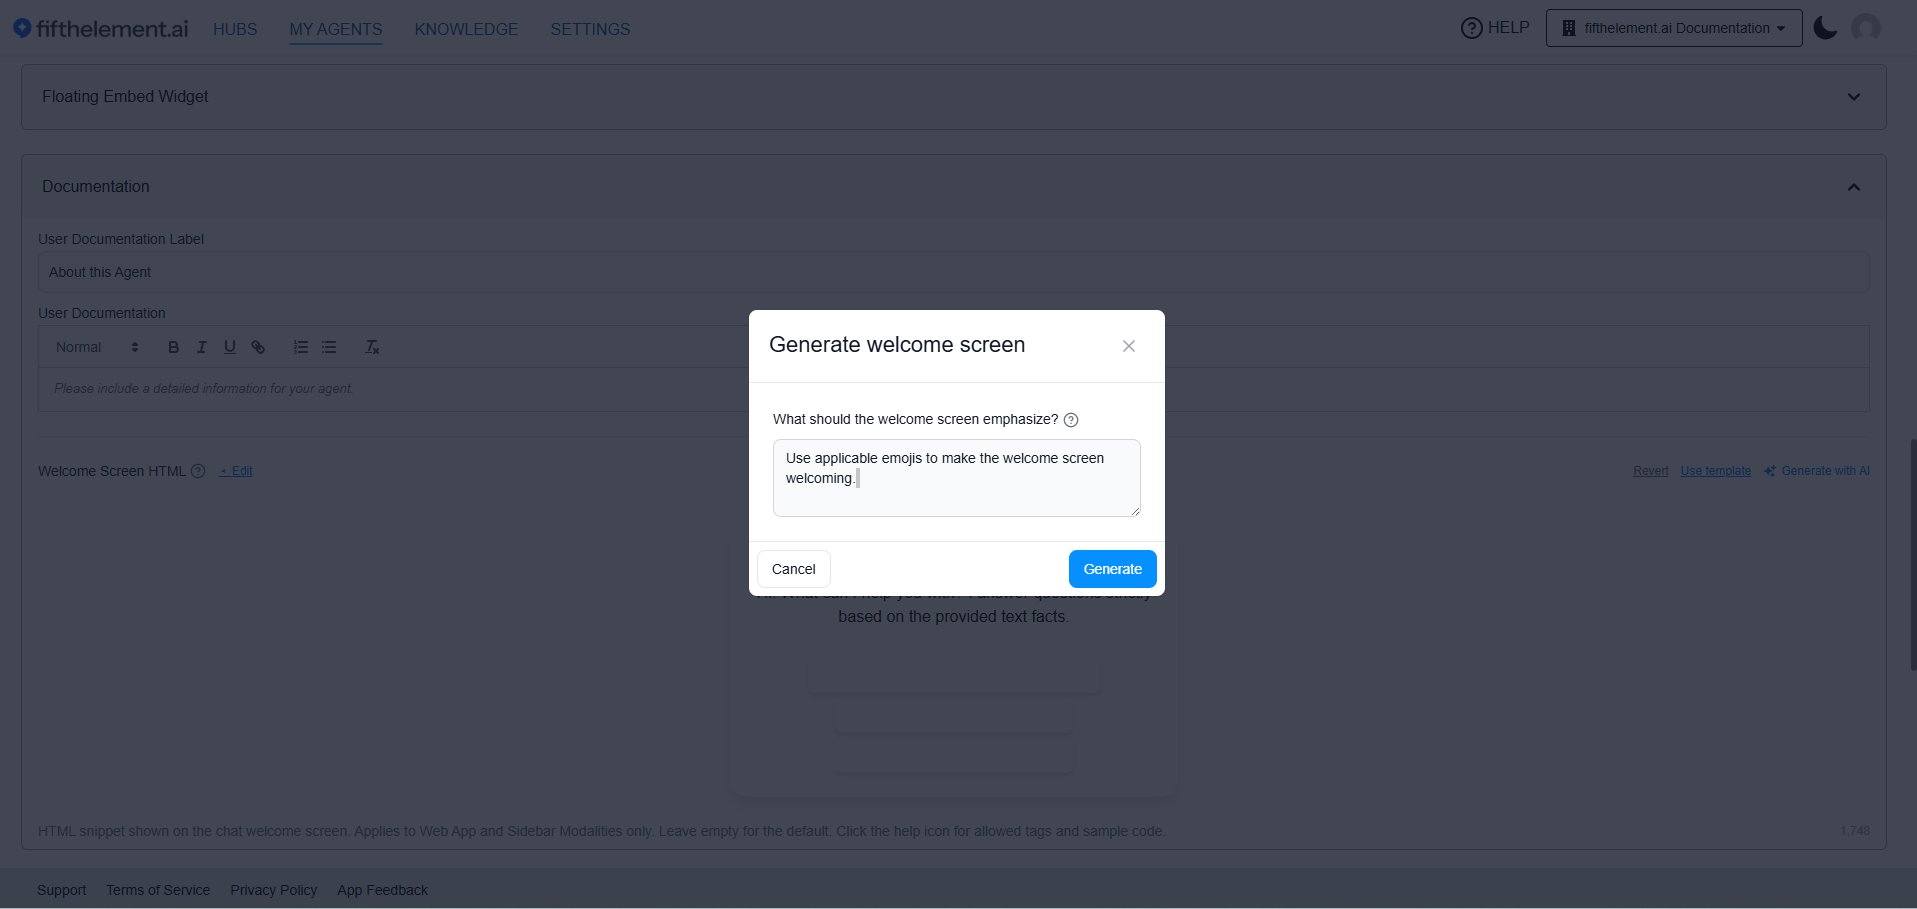
| Generate with AI | Opens the Generate welcome screen modal with a "What should the welcome screen emphasize?" prompt, pre-filled with a default you can edit or replace. Describe the desired tone or focus, click Generate, and the AI writes the full HTML into the field. Cancel closes the modal with no change |
| Revert | Restores the previously saved Welcome Screen HTML |
| Character count | Live count displayed in the bottom-right of the field |
End-User Experience
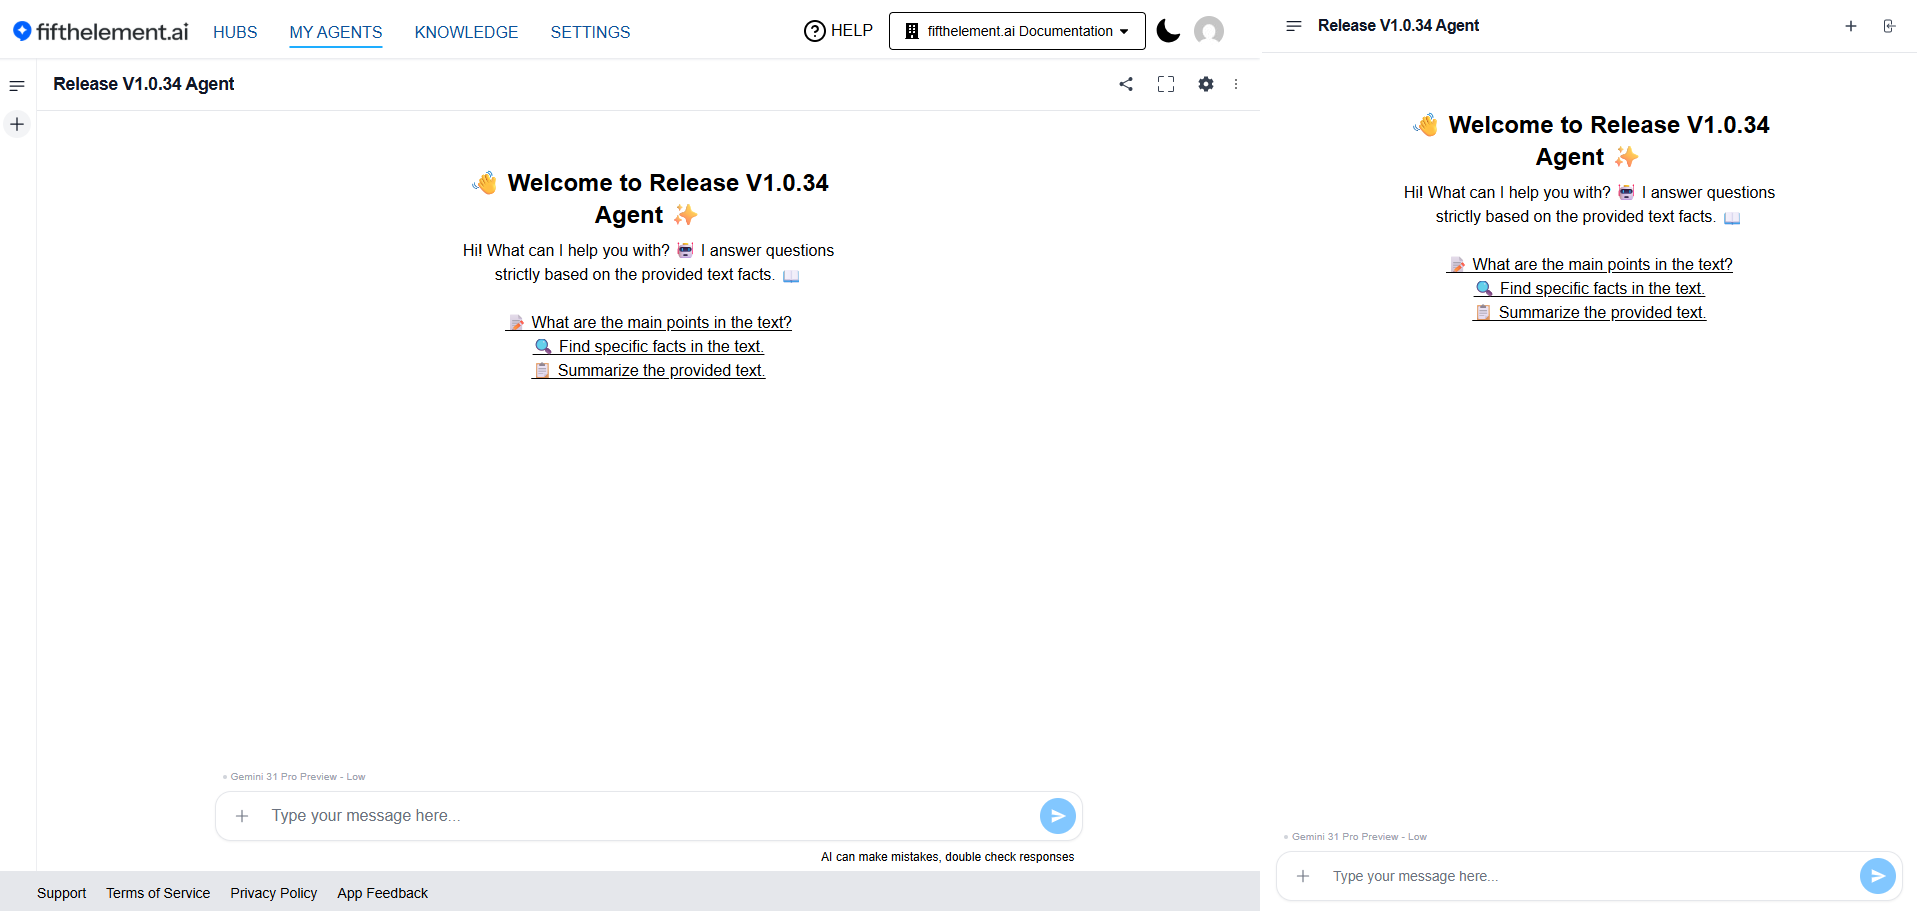
- Saved HTML renders as the initial state of every new chat on Web App and Sidebar, above the message input
- Clickable links or starter questions behave as the admin defined them
- Leaving the field empty preserves the existing default empty state
Agent Parameters
When to use
Use agent parameters for reusable templates, or to update values (company name, support hours, contact info) without modifying core instructions.
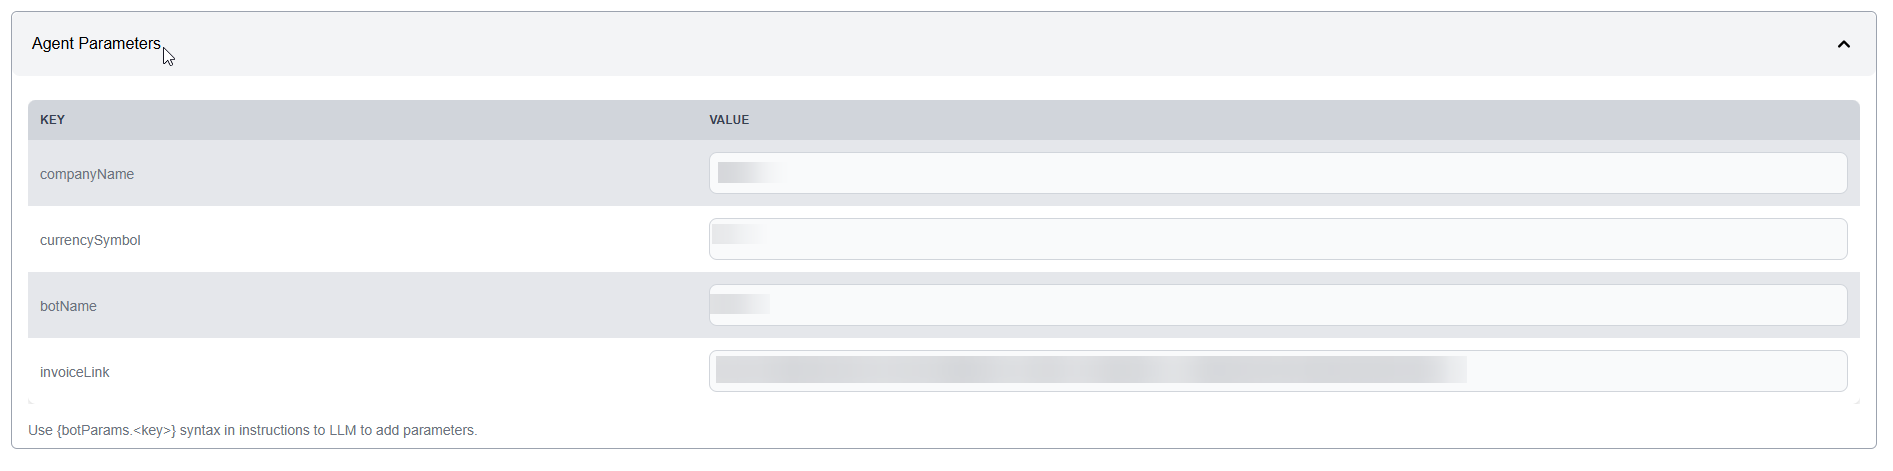
Agent Parameters are dynamic key-value variables referenced in instructions using {botParams.<key>} syntax.
Step 1: Reference a parameter in a prompt
Add a placeholder such as {botParams.company_name} to Instructions or Special Instructions:
Step 2: Set its value
Add Agent Parameters through Add a section if needed. The company_name key appears automatically from the prompt. Enter its Value, for example fifthelement.ai, then save the agent when the configuration is ready.
Benefits:
- Easy updates without touching instructions
- Reusable agent configurations
- Multi-environment configuration (dev, staging, prod)
Translation
When to use
Enable translation when the agent serves users across languages.
| Setting | Description |
|---|---|
| Translation | Enable / Disable. When enabled, the agent is able to translate messages |
| Translation Language Model | Required. The model used for translation tasks |
| Translation Prompt | The prompt used for translation tasks. Default restores the built-in wording |
Search Filters
Search agents only
This section is on the page from the start for Search agents and is not offered to Chat agents.
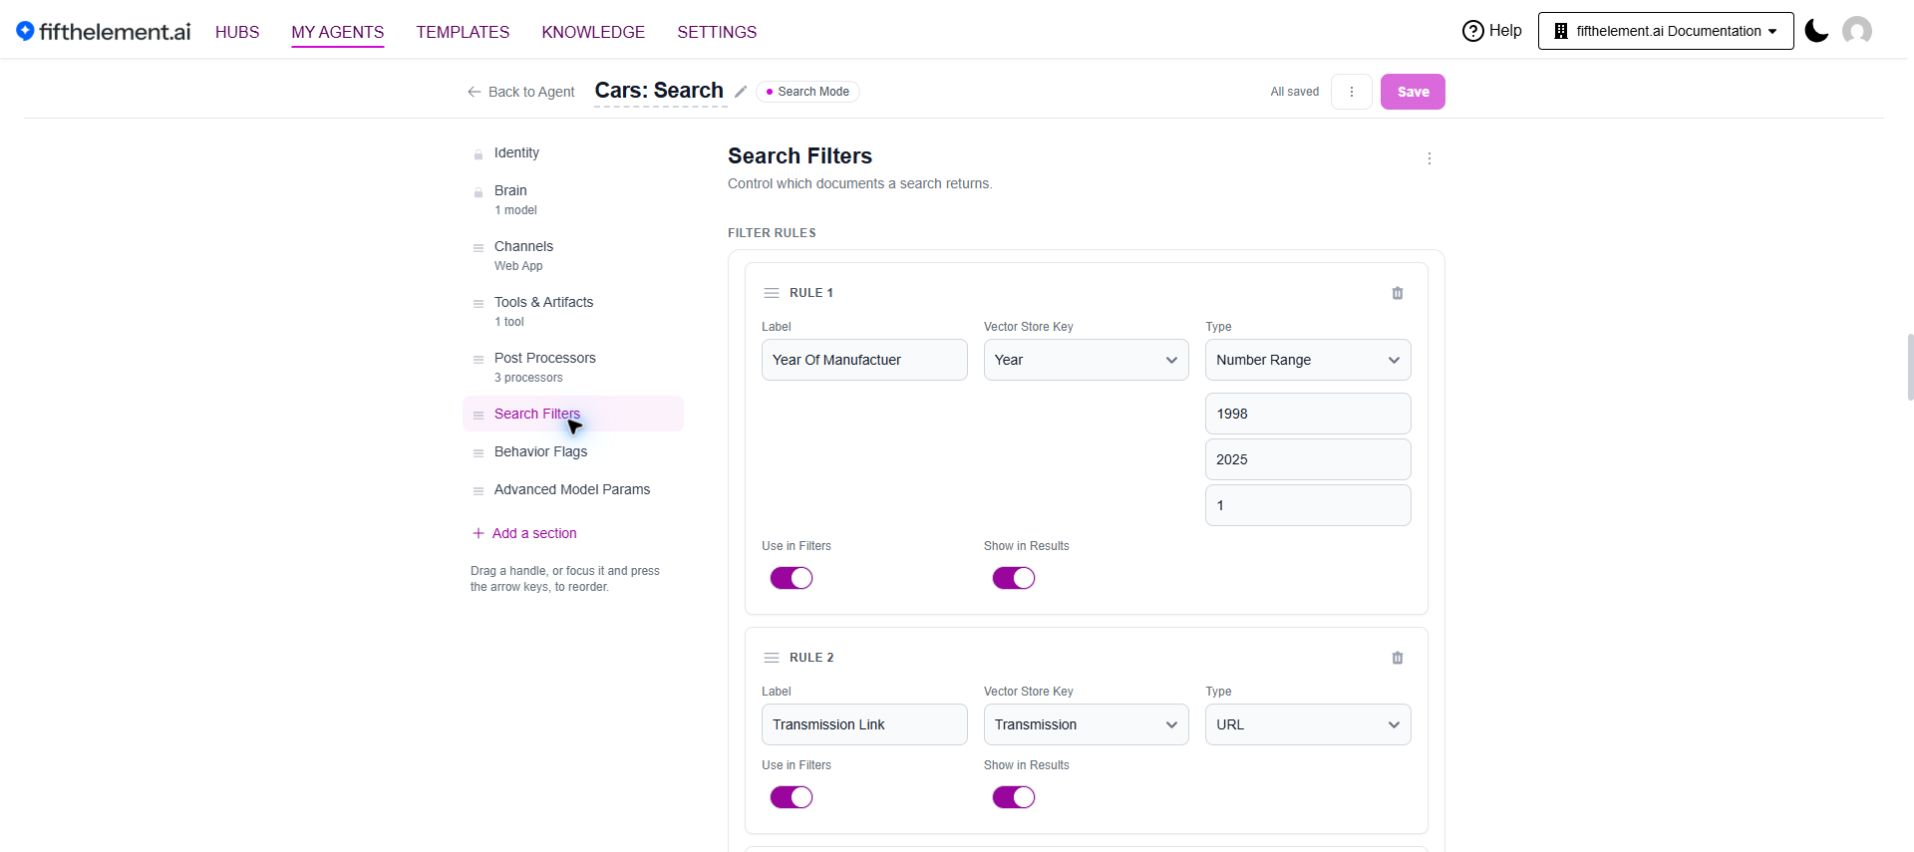
Search Filters control which documents a search returns. Click Add rule to create a rule. Set its Label, Vector Store Key and Type (Select Box, Text, Number Range, URL or Date). Use Use in Filters and Show in Results to control where the field appears.
Vector Store Key needs a retrieval tool
To use the Vector Store Key dropdown, first select a retrieval tool in the Tools section. This enables you to configure and select available vector store keys for your agent.
Related Topics
- Agent Builder - Basic Configuration - Essential setup steps
- Agent Builder - Full reference for every section and field
- Agent Reports - Monitor agent performance and analytics
- Agent's Look & Feel - Customize branding and appearance
- Cloning an Agent - Duplicate and modify existing agents
- Version Control - Manage agent versions and rollback
- Knowledge Overview - Configure knowledge bases for RAG
- Settings > AI Models - Manage available language models
- Settings > Processors - Configure pre/post processors